1.使用Vue-Cli创建前端项目
运用vue-cli工具可以很轻松地构建前端项目,当然,使用WebStorm来构建会更加简洁(如图)。本文推荐使用WebStorm,因为在后续开发中,IDE会使我们的开发更加简洁。部分配置如图:


2.Navbar编写
作为一个WebApp,Navbar作为应用的导航栏是必不可少的。在本项目中,笔者引入了bootstrap对Navbar进行了轻松地构建。在vue中我们需要在components文件夹中将我们的组件加进去,对于本工程来说,Navbar是我们要加入的第一个组件,他独立于router之外,一直固定在网页上方。
2.1 首先,我们使用npm来安装vue,vue-cli,bootstrap
- npm install vue
- npm install -g vue-cli
- npm install --save bootstrap jquery popper.js
2.2 接下来我们在components目录下new一个vue组件,并且在main.js中引入bootstrap依赖:
- import 'bootstrap/dist/css/bootstrap.min.css'
- import 'bootstrap/dist/js/bootstrap.min'
2.3 下面就可以开始写代码了,由于本文只关注table相关的功能,所以导航栏中除了Script意外的元素都已经disable,代码如下:
- <template>
- <nav class="navbar navbar-expand-lg navbar-dark bg-dark">
- <span class="navbar-brand mb-0 h1">Vue-SpringBoot</span>
- <button class="navbar-toggler" type="button" data-toggle="collapse" data-target="#navbarNav" aria-controls="navbarNav" aria-expanded="false" aria-label="Toggle navigation">
- <span class="navbar-toggler-icon"></span>
- </button>
- <div class="collapse navbar-collapse" id="navbarNav">
- <ul class="navbar-nav">
- <li class="nav-item">
- <router-link class="nav-link" to="/home">Home</router-link>
- </li>
- <li class="nav-item active">
- <router-link to="/" class="nav-link">Script</router-link>
- </li>
- <li class="nav-item">
- <router-link to="/history" class="nav-link">History</router-link>
- </li>
- </ul>
- </div>
- </nav>
- </template>
- <script>
- export default {
- name: "MyNavbar"
- }
- </script>
- <style scoped>
- </style>
2.3 在App.vue中引入MyNavbar
3.Script Table编写
作为自动化工具,必不可少的一部分就是引入Script,我们希望用户能够自由地使用H5界面进行Script的编写,因此在这里使用了vue的数据双向绑定进行Table CRUD。
3.1 新建一个vue组件ScriptTable,代码如下:
- <template>
- <div class="container-fluid" id="scriptTable">
- <h3>My Script</h3>
- <form style="margin-top: 1rem">
- <input type="file" @change="getFile($event)" class="" multiple/>
- <input type="button" value="upload" @click="submit($event)" class="btn btn-dark">
- </form>
- <table class="table table-hover text-center table-bordered"
- style="word-break: break-all; word-wrap: break-word;margin-top: 1rem;">
- <thead>
- <th>#</th>
- <th>Platform</th>
- <th>Action</th>
- <th>Path</th>
- <th>Value</th>
- <th>Wait</th>
- <th>Screenshot</th>
- <th>Change</th>
- </thead>
- <tbody>
- <tr v-cloak v-for="(item, index) in steps">
- <th>{{index+1}}</th>
- <td>{{item.platform}}</td>
- <td>{{item.action}}</td>
- <td>{{item.path}}</td>
- <td>{{item.value}}</td>
- <td>{{item.wait}}</td>
- <td>{{item.screenshot}}</td>
- <td><a href="#" v-on:click="edit(item)">Edit</a> | <a href="#" v-on:click='aaa(index)'>Delete</a>
- </td>
- </tr>
- <tr>
- <th></th>
- <td><select class="form-control" v-model="stepstemp.platform">
- <option>Web</option>
- <option>Android</option>
- </select></td>
- <td><select class="form-control" v-model="stepstemp.action">
- <option>click</option>
- <option>get</option>
- <option>input</option>
- <option>swipe</option>
- </select></td>
- <td><input class="form-control" v-model="stepstemp.path" placeholder="Enter the xPath"></td>
- <td><input class="form-control" v-model="stepstemp.value" placeholder="Enter the input value"></td>
- <td><input class="form-control" v-model="stepstemp.wait" placeholder="Waiting seconds"></td>
- <td><select class="form-control" v-model="stepstemp.screenshot">
- <option>yes</option>
- <option>no</option>
- </select></td>
- <td>
- <button class="btn btn-sm btn-dark" v-on:click='save' v-if="isNotEdit">Save</button>
- <button class="btn btn-sm btn-primary" v-on:click='saveEdit' v-else>SaveEdit</button>
- </td>
- </tr>
- </tbody>
- </table>
- <hr/>
- </div>
- </template>
- <script>
- import Vue from 'vue'
- import axios from 'axios'
- export default {
- name: "ScriptTable",
- data() {
- return ({
- steps: [],
- stepstemp: {
- platform: '',
- action: '',
- path: '',
- value: '',
- wait: '',
- screenshot: ''
- },
- isNotEdit: true
- });
- },
- methods: {
- save: function () {
- this.steps.push(this.stepstemp);
- this.stepstemp = {
- platform: '',
- action: '',
- path: '',
- value: '',
- wait: '',
- screenshot: ''
- };
- },
- aaa: function (index) {
- this.steps.splice(index, 1)
- },
- edit: function (item) {
- this.isNotEdit = false;
- this.stepstemp = item;
- },
- saveEdit: function () {
- this.isNotEdit = true;
- this.stepstemp = {
- platform: '',
- action: '',
- path: '',
- value: '',
- wait: '',
- screenshot: ''
- };
- }
- }
- }
- </script>
- <style scoped>
- </style>
3.3 运行dev,打开localhost:8080
npm run dev
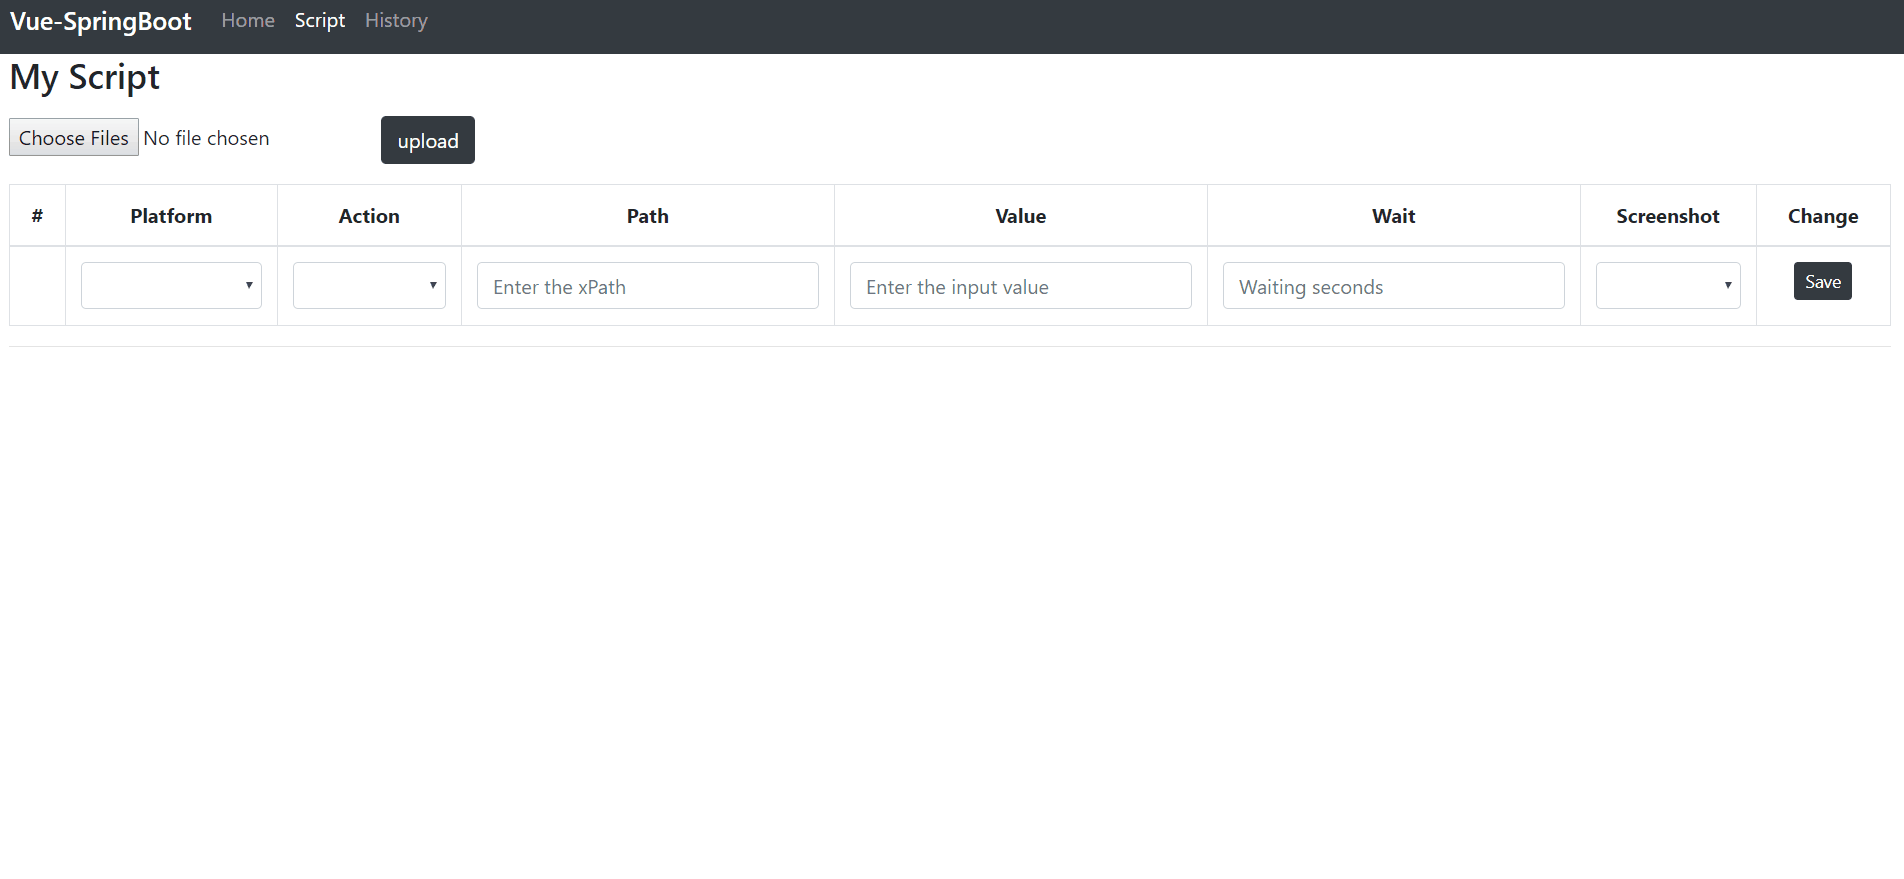
前端页面效果如下:
至此,本文相关的纯前端部分完成地差不多了,加上mock的数据后,我们可以开始进行后端的开发了。
4.使用Spring Initializr创建后端项目
为了更轻松地构建工程,构建RESTful API以及更轻松地配置请求处理,笔者选择了Spring Boot作为后端框架。
4.1 首先我们使用IDEA集成的Spring Initializr来构建项目,部分配置如图:


4.2 接下来在pom.xml中引入poi依赖,点击import change。如下所示:
- <dependency>
- <groupId>org.apache.poi</groupId>
- <artifactId>poi-ooxml</artifactId>
- <version>4.0.0</version>
- </dependency>
4.3 接下来我们在application.properties中配置server.port=8088,与前端项目分开
5.pojo类Step的编写
下面是对pojo类的编写,本文所需的pojo只有Step一种,与前端的table相对应,代码如下:
- import lombok.Data;
- @Data
- public class Step {
- private String platform;
- private String action;
- private String path;
- private String value;
- private int wait;
- private String screenshot;
- }
6.UploadController的编写
接下来是对前端Post请求的Handler(Controller)进行编写,我们将上传这个Post请求与"/uploadfile"相对应,注意加入@CrossOrigin注解实现跨域,代码如下:
- package com.daniel.vuespringbootuploadbe;
- import org.springframework.beans.factory.annotation.Autowired;
- import org.springframework.stereotype.Controller;
- import org.springframework.web.bind.annotation.CrossOrigin;
- import org.springframework.web.bind.annotation.PostMapping;
- import org.springframework.web.bind.annotation.ResponseBody;
- import org.springframework.web.multipart.MultipartFile;
- import java.io.File;
- import java.io.IOException;
- import java.nio.file.Files;
- import java.nio.file.Path;
- import java.nio.file.Paths;
- import java.util.List;
- @Controller
- @CrossOrigin
- @ResponseBody
- public class UploadController {
- private static String UPLOADED_FOLDER = "src/main/resources/static/temp/";
- @Autowired
- private LoadService loadService;
- @PostMapping("/upload")
- public List<Step> singleFileUpload(MultipartFile file) {
- try {
- // Get the file and save it somewhere
- byte[] bytes = file.getBytes();
- Path path = Paths.get(UPLOADED_FOLDER + file.getOriginalFilename());
- Files.write(path, bytes);
- } catch (IOException e) {
- e.printStackTrace();
- }
- // Print file data to html
- List<Step> result = loadService.castToStep(new File(UPLOADED_FOLDER + file.getOriginalFilename()));
- return result;
- }
- }
7.LoadService的编写
下面该编写Service来读取请求中传送的文件了,简单地来说只有一个步骤,将Excel中的Script转换为pojo的链表并在Controller中作为ResponseBody返回.
7.1 首先创建Service接口,代码如下:
- package com.daniel.vuespringbootuploadbe;
- import org.springframework.stereotype.Service;
- import java.io.File;
- import java.util.List;
- @Service
- public interface LoadService {
- List<Step> castToStep(File file);
- }
7.2 接下来创建Service实现类,代码如下:
- package com.daniel.vuespringbootuploadbe;
- import org.apache.poi.openxml4j.exceptions.InvalidFormatException;
- import org.apache.poi.ss.usermodel.Row;
- import org.apache.poi.ss.usermodel.Sheet;
- import org.apache.poi.ss.usermodel.Workbook;
- import org.apache.poi.xssf.usermodel.XSSFWorkbook;
- import org.springframework.stereotype.Service;
- import java.io.File;
- import java.io.IOException;
- import java.util.ArrayList;
- import java.util.List;
- @Service
- public class LoadServiceImpl implements LoadService {
- @Override
- public List<Step> castToStep(File file) {
- List<Step> steps = new ArrayList<>();
- Workbook workbook = null;
- try {
- workbook = new XSSFWorkbook(file);
- } catch (IOException e) {
- e.printStackTrace();
- } catch (InvalidFormatException e) {
- e.printStackTrace();
- }
- Sheet sheet = workbook.getSheetAt(0);
- int num = sheet.getLastRowNum() - sheet.getFirstRowNum();
- //Read steps
- for (int i = 0; i < num; i++) {
- Row row = sheet.getRow(i+1);
- Step step = new Step();
- step.setPlatform(row.getCell(0).getStringCellValue());
- step.setAction(row.getCell(1).getStringCellValue());
- step.setPath(row.getCell(2).getStringCellValue());
- step.setValue(row.getCell(3).getStringCellValue());
- step.setWait((int) row.getCell(4).getNumericCellValue());
- step.setScreenshot(row.getCell(5).getStringCellValue());
- steps.add(step);
- }
- try {
- workbook.close();
- } catch (IOException e) {
- e.printStackTrace();
- }
- return steps;
- }
- }
8.搭建简单的RESTful API
文章临近尾声,现在前后端的独立代码基本开发完毕,是时候搭建RESTful了,本文中的API非常简单,就是对上传做出响应,并将返回的json写入界面上的Table中,完成Script导入,npm安装axios后,在ScriptTable组件中加入如下代码:
- getFile: function (event) {
- this.file = event.target.files[0];
- console.log(this.file);
- },
- submit: function (event) {
- event.preventDefault();
- let formData = new FormData();
- formData.append("file", this.file);
- axios.post('http://localhost:8088/upload', formData)
- .then(function (response) {
- for (let i = 0; i < response.data.length; i++) {
- var tempData = {
- platform: response.data[i].platform,
- action: response.data[i].action,
- path: response.data[i].path,
- value: response.data[i].value,
- wait: response.data[i].wait,
- screenshot: response.data[i].screenshot
- };
- this.steps.push(tempData);
- }
- }.bind(this))
- .catch(function (error) {
- alert("Fail");
- console.log(error);
- });
- }
9.运行服务,编写Script并上传
接下来我们创建一个Excel,按如图格式编写简单Script,运行前后端服务,实现上传:

运行后,Excel文件会上传到后端工程的static的temp目录中
总结
以上所述是小编给大家介绍的使用Vue+Spring Boot实现Excel上传功能,希望对大家有所帮助,如果大家有任何疑问请给我留言,小编会及时回复大家的。在此也非常感谢大家对w3xue网站的支持!
