mybatis-plus插件是对mybatis做出系列增强插件,后面简称MP,MP可免去开发者重复编写xml、mapper、service、entity等代码,通过MP提供的实体注解来完成单表的CRUD简单操作,MP同样配套有代码生成工具,可通过简单的配置来生成xml、mapper、service、entity等文件,极大提升了开发速度,本文是在spring-cloud的环境下集成mybatis-plus。
spirng-cloud的基础环境搭建可参考https://www.cnblogs.com/xxpandong/p/10485172.html。
进入正文。
——————————————————————————————————————————————————————————————————————————————————————————————————————————————
先来pom.xml文件

 View Code
里面部分jar包是微服务所需jar包,核心jar包commons-pool2、mysql-connector-java、mybatis-plus-boot-starter、lombok、freemarker、spring-cloud、spring-boot这几个,其他的不需要可以删掉。
lombok可以极大减少实体重复代码的编写,例如get/set/toString/constrator等,感兴趣的朋友可以去度娘一下,基本就是几个注解。
这里使用的是3.x版本的MP插件,支持jdk1.8的特性,文档地址:https://baomidou.gitee.io/mybatis-plus-doc/#/quick-start。
再来编写入口类:
- package com.authorize;
- import org.mybatis.spring.annotation.MapperScan;
- import org.springframework.boot.SpringApplication;
- import org.springframework.boot.autoconfigure.SpringBootApplication;
- import org.springframework.cloud.netflix.eureka.EnableEurekaClient;
- import org.springframework.cloud.openfeign.EnableFeignClients;
- import org.springframework.context.annotation.Bean;
- import com.baomidou.mybatisplus.extension.plugins.PaginationInterceptor;
- /**
- * 入口类
- * @title AuthorizeApplication.java
- * @package com.authorize
- * @description TODO(一句话描述该类作用)
- * @author Pandong
- * @date 2019年2月22日
- */
- @SpringBootApplication
- @EnableFeignClients // 服务之间通信所需注解
- @EnableEurekaClient // 基于spring-boot环境的可以删掉上面及本行注解
- @MapperScan("com.authorize.dao")
- public class AuthorizeApplication {
- public static void main(String[] args) {
- SpringApplication.run(AuthorizeApplication.class, args);
- }
- /**
- * MP分页插件,后面会有说明
- */
- @Bean
- public PaginationInterceptor paginationInterceptor() {
- return new PaginationInterceptor();
- }
-
- }
编写application.yml文件:
- server:
- port: 8082
- spring:
- application:
- # 指定注册到eureka server上的服务名称
- name: custom-authorize
- #################################redis配置########################################
- redis:
- host: 127.0.0.1
- password: 123
- port: 6379
- timeout: 10000 # 连接超时时间(毫秒)
- database: 0 # Redis默认情况下有16个分片,这里配置具体使用的分片,默认是0
- lettuce:
- pool:
- max-active: 8 # 连接池最大连接数(使用负值表示没有限制)默认 8
- max-wait: -1 # 连接池最大阻塞等待时间(使用负值表示没有限制)默认 -1
- max-idle: 8 # 连接池中的最大空闲连接默认 8
- min-idle: 0 # 连接池中的最小空闲连接默认 0
- #################################redis配置########################################
- #####################################################################################################
- # mysql 属性配置
- datasource:
- driver-class-name: com.mysql.jdbc.Driver
- url: jdbc:mysql://127.0.0.1:3306/web_custom
- username: root
- password: pd123
- # jpa:
- # hibernate:
- # #ddl-auto: create #ddl-auto:设为create表示每次都重新建表
- # ddl-auto: update #ddl-auto:设为update表示每次都不会重新建表
- # show-sql: true
- #####################################################################################################
- #####################################################################################################
- # mybatis mapper xml 配置
- #mybatis:
- # mybatis.type-aliases-package:指定domain类的基包,即指定其在*Mapper.xml文件中可以使用简名来代替全类名(看后边的UserMapper.xml介绍)
- #type-aliases-package:
- #mapper-locations: classpath:mybatis/mapper/*.xml
- #config-location: classpath:mybatis/mybatis-config.xml
-
- # mybatis-plus 配置
- mybatis-plus:
- # 如果是放在src/main/java目录下 classpath:/com/yourpackage/*/mapper/*Mapper.xml
- # 如果是放在resource目录 classpath:/mapper/*Mapper.xml
- config-location: classpath:/mybatis/mybatis-config.xml
- mapper-locations: classpath:/mybatis/mapper/*.xml
- #实体扫描,多个package用逗号或者分号分隔
- typeAliasesPackage: com.authorize.entity
- global-config:
- #主键类型 0:"数据库ID自增", 1:"用户输入ID",2:"全局唯一ID (数字类型唯一ID)", 3:"全局唯一ID UUID";
- id-type: 3
- # 热加载mapper文件
- refresh: true
- db-config:
- db-type: mysql
- #####################################################################################################
- eureka:
- client:
- service-url:
- # 指定eureka server通信地址,注意/eureka/小尾巴不能少
- defaultZone: http://admin:123@localhost:8080/eureka/
- instance:
- # 是否注册IP到eureka server,如不指定或设为false,那就会注册主机名到eureka server
- prefer-ip-address: true
- logging:
- level:
- root: INFO
- org.hibernate: INFO
- org.hibernate.type.descriptor.sql.BasicBinder: TRACE
- org.hibernate.type.descriptor.sql.BasicExtractor: TRACE
- com.authorize: DEBUG
View Code
编写mybatis-config.xml文件:
- <?xml version="1.0" encoding="UTF-8" ?>
- <!DOCTYPE configuration PUBLIC "-//mybatis.org//DTD Config 3.0//EN" "http://mybatis.org/dtd/mybatis-3-config.dtd">
- <configuration>
-
- <settings>
- <setting name="callSettersOnNulls" value="true"/>
-
- <setting name="cacheEnabled" value="true"/>
-
- <setting name="lazyLoadingEnabled" value="true"/>
-
- <setting name="aggressiveLazyLoading" value="true"/>
-
- <setting name="multipleResultSetsEnabled" value="true"/>
-
- <setting name="useColumnLabel" value="true"/>
-
- <setting name="useGeneratedKeys" value="false"/>
-
- <setting name="autoMappingBehavior" value="PARTIAL"/>
-
- <setting name="defaultExecutorType" value="SIMPLE"/>
-
- <setting name="mapUnderscoreToCamelCase" value="true"/>
-
- <setting name="localCacheScope" value="SESSION"/>
-
- <setting name="jdbcTypeForNull" value="NULL"/>
-
- </settings>
-
- <typeAliases>
- <typeAlias alias="Integer" type="java.lang.Integer" />
- <typeAlias alias="Long" type="java.lang.Long" />
- <typeAlias alias="HashMap" type="java.util.HashMap" />
- <typeAlias alias="LinkedHashMap" type="java.util.LinkedHashMap" />
- <typeAlias alias="ArrayList" type="java.util.ArrayList" />
- <typeAlias alias="LinkedList" type="java.util.LinkedList" />
- </typeAliases>
-
- </configuration>
View Code
编写实体类:
- 1 package com.authorize.entity;
- 2
- 3 import java.math.BigDecimal;
- 4 import com.baomidou.mybatisplus.annotation.TableName;
- 5 import com.baomidou.mybatisplus.annotation.IdType;
- 6 import com.baomidou.mybatisplus.extension.activerecord.Model;
- 7 import com.baomidou.mybatisplus.annotation.TableId;
- 8 import com.baomidou.mybatisplus.annotation.TableField;
- 9 import java.io.Serializable;
- 10
- 11 import lombok.Data;
- 12 import lombok.EqualsAndHashCode;
- 13 import lombok.experimental.Accessors;
- 14
- 15 /**
- 16 * <p>
- 17 *
- 18 * </p>
- 19 *
- 20 * @author Pandong
- 21 * @since 2019-03-05
- 22 */
- 23 @Data
- 24 @EqualsAndHashCode(callSuper = false)
- 25 @Accessors(chain = true)
- 26 @TableName("ct_user")
- 27 public class CtUser extends Model<CtUser> {
- 28
- 29 private static final long serialVersionUID = 1L;
- 30
- 31 /**
- 32 * 主键
- 33 */
- 34 @TableId(value = "user_id", type = IdType.AUTO)
- 35 private Long userId;
- 36
- 37 /**
- 38 * 用户名称
- 39 */
- 40 @TableField("user_name")
- 41 private String userName;
- 42
- 43 /**
- 44 * 年龄
- 45 */
- 46 private Integer age;
- 47
- 48 /**
- 49 * 价格
- 50 */
- 51 private BigDecimal balance;
- 52
- 53
- 54 @Override
- 55 protected Serializable pkVal() {
- 56 return this.userId;
- 57 }
- 58
- 59 }
View Code
可以看到实体类上面使用了与hibernate相似的注解,属性上面使用了TableId注解,属性还有其他注解,可自行去查看文档。
实体上其他注解都是lombok的注解,是不是减少了很多代码。
编写mapper:
- package com.authorize.dao;
- import com.authorize.entity.CtUser;
- import com.baomidou.mybatisplus.core.mapper.BaseMapper;
- /**
- * <p>
- * Mapper 接口
- * </p>
- *
- * @author Pandong
- * @since 2019-03-05
- */
- public interface CtUserMapper extends BaseMapper<CtUser> {
- }
View Code
没看错,只需要继承BaseMapper就可实现CRUD,里面有大量的基础方法提供调用,能满足大部分的单表以及分页操作。
mapper上面未使用@Mapper注解,是因为在入口类中增加了注解@MapperScan注解。
编写Service:
- package com.authorize.service.authorize;
- import com.authorize.entity.CtUser;
- import com.baomidou.mybatisplus.extension.service.IService;
- /**
- * <p>
- * 服务类
- * </p>
- *
- * @author Pandong
- * @since 2019-03-05
- */
- public interface ICtUserService extends IService<CtUser> {
- }
View Code
编写Impl:
- package com.authorize.service.impl;
- import com.authorize.entity.CtUser;
- import com.authorize.dao.CtUserMapper;
- import com.authorize.service.authorize.ICtUserService;
- import com.baomidou.mybatisplus.extension.service.impl.ServiceImpl;
- import org.springframework.stereotype.Service;
- /**
- * <p>
- * 服务实现类
- * </p>
- *
- * @author Pandong
- * @since 2019-03-05
- */
- @Service
- public class CtUserServiceImpl extends ServiceImpl<CtUserMapper, CtUser> implements ICtUserService {
- }
View Code
service同样继承MP提供的顶级基类,里面包含了大量的基础方法提供调用。
编写完成后整体的目录结构:

generatorTemplate目录是代码生成的自定义模板目录,后面说代码生成会说到。
最后编写测试类:
- package com.authorize.controller;
- import static org.springframework.test.web.servlet.result.MockMvcResultMatchers.status;
- import org.junit.Before;
- import org.junit.Test;
- import org.junit.runner.RunWith;
- import org.springframework.beans.factory.annotation.Autowired;
- import org.springframework.boot.test.context.SpringBootTest;
- import org.springframework.http.MediaType;
- import org.springframework.test.context.junit4.SpringJUnit4ClassRunner;
- import org.springframework.test.web.servlet.MockMvc;
- import org.springframework.test.web.servlet.ResultActions;
- import org.springframework.test.web.servlet.request.MockMvcRequestBuilders;
- import com.authorize.AuthorizeApplication;
- import com.authorize.service.authorize.ICtMenuService;
- /**
- *
- * @filename CtSysyserControllerTest.java
- * @pakage com.authorize.controller
- * @descption TODO(用一句话表述类的作用)
- * @author Pandong
- * @date 2019年3月5日
- */
- @RunWith(SpringJUnit4ClassRunner.class)
- @SpringBootTest(classes = AuthorizeApplication.class)
- public class CtSysyserControllerTest {
- @Autowired
- private ICtUserService ss;
-
// 由于我数据库中已经有数据,所以插入数据的代码就不写了 - @Test
- public void test() {
-
- CtUser CtUser = ss.selectById(1);
- System.out.println(user);
-
- }
-
-
- }
到这里MP已经集成进来了,单表基本不用自己去写任何代码,当然,上面只是基本的配置,现在来说分页插件如何使用。
官方文档中有多个分页的实现,这里只讲官方推荐的方式,在上面的入口类中已经添加了分页插件的初始化(使用spring同志请自行去看文档)。
- @Bean
- public PaginationInterceptor paginationInterceptor() {
- return new PaginationInterceptor();
- }
编写测试类:
- package com.authorize.controller;
- import org.junit.Test;
- import org.junit.runner.RunWith;
- import org.springframework.beans.factory.annotation.Autowired;
- import org.springframework.boot.test.context.SpringBootTest;
- import org.springframework.test.context.junit4.SpringJUnit4ClassRunner;
- import com.authorize.AuthorizeApplication;
- import com.authorize.entity.CtUser;
- import com.authorize.service.authorize.ICtUserService;
- import com.baomidou.mybatisplus.core.conditions.query.QueryWrapper;
- import com.baomidou.mybatisplus.core.metadata.IPage;
- import com.baomidou.mybatisplus.extension.plugins.pagination.Page;
- /**
- *
- * @filename CtSysyserControllerTest.java
- * @pakage com.authorize.controller
- * @descption TODO(用一句话表述类的作用)
- * @author Pandong
- * @date 2019年3月5日
- */
- @RunWith(SpringJUnit4ClassRunner.class)
- @SpringBootTest(classes = AuthorizeApplication.class)
- public class CtUserControllerTest {
- @Autowired
- private ICtUserService ss;
-
- @Test
- public void test() {
- IPage<CtUser> page = new Page<>(1, 20);
- QueryWrapper<CtUser> wapper = new QueryWrapper<>();
- page = ss.selectPage(page, wapper);
- System.out.println(page.getRecords());
- }
-
-
- }
View Code
MP实现分页只需要new Page就完了,这样就完成一个简单的分页查询。
可能有的朋友看不明白QueryWrapper是什么,QueryWrapper是MP对查询的封装,这里做一些简单的说明,详细的去文档中查看,国人大牛开发的,注释都是中文的。
- @Test
- public void test1() {
- IPage<CtUser> page = new Page<>(1, 20);
- QueryWrapper<CtUser> wapper = new QueryWrapper<>();
- LambdaQueryWrapper<CtUser> lambda = wapper.lambda();
- lambda.and( obj -> obj.eq(CtUser::getUserName, "张三").eq(CtUser::getAge, "30"));
- page = ss.selectPage(page, lambda);
- System.out.println(page.getRecords());
- }
View Code
上面代码是一个简单的查询分页操作,MP支持lambda表达式以及1.8的一些新特性,看不明白函数接口、方法引用的可参考http://www.runoob.com/java/java8-new-features.html。
LambdaQueryWrapper中封装了很多方法来构造各种不同的查询条件,上面所用到的and方法,查询的sql语句:SELECT user_id AS userId,user_name AS userName,age,balance FROM ct_user WHERE ( user_name = ? AND age = ? ) ,
里面还封装了eq、or、like等等,详细的可以去看官方文档,上文中就给出地址。
到这里MP基本的CURD已经算是完成了,最后再来说一下代码生成:
View Code
上面是官网给出的例子改的DEMO,上面我自己改了代码生成的位置,使用的模板也改过了,模板可以从源码的templates中拷贝。
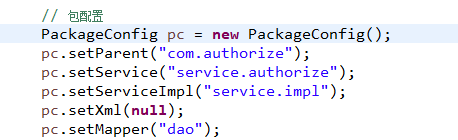
这里配置生成文件的位置,可自行修改位置。
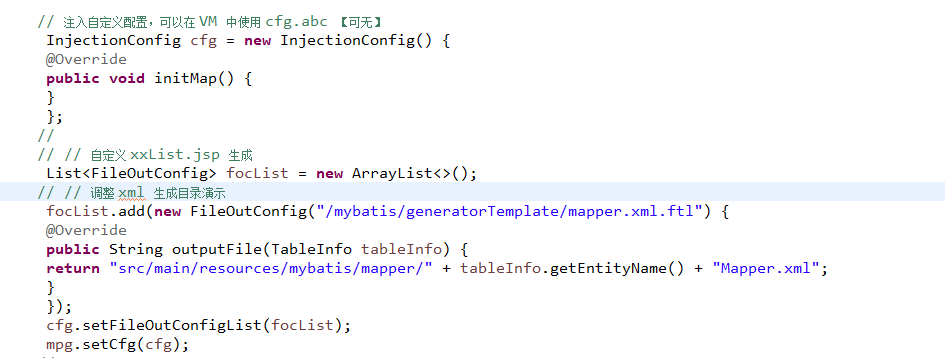
这段代码就是修改xml生成的位置,以及使用自己修改过的模板。
说到这里基本集成已经完成了,包含了生成的系列代码,更详细的就去看官方文档。。。
