1、Oauth2简介
OAuth(开放授权)是一个开放标准,允许用户授权第三方移动应用访问他们存储在另外的服务提供者上的信息,而不需要将用户名和密码提供给第三方移动应用或分享他们数据的所有内容,OAuth2.0是OAuth协议的延续版本,但不向后兼容OAuth 1.0即完全废止了OAuth1.0。
2、Oauth2服务器
- 授权服务器 Authorization Service.
- 资源服务器 Resource Service.
授权服务器
授权服务器,即服务提供商专门用来处理认证的服务器。在这里简单说一下,主要的功能;
1、通过请求获得令牌(Token),默认的URL是/oauth/token.
2、根据令牌(Token)获取相应的权限.
资源服务器
资源服务器托管了受保护的用户账号信息,并且对接口资源进行用户权限分配及管理,简单的说,就是某个接口(/user/add),我限制只能持有管理员权限的用户才能访问,那么普通用户就没有访问的权限。
以下摘自百度百科图:

3、Demo实战加代码详解
前面我是简单地介绍了一下oauth2的一些基本概念,关于oauth2的深入介绍,可以去搜索更多其它相关oauth2的博文,在这里推荐一篇前辈的博文https://www.cnblogs.com/Wddpct/p/8976480.html,里面有详细的oauth2介绍,包括原理、实现流程等都讲得比较详细。我的课题,是主要是以实战为主,理论的东西我不想介绍太多, 这里是我个人去根据自己的业务需求去改造的,存在很多可优化的点,希望大家可以指出和给予我一些宝贵意见。
接下来开始介绍我的代码流程吧!
准备
新建一个springboot项目,引入以下依赖。
- 1 <dependencies>
- 2 <dependency>
- 3 <groupId>org.springframework.boot</groupId>
- 4 <artifactId>spring-boot-starter</artifactId>
- 5 </dependency>
- 6 <dependency>
- 7 <groupId>org.springframework.boot</groupId>
- 8 <artifactId>spring-boot-starter-test</artifactId>
- 9 <scope>test</scope>
- 10 </dependency>
- 11
- 12 <!--web依赖-->
- 13 <dependency>
- 14 <groupId>org.springframework.boot</groupId>
- 15 <artifactId>spring-boot-starter-web</artifactId>
- 16 </dependency>
- 17
- 18 <!--redis依赖-->
- 19 <dependency>
- 20 <groupId>org.springframework.boot</groupId>
- 21 <artifactId>spring-boot-starter-data-redis</artifactId>
- 22 </dependency>
- 23
- 24 <!--sl4f日志框架-->
- 25 <dependency>
- 26 <groupId>org.projectlombok</groupId>
- 27 <artifactId>lombok</artifactId>
- 28 </dependency>
- 29
- 30 <!--security依赖-->
- 31 <dependency>
- 32 <groupId>org.springframework.boot</groupId>
- 33 <artifactId>spring-boot-starter-security</artifactId>
- 34 </dependency>
- 35 <!--oauth2依赖-->
- 36 <dependency>
- 37 <groupId>org.springframework.security.oauth</groupId>
- 38 <artifactId>spring-security-oauth2</artifactId>
- 39 <version>2.3.3.RELEASE</version>
- 40 </dependency>
- 41
- 42 <!--JPA数据库持久化-->
- 43 <dependency>
- 44 <groupId>mysql</groupId>
- 45 <artifactId>mysql-connector-java</artifactId>
- 46 <version>5.1.47</version>
- 47 <scope>runtime</scope>
- 48 </dependency>
- 49 <dependency>
- 50 <groupId>org.springframework.boot</groupId>
- 51 <artifactId>spring-boot-starter-data-jpa</artifactId>
- 52 </dependency>
- 53
- 54 <!--json工具-->
- 55 <dependency>
- 56 <groupId>com.alibaba</groupId>
- 57 <artifactId>fastjson</artifactId>
- 58 <version>1.2.47</version>
- 59 </dependency>
- 60 </dependencies>
项目目录结构

接口
这里我只编写了一个AuthController,里面基本所有关于用户管理及登录、注销的接口我都定义出来了。
AuthController代码如下:
这里所有的接口功能,我都已经在业务代码里实现了,后面相关登录、注销、及刷新token的等接口的业务实现的内容我会贴出来。接下来我需要讲解的是关于oath2及security的详细配置。
注意一点:这里没有角色的增删改功能,只有获取角色列表功能,为了节省时间,我这里的角色列表是项目初始化阶段,直接生成的固定的两个角色,分别是ROLE_USER(普通用户)、ROLE_ADMIN(管理员);同时初始化一个默认的管理员。
springbootsecurityauth.sql脚本如下:
- 1 SET NAMES utf8;
- 2 SET FOREIGN_KEY_CHECKS = 0;
- 3 /**
- 4 初始化角色信息
- 5 */
- 6 CREATE TABLE IF NOT EXISTS `um_t_role`(
- 7 `id` INT(11) PRIMARY KEY AUTO_INCREMENT ,
- 8 `description` VARCHAR(255) CHARACTER SET utf8 COLLATE utf8_general_ci NULL DEFAULT NULL,
- 9 `created_time` BIGINT(20) NOT NULL,
- 10 `name` VARCHAR(255) CHARACTER SET utf8 COLLATE utf8_general_ci NOT NULL,
- 11 `role` VARCHAR(255) CHARACTER SET utf8 COLLATE utf8_general_ci NOT NULL
- 12 );
- 13 INSERT IGNORE INTO `um_t_role`(id,`name`,description,created_time,created_user,role) VALUES(1,'管理员','管理员拥有所有接口操作权限',UNIX_TIMESTAMP(NOW()),'ADMIN'),(2,'普通用户','普通拥有查看用户列表与修改密码权限,不具备对用户增删改权限',UNIX_TIMESTAMP(NOW()),'USER');
- 14
- 15 /**
- 16 初始化一个默认管理员
- 17 */
- 18 CREATE TABLE IF NOT EXISTS `um_t_user`(
- 19 `id` INT(11) PRIMARY KEY AUTO_INCREMENT ,
- 20 `account` VARCHAR(255) CHARACTER SET utf8 COLLATE utf8_general_ci NULL DEFAULT NULL,
- 21 `description` VARCHAR(255) CHARACTER SET utf8 COLLATE utf8_general_ci NULL DEFAULT NULL,
- 22 `password` VARCHAR(255) CHARACTER SET utf8 COLLATE utf8_general_ci NULL DEFAULT NULL,
- 23 `name` VARCHAR(255) CHARACTER SET utf8 COLLATE utf8_general_ci NOT NULL
- 24 );
- 25 INSERT IGNORE INTO `um_t_user`(id,account,`password`,`name`,description) VALUES(1,'admin','123456','小小丰','系统默认管理员');
- 26
- 27 /**
- 28 关联表赋值
- 29 */
- 30 CREATE TABLE IF NOT EXISTS `um_t_role_user`(
- 31 `role_id` INT(11),
- 32 `user_id` INT(11)
- 33 );
- 34 INSERT IGNORE INTO `um_t_role_user`(role_id,user_id)VALUES(1,1);
配置
application.yml文件:
- 1 server:
- 2 port: 8080
- 3 spring:
- 4 # mysql 配置
- 5 datasource:
- 6 url: jdbc:mysql://localhost:3306/auth_test?useUnicode=true&characterEncoding=UTF-8&useSSL=false
- 7 username: root
- 8 password: 123456
- 9 schema: classpath:springbootsecurityauth.sql
- 10 sql-script-encoding: utf-8
- 11 initialization-mode: always
- 12 driver-class-name: com.mysql.jdbc.Driver
- 13 # 初始化大小,最小,最大
- 14 initialSize: 1
- 15 minIdle: 3
- 16 maxActive: 20
- 17 # 配置获取连接等待超时的时间
- 18 maxWait: 60000
- 19 # 配置间隔多久才进行一次检测,检测需要关闭的空闲连接,单位是毫秒
- 20 timeBetweenEvictionRunsMillis: 60000
- 21 # 配置一个连接在池中最小生存的时间,单位是毫秒
- 22 minEvictableIdleTimeMillis: 30000
- 23 validationQuery: select 'x'
- 24 testWhileIdle: true
- 25 testOnBorrow: false
- 26 testOnReturn: false
- 27 # 打开PSCache,并且指定每个连接上PSCache的大小
- 28 poolPreparedStatements: true
- 29 maxPoolPreparedStatementPerConnectionSize: 20
- 30 # 配置监控统计拦截的filters,去掉后监控界面sql无法统计,'wall'用于防火墙
- 31 filters: stat,wall,slf4j
- 32 # 通过connectProperties属性来打开mergeSql功能;慢SQL记录
- 33 connectionProperties: druid.stat.mergeSql=true;druid.stat.slowSqlMillis=5000
- 34 #redis 配置
- 35 redis:
- 36 open: true # 是否开启redis缓存 true开启 false关闭
- 37 database: 1
- 38 host: localhost
- 39 port: 6379
- 40 timeout: 5000s # 连接超时时长(毫秒)
- 41 jedis:
- 42 pool:
- 43 max-active: 8 #连接池最大连接数(使用负值表示没有限制)
- 44 max-idle: 8 #连接池中的最大空闲连接
- 45 max-wait: -1s #连接池最大阻塞等待时间(使用负值表示没有限制)
- 46 min-idle: 0 #连接池中的最小空闲连接
- 47
- 48 # jpa 配置
- 49 jpa:
- 50 database: mysql
- 51 show-sql: false
- 52 hibernate:
- 53 ddl-auto: update
- 54 properties:
- 55 hibernate:
- 56 dialect: org.hibernate.dialect.MySQL5Dialect
资源服务器与授权服务器
编写类Oauth2Config,实现资源服务器与授权服务器,这里的资源服务器与授权服务器以内部类的形式实现。
Oauth2Config代码如下:
这里有个点要强调一下,就是上面的CustomAuthExceptionHandler ,这是一个自定义返回异常处理。要知道oauth2在登录时用户密码不正确或者权限不足时,oauth2内部携带的Endpoint处理,会默认返回401并且携带的message是它内部默认的英文,例如像这种:

感觉就很不友好,所以我这里自己去处理AuthException并返回自己想要的数据及数据格式给客户端。
CustomAuthExceptionHandler代码如下:
- 1 package com.unionman.humancar.handler;
- 2
- 3 import com.alibaba.fastjson.JSON;
- 4 import com.unionman.humancar.enums.ResponseEnum;
- 5 import com.unionman.humancar.vo.ResponseVO;
- 6 import lombok.extern.slf4j.Slf4j;
- 7 import org.springframework.security.access.AccessDeniedException;
- 8 import org.springframework.security.core.AuthenticationException;
- 9 import org.springframework.security.oauth2.common.exceptions.InvalidTokenException;
- 10 import org.springframework.security.web.AuthenticationEntryPoint;
- 11 import org.springframework.security.web.access.AccessDeniedHandler;
- 12 import org.springframework.stereotype.Component;
- 13
- 14 import javax.servlet.ServletException;
- 15 import javax.servlet.http.HttpServletRequest;
- 16 import javax.servlet.http.HttpServletResponse;
- 17 import java.io.IOException;
- 18
- 19 /**
- 20 * @author Zhifeng.Zeng
- 21 * @description 自定义未授权 token无效 权限不足返回信息处理类
- 22 * @date 2019/3/4 15:49
- 23 */
- 24 @Component
- 25 @Slf4j
- 26 public class CustomAuthExceptionHandler implements AuthenticationEntryPoint, AccessDeniedHandler {
- 27 @Override
- 28 public void commence(HttpServletRequest request, HttpServletResponse response, AuthenticationException authException) throws IOException, ServletException {
- 29
- 30 Throwable cause = authException.getCause();
- 31 response.setContentType("application/json;charset=UTF-8");
- 32 response.setStatus(HttpServletResponse.SC_UNAUTHORIZED);
- 33 // CORS "pre-flight" request
- 34 response.addHeader("Access-Control-Allow-Origin", "*");
- 35 response.addHeader("Cache-Control","no-cache");
- 36 response.addHeader("Access-Control-Allow-Methods", "GET, POST, PUT, DELETE, OPTIONS");
- 37 response.setHeader("Access-Control-Allow-Headers", "x-requested-with");
- 38 response.addHeader("Access-Control-Max-Age", "1800");
- 39 if (cause instanceof InvalidTokenException) {
- 40 log.error("InvalidTokenException : {}",cause.getMessage());
- 41 //Token无效
- 42 response.getWriter().write(JSON.toJSONString(ResponseVO.error(ResponseEnum.ACCESS_TOKEN_INVALID)));
- 43 } else {
- 44 log.error("AuthenticationException : NoAuthentication");
- 45 //资源未授权
- 46 response.getWriter().write(JSON.toJSONString(ResponseVO.error(ResponseEnum.UNAUTHORIZED)));
- 47 }
- 48
- 49 }
- 50
- 51 @Override
- 52 public void handle(HttpServletRequest request, HttpServletResponse response, AccessDeniedException accessDeniedException) throws IOException, ServletException {
- 53 response.setContentType("application/json;charset=UTF-8");
- 54 response.setStatus(HttpServletResponse.SC_UNAUTHORIZED);
- 55 response.addHeader("Access-Control-Allow-Origin", "*");
- 56 response.addHeader("Cache-Control","no-cache");
- 57 response.addHeader("Access-Control-Allow-Methods", "GET, POST, PUT, DELETE, OPTIONS");
- 58 response.setHeader("Access-Control-Allow-Headers", "x-requested-with");
- 59 response.addHeader("Access-Control-Max-Age", "1800");
- 60 //访问资源的用户权限不足
- 61 log.error("AccessDeniedException : {}",accessDeniedException.getMessage());
- 62 response.getWriter().write(JSON.toJSONString(ResponseVO.error(ResponseEnum.INSUFFICIENT_PERMISSIONS)));
- 63 }
- 64 }
Spring Security
这里security主要承担的角色是,用户资源管理,简单地说就是,在客户端发送登录请求的时候,security会将先去根据用户输入的用户名和密码,去查数据库,如果匹配,那么就把相应的用户信息进行一层转换,然后交给认证授权管理器,然后认证授权管理器会根据相应的用户,给他分发一个token(令牌),然后下次进行请求的时候,携带着该token(令牌),认证授权管理器就能根据该token(令牌)去找到相应的用户了。
SecurityConfig代码如下:
- 1 package com.unionman.springbootsecurityauth2.config;
- 2
- 3 import com.unionman.springbootsecurityauth2.domain.CustomUserDetail;
- 4 import com.unionman.springbootsecurityauth2.entity.User;
- 5 import com.unionman.springbootsecurityauth2.repository.UserRepository;
- 6 import lombok.extern.slf4j.Slf4j;
- 7 import org.springframework.beans.factory.annotation.Autowired;
- 8 import org.springframework.context.annotation.Bean;
- 9 import org.springframework.context.annotation.Configuration;
- 10 import org.springframework.security.authentication.AuthenticationManager;
- 11 import org.springframework.security.config.annotation.web.configuration.EnableWebSecurity;
- 12 import org.springframework.security.config.annotation.web.configuration.WebSecurityConfigurerAdapter;
- 13 import org.springframework.security.core.GrantedAuthority;
- 14 import org.springframework.security.core.authority.AuthorityUtils;
- 15 import org.springframework.security.core.userdetails.UserDetails;
- 16 import org.springframework.security.core.userdetails.UserDetailsService;
- 17 import org.springframework.security.core.userdetails.UsernameNotFoundException;
- 18 import org.springframework.security.crypto.bcrypt.BCryptPasswordEncoder;
- 19 import org.springframework.security.crypto.factory.PasswordEncoderFactories;
- 20 import org.springframework.security.crypto.password.PasswordEncoder;
- 21 import org.springframework.web.client.RestTemplate;
- 22
- 23 import java.util.List;
- 24
- 25 /**
- 26 * @description Security核心配置
- 27 * @author Zhifeng.Zeng
- 28 */
- 29 @Configuration
- 30 @EnableWebSecurity
- 31 @Slf4j
- 32 public class SecurityConfig extends WebSecurityConfigurerAdapter {
- 33
- 34
- 35 @Autowired
- 36 private UserRepository userRepository;
- 37
- 38 @Bean
- 39 @Override
- 40 public AuthenticationManager authenticationManagerBean() throws Exception {
- 41 return super.authenticationManagerBean();
- 42 }
- 43
- 44 @Bean
- 45 public RestTemplate restTemplate(){
- 46 return new RestTemplate();
- 47 }
- 48
- 49 @Bean
- 50 @Override
- 51 protected UserDetailsService userDetailsService() {
- 52 BCryptPasswordEncoder bCryptPasswordEncoder = new BCryptPasswordEncoder();
- 53 return new UserDetailsService(){
- 54 @Override
- 55 public UserDetails loadUserByUsername(String username) throws UsernameNotFoundException {
- 56 log.info("username:{}",username);
- 57 User user = userRepository.findUserByAccount(username);
- 58 if(user != null){
- 59 CustomUserDetail customUserDetail = new CustomUserDetail();
- 60 customUserDetail.setUsername(user.getAccount());
- 61 customUserDetail.setPassword("{bcrypt}"+bCryptPasswordEncoder.encode(user.getPassword()));
- 62 List<GrantedAuthority> list = AuthorityUtils.createAuthorityList(user.getRole().getRole());
- 63 customUserDetail.setAuthorities(list);
- 64 return customUserDetail;
- 65 }else {//返回空
- 66 return null;
- 67 }
- 68
- 69 }
- 70 };
- 71 }
- 72
- 73 @Bean
- 74 PasswordEncoder passwordEncoder() {
- 75 return PasswordEncoderFactories.createDelegatingPasswordEncoder();
- 76 }
- 77 }
业务逻辑
这里我只简单地实现了用户的增删改查以及用户登录的业务逻辑。并没有做太深的业务处理,主要是重点看一下登录的业务逻辑。里面引了几个组件,简单说一下,RestTemplate(http客户端)用于发送http请求,ServerConfig(服务配置)用于获取本服务的ip和端口,RedisUtil(redis工具类) 用户对redis进行缓存的增删改查操作。
UserServiceImpl代码如下:
- package com.unionman.springbootsecurityauth2.service.impl;
-
- import com.unionman.springbootsecurityauth2.config.ServerConfig;
- import com.unionman.springbootsecurityauth2.domain.Token;
- import com.unionman.springbootsecurityauth2.dto.LoginUserDTO;
- import com.unionman.springbootsecurityauth2.dto.UserDTO;
- import com.unionman.springbootsecurityauth2.entity.Role;
- import com.unionman.springbootsecurityauth2.entity.User;
- import com.unionman.springbootsecurityauth2.enums.ResponseEnum;
- import com.unionman.springbootsecurityauth2.enums.UrlEnum;
- import com.unionman.springbootsecurityauth2.repository.UserRepository;
- import com.unionman.springbootsecurityauth2.service.RoleService;
- import com.unionman.springbootsecurityauth2.service.UserService;
- import com.unionman.springbootsecurityauth2.utils.BeanUtils;
- import com.unionman.springbootsecurityauth2.utils.RedisUtil;
- import com.unionman.springbootsecurityauth2.vo.LoginUserVO;
- import com.unionman.springbootsecurityauth2.vo.ResponseVO;
- import com.unionman.springbootsecurityauth2.vo.RoleVO;
- import com.unionman.springbootsecurityauth2.vo.UserVO;
- import org.springframework.beans.factory.annotation.Autowired;
- import org.springframework.stereotype.Service;
- import org.springframework.transaction.annotation.Transactional;
- import org.springframework.util.LinkedMultiValueMap;
- import org.springframework.util.MultiValueMap;
- import org.springframework.web.client.RestClientException;
- import org.springframework.web.client.RestTemplate;
-
- import java.util.ArrayList;
- import java.util.List;
- import java.util.concurrent.TimeUnit;
-
- import static com.unionman.springbootsecurityauth2.config.OAuth2Config.CLIENT_ID;
- import static com.unionman.springbootsecurityauth2.config.OAuth2Config.CLIENT_SECRET;
- import static com.unionman.springbootsecurityauth2.config.OAuth2Config.GRANT_TYPE;
-
- @Service
- public class UserServiceImpl implements UserService {
-
- @Autowired
- private UserRepository userRepository;
-
- @Autowired
- private RoleService roleService;
-
- @Autowired
- private RestTemplate restTemplate;
-
- @Autowired
- private ServerConfig serverConfig;
-
- @Autowired
- private RedisUtil redisUtil;
-
- @Override
- @Transactional(rollbackFor = Exception.class)
- public void addUser(UserDTO userDTO) {
- User userPO = new User();
- User userByAccount = userRepository.findUserByAccount(userDTO.getAccount());
- if(userByAccount != null){
- //此处应该用自定义异常去返回,在这里我就不去具体实现了
- try {
- throw new Exception("This user already exists!");
- } catch (Exception e) {
- e.printStackTrace();
- }
- }
- userPO.setCreatedTime(System.currentTimeMillis());
- //添加用户角色信息
- Role rolePO = roleService.findById(userDTO.getRoleId());
- userPO.setRole(rolePO);
- BeanUtils.copyPropertiesIgnoreNull(userDTO,userPO);
- userRepository.save(userPO);
- }
-
- @Override
- @Transactional(rollbackFor = Exception.class)
- public void deleteUser(Integer id) {
- User userPO = userRepository.findById(id).get();
- if(userPO == null){
- //此处应该用自定义异常去返回,在这里我就不去具体实现了
- try {
- throw new Exception("This user not exists!");
- } catch (Exception e) {
- e.printStackTrace();
- }
- }
- userRepository.delete(userPO);
- }
-
- @Override
- @Transactional(rollbackFor = Exception.class)
- public void updateUser(UserDTO userDTO) {
- User userPO = userRepository.findById(userDTO.getId()).get();
- if(userPO == null){
- //此处应该用自定义异常去返回,在这里我就不去具体实现了
- try {
- throw new Exception("This user not exists!");
- } catch (Exception e) {
- e.printStackTrace();
- }
- }
- BeanUtils.copyPropertiesIgnoreNull(userDTO, userPO);
- //修改用户角色信息
- Role rolePO = roleService.findById(userDTO.getRoleId());
- userPO.setRole(rolePO);
- userRepository.saveAndFlush(userPO);
- }
-
- @Override
- public ResponseVO<List<UserVO>> findAllUserVO() {
- List<User> userPOList = userRepository.findAll();
- List<UserVO> userVOList = new ArrayList<>();
- userPOList.forEach(userPO->{
- UserVO userVO = new UserVO();
- BeanUtils.copyPropertiesIgnoreNull(userPO,userVO);
- RoleVO roleVO = new RoleVO();
- BeanUtils.copyPropertiesIgnoreNull(userPO.getRole(),roleVO);
- userVO.setRole(roleVO);
- userVOList.add(userVO);
- });
- return ResponseVO.success(userVOList);
- }
-
- @Override
- public ResponseVO login(LoginUserDTO loginUserDTO) {
- MultiValueMap<String, Object> paramMap = new LinkedMultiValueMap<>();
- paramMap.add("client_id", CLIENT_ID);
- paramMap.add("client_secret", CLIENT_SECRET);
- paramMap.add("username", loginUserDTO.getAccount());
- paramMap.add("password", loginUserDTO.getPassword());
- paramMap.add("grant_type", GRANT_TYPE[0]);
- Token token = null;
- try {
- //因为oauth2本身自带的登录接口是"/oauth/token",并且返回的数据类型不能按我们想要的去返回
- //但是我的业务需求是,登录接口是"user/login",由于我没研究过要怎么去修改oauth2内部的endpoint配置
- //所以这里我用restTemplate(HTTP客户端)进行一次转发到oauth2内部的登录接口,比较简单粗暴
- token = restTemplate.postForObject(serverConfig.getUrl() + UrlEnum.LOGIN_URL.getUrl(), paramMap, Token.class);
- LoginUserVO loginUserVO = redisUtil.get(token.getValue(), LoginUserVO.class);
- if(loginUserVO != null){
- //登录的时候,判断该用户是否已经登录过了
- //如果redis里面已经存在该用户已经登录过了的信息
- //我这边要刷新一遍token信息,不然,它会返回上一次还未过时的token信息给你
- //不便于做单点维护
- token = oauthRefreshToken(loginUserVO.getRefreshToken());
- redisUtil.deleteCache(loginUserVO.getAccessToken());
- }
- } catch (RestClientException e) {
- try {
- e.printStackTrace();
- //此处应该用自定义异常去返回,在这里我就不去具体实现了
- //throw new Exception("username or password error");
- } catch (Exception e1) {
- e1.printStackTrace();
- }
- }
- //这里我拿到了登录成功后返回的token信息之后,我再进行一层封装,最后返回给前端的其实是LoginUserVO
- LoginUserVO loginUserVO = new LoginUserVO();
- User userPO = userRepository.findUserByAccount(loginUserDTO.getAccount());
- BeanUtils.copyPropertiesIgnoreNull(userPO, loginUserVO);
- loginUserVO.setPassword(userPO.getPassword());
- loginUserVO.setAccessToken(token.getValue());
- loginUserVO.setAccessTokenExpiresIn(token.getExpiresIn());
- loginUserVO.setAccessTokenExpiration(token.getExpiration());
- loginUserVO.setExpired(token.isExpired());
- loginUserVO.setScope(token.getScope());
- loginUserVO.setTokenType(token.getTokenType());
- loginUserVO.setRefreshToken(token.getRefreshToken().getValue());
- loginUserVO.setRefreshTokenExpiration(token.getRefreshToken().getExpiration());
- //存储登录的用户
- redisUtil.set(loginUserVO.getAccessToken(),loginUserVO,TimeUnit.HOURS.toSeconds(1));
- return ResponseVO.success(loginUserVO);
- }
-
- /**
- * @description oauth2客户端刷新token
- * @param refreshToken
- * @date 2019/03/05 14:27:22
- * @author Zhifeng.Zeng
- * @return
- */
- private Token oauthRefreshToken(String refreshToken) {
- MultiValueMap<String, Object> paramMap = new LinkedMultiValueMap<>();
- paramMap.add("client_id", CLIENT_ID);
- paramMap.add("client_secret", CLIENT_SECRET);
- paramMap.add("refresh_token", refreshToken);
- paramMap.add("grant_type", GRANT_TYPE[1]);
- Token token = null;
- try {
- token = restTemplate.postForObject(serverConfig.getUrl() + UrlEnum.LOGIN_URL.getUrl(), paramMap, Token.class);
- } catch (RestClientException e) {
- try {
- //此处应该用自定义异常去返回,在这里我就不去具体实现了
- throw new Exception(ResponseEnum.REFRESH_TOKEN_INVALID.getMessage());
- } catch (Exception e1) {
- e1.printStackTrace();
- }
- }
- return token;
- }
-
-
- }
示例
这里我使用postman(接口测试工具)去对接口做一些简单的测试。
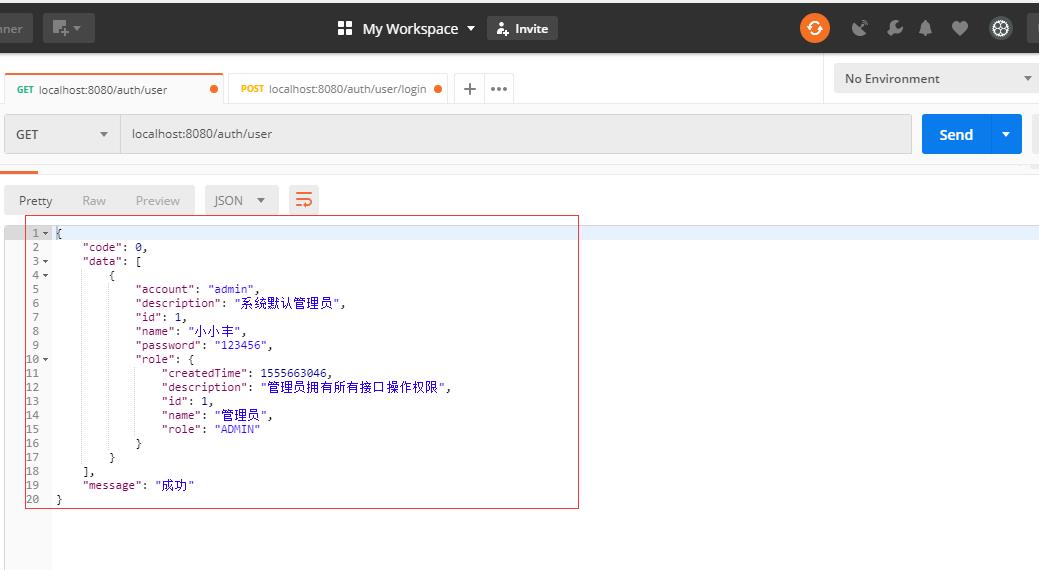
(1)这里我去发送一个获取用户列表的请求:

结果可以看到,由于没有携带token信息,所以返回了如下信息。
(2)接下来,我们先去登录。

登录成功后,这里会返回一系列信息,记住这个token信息,待会我们尝试使用这个token信息再次请求上面那个获取用户列表接口。
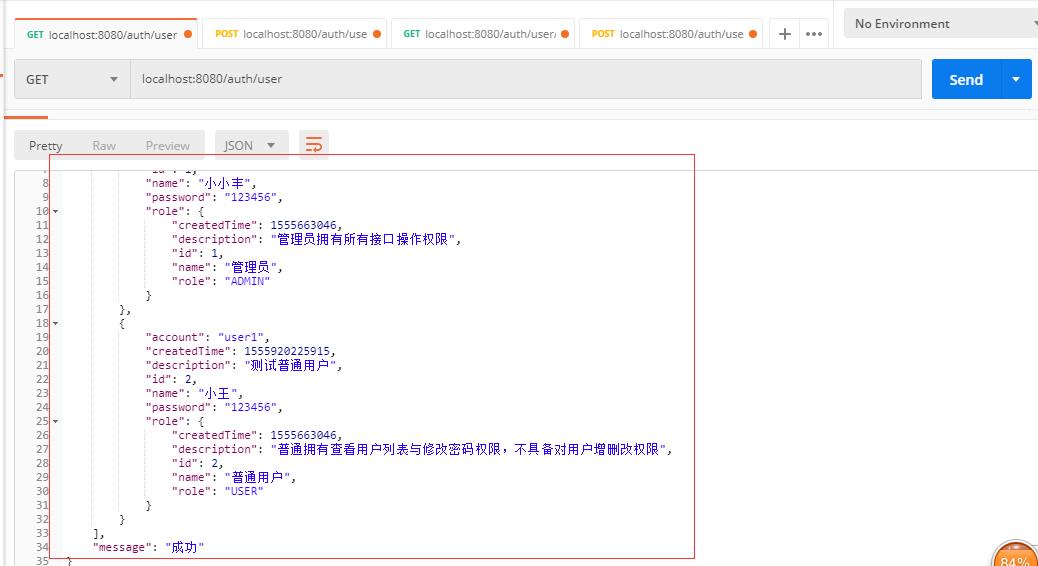
(3)携带token去获取用户列表

可以看到,可以成功拿到接口返回的资源(用户的列表信息)啦。
(4)这里测试一下,用户注销的接口。用户注销,会把redis里的token信息全部清除。
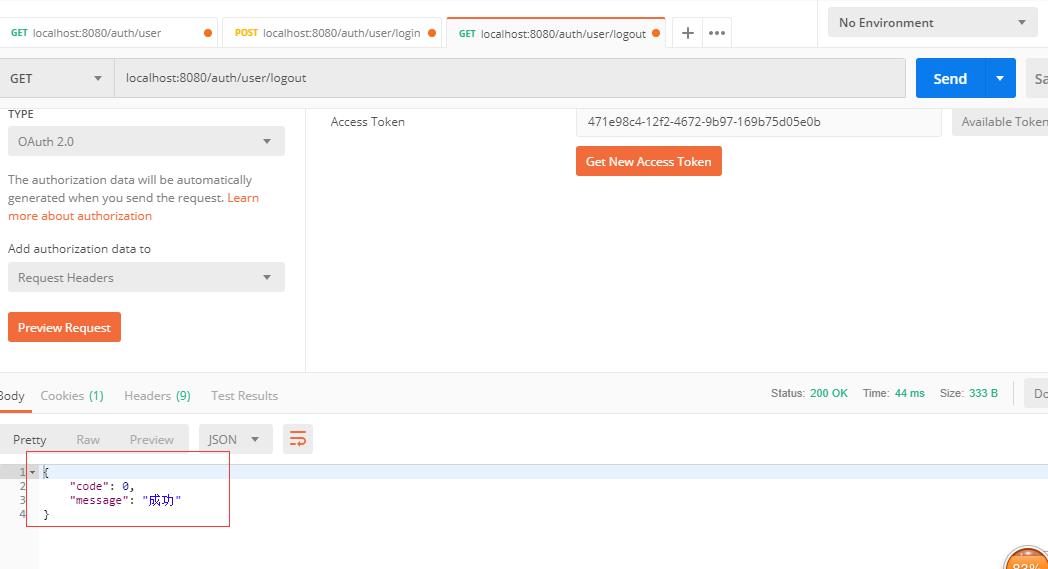
可以看到,注销成功了。那么我们再用这个已经被注销的token再去请求一遍那个获取用户列表接口。
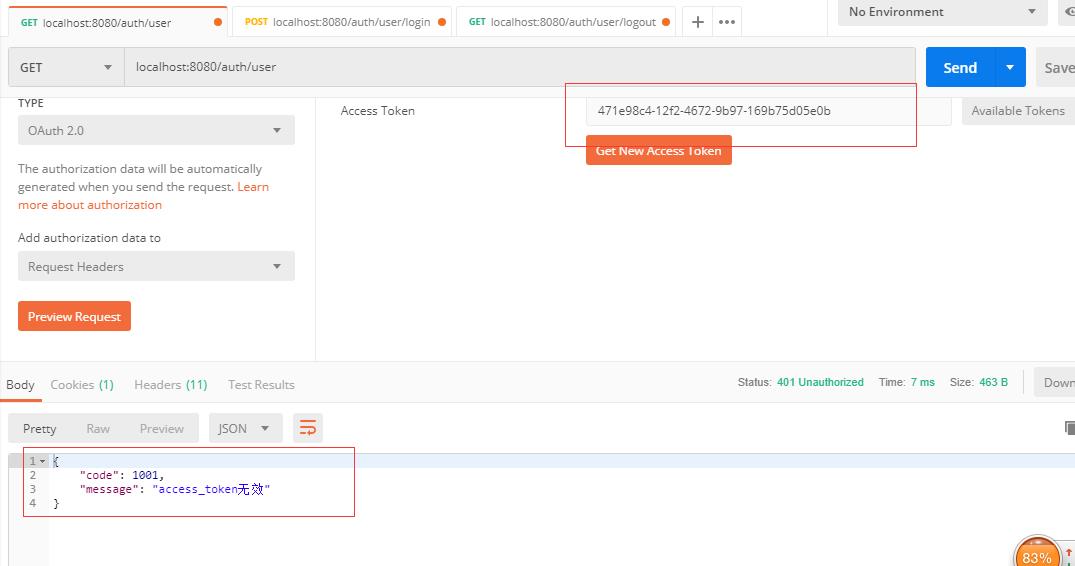
很显然,此时已经报token无效了。
接下来,我们对角色的资源分配管理进行一个测试。可以看到我们库里面,项目初始化的时候,就已经创建了一个管理员,我们上面配置已经规定,管理员是拥有所有接口的访问权限的,而普通用户却只有查询权限。我们现在就来测试一下这个效果。
(1)首先我使用该管理员去添加一个普通用户。
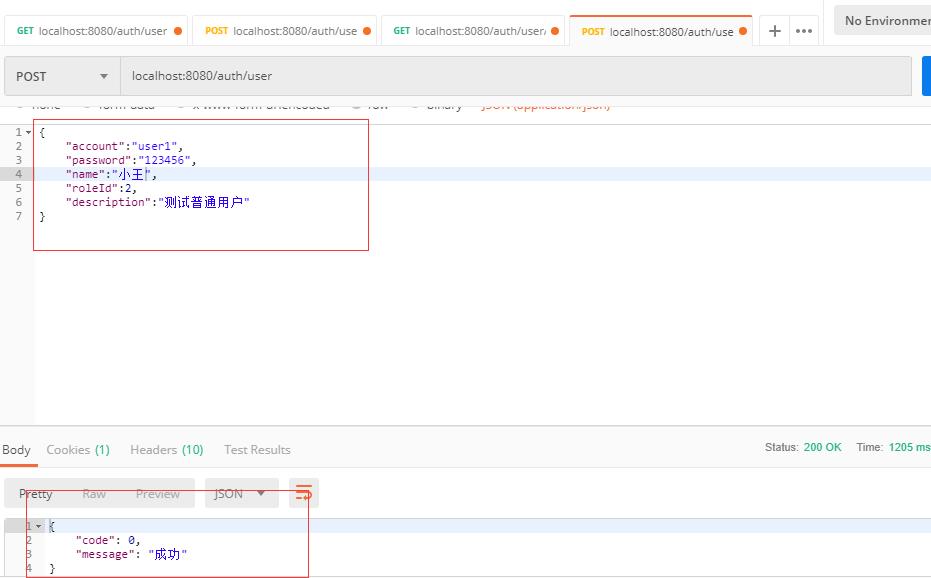
可以看到,我们返回了添加成功信息了,那么我去查看一下用户列表。
很显然,现在这个用户已经成功添加进去了。
(2)接下来,我们用新添加的用户去登录一下该系统。
该用户也登录成功了,我们先保存这个token。
(3)我们现在携带着刚才登录的普通用户"小王"的token去添加一个普通用户。

可以看到,由于"小王"是普通用户,所以是不具备添加用户的权限的。
(4)那么我们现在用"小王"这个用户去查询一下用户列表。
可以看到,"小王"这个普通用户是拥有查询用户列表接口的权限的。
总结
基于Springboot集成security、oauth2实现认证鉴权、资源管理的博文就到这了。描述得其实已经较为详细了,具体代码的示例也给了相关的注释。基本上都是以最简单最基本的方式去做的一个整合Demo。一般实际应用场景里,业务会比较复杂,其中还会有,修改密码,重置密码,主动延时token时长,加密解密等等。这些就根据自己的业务需求去做相应的处理了,基本上的操作都是针对redis去做,因为token相关信息都是存储在redis的。
具体源码我已经上传到github:https://github.com/githubzengzhifeng/springboot-security-oauth2
