docker容器源码部署httpd,用存储卷部署网站
创建一个httpd镜像
- // 创建一个httpd容器
- [root@localhost ~]# docker run -tid --name httpd centos
- 2d693e16f4f3734b127cbae90d189c1b4e78619a54ceec912a82d96cf4f1c345
- [root@localhost ~]# docker ps
- CONTAINER ID IMAGE COMMAND CREATED STATUS PORTS NAMES
- 2d693e16f4f3 centos "/bin/bash" 5 seconds ago Up 4 seconds httpd
-
- // 连接上这个容器
- [root@localhost ~]# docker exec -it 2d693e16f4f3 /bin/bash
- [root@2d693e16f4f3 /]#
-
- // 把源码包放到容器中
- [root@localhost ~]# docker cp /usr/src/apr-1.7.0.tar.gz 2d693e16f4f3:/usr/src/
- [root@localhost ~]# docker cp /usr/src/apr-util-1.6.1.tar.gz 2d693e16f4f3:/usr/src/
- [root@localhost ~]# docker cp /usr/src/httpd-2.4.49.tar.gz 2d693e16f4f3:/usr/src/
- [root@2d693e16f4f3 /]# ls /usr/src/
- apr-1.7.0.tar.gz debug kernels
- apr-util-1.6.1.tar.gz httpd-2.4.49.tar.gz
-
- // 源码安装httpd
- [root@2d693e16f4f3 /]# useradd -r -M -s /sbin/nologin apache
- [root@2d693e16f4f3 /]# id apache
- uid=998(apache) gid=996(apache) groups=996(apache)
- [root@2d693e16f4f3 /]# yum groups mark install 'Development Tools' -y
- [root@2d693e16f4f3 /]# yum -y install openssl-devel pcre-devel expat-devel libtool gcc gcc-c++ make
- [root@2d693e16f4f3 /]# cd /usr/src/
- [root@2d693e16f4f3 src]# tar xf apr-1.7.0.tar.gz -C /usr/local/
- [root@2d693e16f4f3 src]# tar xf apr-util-1.6.1.tar.gz -C /usr/local/
- [root@2d693e16f4f3 src]# tar xf httpd-2.4.49.tar.gz -C /usr/local/
- [root@2d693e16f4f3 src]# cd /usr/local/apr-1.7.0/
- [root@2d693e16f4f3 apr-1.7.0]# vi configure
- cfgfile="${ofile}T"
- trap "$RM \"$cfgfile\"; exit 1" 1 2 15
- # $RM "$cfgfile" //将此行加上注释,或者删除此行
- [root@2d693e16f4f3 apr-1.7.0]# ./configure --prefix=/usr/local/apr
- [root@2d693e16f4f3 apr-1.7.0]# make && make install
- [root@2d693e16f4f3 local]# cd apr-util-1.6.1/
- [root@2d693e16f4f3 apr-util-1.6.1]# ./configure --prefix=/usr/local/apr-util --with-apr=/usr/local/apr/
- [root@2d693e16f4f3 apr-util-1.6.1]# make && make install
- [root@2d693e16f4f3 apr-util-1.6.1]# cd ../httpd-2.4.49/
- [root@2d693e16f4f3 httpd-2.4.49]# ./configure --prefix=/usr/local/apache > --enable-so > --enable-ssl > --enable-cgi > --enable-rewrite > --with-zlib > --with-pcre > --with-apr=/usr/local/apr > --with-apr-util=/usr/local/apr-util/ > --enable-modules=most > --enable-mpms-shared=all > --with-mpm=prefork
- [root@2d693e16f4f3 httpd-2.4.49]# make && make install
- [root@2d693e16f4f3 local]# echo 'export PATH=/usr/local/apache/bin:$PATH' > /etc/profile.d/httpd.sh
- [root@2d693e16f4f3 local]# source /etc/profile.d/httpd.sh
- [root@2d693e16f4f3 local]# ln -s /usr/local/apache/include /usr/include/apache
- [root@2d693e16f4f3 local]# apachectl start
- [root@2d693e16f4f3 local]# ss -anlt
- State Recv-Q Send-Q Local Address:Port Peer Address:Port Process
- LISTEN 0 128 0.0.0.0:80 0.0.0.0:*
- [root@2d693e16f4f3 local]# cd /
- [root@2d693e16f4f3 /]#
- [root@2d693e16f4f3 /]#
- [root@2d693e16f4f3 /]# vi start.sh
- #! /bin/sh
- /usr/local/apache/bin/apachectl start
- /bin/bash
- [root@2d693e16f4f3 /]# chmod +x start.sh
-
-
- // 构建镜像
- [root@localhost ~]# docker commit -p -c 'CMD ["/bin/bash","start.sh"]' 2d693e16f4f3 syblyw0806/httpd:v0.1
- sha256:16913ce01fdceee9a389906cf385893120734b1a088b894cc5dce1a9ead252fd
- [root@localhost ~]# docker images
- REPOSITORY TAG IMAGE ID CREATED SIZE
- syblyw0806/httpd v0.1 16913ce01fdc 6 seconds ago 713MB
- busybox latest d23834f29b38 6 days ago 1.24MB
- centos latest 5d0da3dc9764 2 months ago 231MB
部署nfs
需要开启一台新的虚拟机
- [root@localhost ~]# yum -y install nfs-utils
- [root@localhost ~]# systemctl restart nfs-server.service
- [root@localhost ~]# mkdir /nfs
- [root@localhost ~]# chmod 777 /nfs/
- [root@localhost ~]# vim /etc/exports
- /nfs 192.168.200.136(rw)
- [root@localhost ~]# systemctl restart nfs-server
在有docker服务的虚拟机上一样安装nfs
- [root@localhost ~]# yum -y install nfs-utils
- [root@localhost ~]# showmount -e 192.168.200.137
- Export list for 192.168.200.137:
- /nfs 192.168.200.136
挂载
- [root@localhost ~]# mount -t nfs 192.168.200.137:/nfs /var/www/html/
- [root@localhost ~]# df -h
- Filesystem Size Used Avail Use% Mounted on
- devtmpfs 883M 0 883M 0% /dev
- tmpfs 901M 0 901M 0% /dev/shm
- tmpfs 901M 8.9M 892M 1% /run
- tmpfs 901M 0 901M 0% /sys/fs/cgroup
- /dev/mapper/rhel-root 47G 23G 25G 48% /
- /dev/nvme0n1p1 1014M 179M 836M 18% /boot
- tmpfs 181M 0 181M 0% /run/user/0
- overlay 47G 23G 25G 48% /var/lib/docker/overlay2/0a219b8bbb04290f6b1cc1ae29f5eb1a9bc713ff12c86c86c7e13d5c7ca63a0e/merged
- 192.168.200.137:/nfs 47G 2.2G 45G 5% /var/www/html
创建容器并映射
- [root@localhost ~]# docker run -itd --name httpd1 -p 80:80 -v /var/www/html/:/usr/local/apache/htdocs 16913ce01fdc
- 42e38f1db61e49fafa0682125d0425e3d41c4f2db0f48e1973dee1905a90daf3
- [root@localhost ~]# docker ps
- CONTAINER ID IMAGE COMMAND CREATED STATUS PORTS NAMES
- 42e38f1db61e 16913ce01fdc "/bin/bash start.sh" 10 seconds ago Up 9 seconds 0.0.0.0:80->80/tcp, :::80->80/tcp httpd1
上传我们要部署网站的代码
- [root@localhost ~]# cd /var/www/html/
- [root@localhost html]# ls
- game.html images index.html js style
此时在新开的一台虚拟机查看nfs
- [root@localhost ~]# ls /nfs/
- game.html images index.html js style
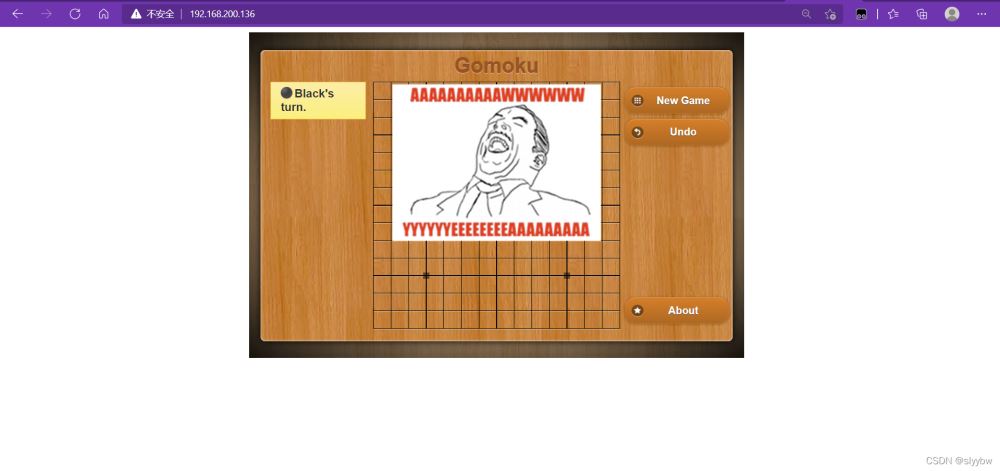
访问测试


到此这篇关于docker容器源码部署httpd用存储卷部署网站的文章就介绍到这了,更多相关docker容器部署httpd内容请搜索w3xue以前的文章或继续浏览下面的相关文章希望大家以后多多支持w3xue!
