3 路由传参?
3.1 query传参?
在某些场景下,路由也需要带参数,例如上述例子中,Message组件下,点击message001、message002、message003时,可以附带参数,实现跳转后统一Detail组件下的不同内容场景。我们把Message组件内容改为如下所示,<router-link>中to参数改为v-bind绑定,其内容改为一个对象配置项,配置项中,path为路由,指向Detail组件,query为传递的传输。
- <template>
- <div>
- <ul>
- <li v-for="m in messageList" :key="m.id">
- <!-- 跳转路由并携带query参数,to的字符串写法 -->
- <!-- <router-link :to="`/home/message/detail?id=${m.id}&title=${m.title}`">{{m.title}}</router-link> -->
-
- <!-- 跳转路由并携带query参数,to的对象写法 -->
- <router-link :to="{
- path:'/home/message/detail',
- query:{
- id:m.id,
- title:m.title
- }
- }">
- {{m.title}}
- </router-link>
-
- </li>
- </ul>
- <hr>
- <router-view></router-view>
- </div>
- </template>
-
- <script>
- export default {
- name:'Message',
- data() {
- return {
- messageList:[
- {id:'001',title:'消息001'},
- {id:'002',title:'消息002'},
- {id:'003',title:'消息003'}
- ]
- }
- },
- }
- </script>
Detail组件内容如下,通过组件实例下的$route.query对象,可以读取通过路由传递过来的参数:
- <template>
- <ul>
- <li>消息编号:{{$route.query.id}}</li>
- <li>消息标题:{{$route.query.title}}</li>
- </ul>
- </template>
-
- <script>
- export default {
- name:'Detail',
- mounted() {
- console.log(this.$route)
- },
- }
- </script>
Detail组件的路由,也需要在router/index.js中重新配置:
- // 该文件专门用于创建整个应用的路由器
- import VueRouter from 'vue-router'
- //引入组件
- import About from '../pages/About'
- import Home from '../pages/Home'
- import News from '../pages/News'
- import Message from '../pages/Message'
- import Detail from '../pages/Detail'
-
- //创建并暴露一个路由器
- export default new VueRouter({
- routes:[
- {
- path:'/about',
- component:About
- },
- {
- path:'/home',
- component:Home,
- children:[
- {
- path:'news',
- component:News,
- },
- {
- path:'message',
- component:Message,
- children:[
- {
- path:'detail',
- component:Detail,
- }
- ]
- }
- ]
- }
- ]
- })
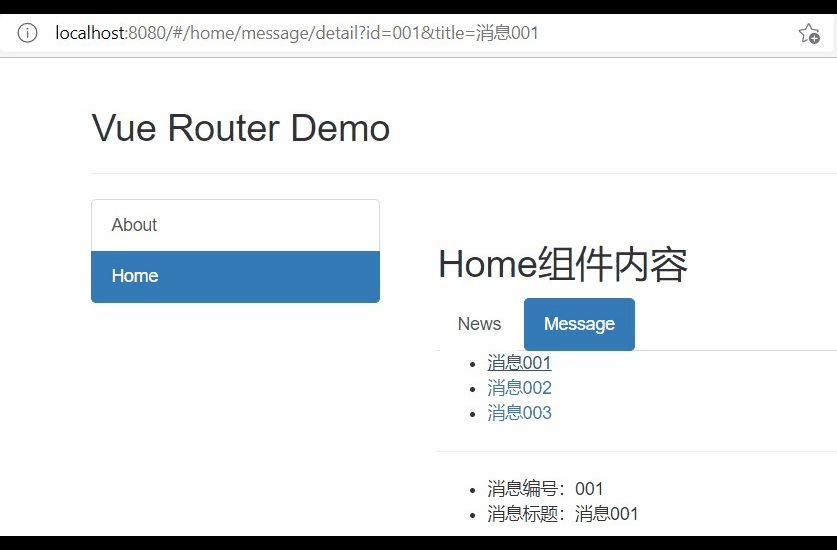
页面效果如下图所示:
3.2 param传参?
vue中也可以使用param参数进行参数,这种方式比query方式更加优雅一些。使用这种方式是,在router/index.js配置文件中,在对Detail组件配置path参数是,进行说明。千万注意,在使用param方式进行传参时,<router-link>标签内不能再使用path配置路由了,一定要使用name参数。:
- // 该文件专门用于创建整个应用的路由器
- import VueRouter from 'vue-router'
- //引入组件
- import About from '../pages/About'
- import Home from '../pages/Home'
- import News from '../pages/News'
- import Message from '../pages/Message'
- import Detail from '../pages/Detail'
-
- //创建并暴露一个路由器
- export default new VueRouter({
- routes:[
- {
- name:'guanyu',
- path:'/about',
- component:About
- },
- {
- path:'/home',
- component:Home,
- children:[
- {
- path:'news',
- component:News,
- },
- {
- path:'message',
- component:Message,
- children:[
- {
- name:'xiangqing',
- path:'detail/:id/:title', // 此处进行配置,说明要接受id和title两个参数
- component:Detail,
- }
- ]
- }
- ]
- }
- ]
- })
在Massage.vue中,读取param传递参数方式如下所示:
- <template>
- <div>
- <ul>
- <li v-for="m in messageList" :key="m.id">
- <!-- 跳转路由并携带params参数,to的字符串写法 -->
- <!-- <router-link :to="`/home/message/detail/${m.id}/${m.title}`">{{m.title}}</router-link> -->
-
- <!-- 跳转路由并携带params参数,to的对象写法 -->
- <router-link :to="{
- name:'xiangqing',
- params:{
- id:m.id,
- title:m.title
- }
- }">
- {{m.title}}
- </router-link>
-
- </li>
- </ul>
- <hr>
- <router-view></router-view>
- </div>
- </template>
-
- <script>
- export default {
- name:'Message',
- data() {
- return {
- messageList:[
- {id:'001',title:'消息001'},
- {id:'002',title:'消息002'},
- {id:'003',title:'消息003'}
- ]
- }
- },
- }
- </script>
Detail组件中读取数据的方式也要跟着变化:
- <template>
- <ul>
- <li>消息编号:{{$route.params.id}}</li>
- <li>消息标题:{{$route.params.title}}</li>
- </ul>
- </template>
-
- <script>
- export default {
- name:'Detail',
- mounted() {
- // console.log(this.$route)
- },
- }
- </script>
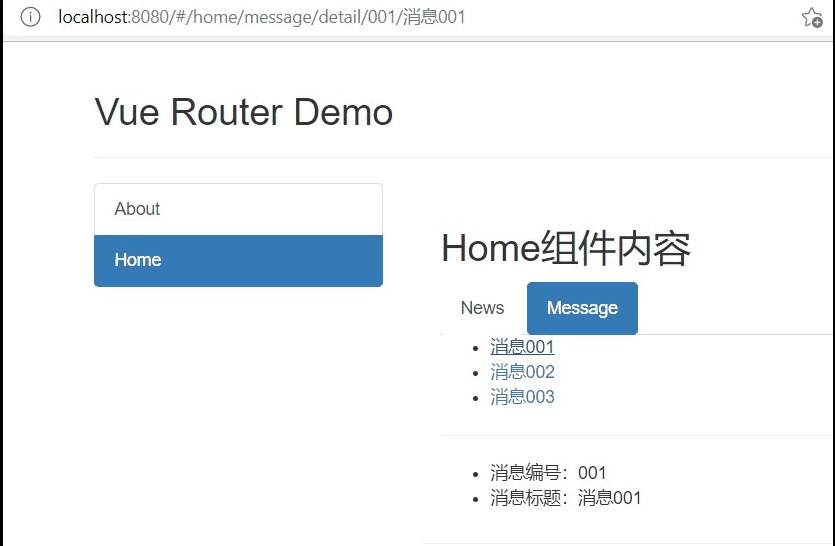
页面效果如下图所示:
3.3 props接收参数?
在上述介绍query和param传参数,我们都是使用$router.query或$router.param进行接收参数,每次接收参数都要写这两个对象,不免有些麻烦。为简便代码,vue提供props进行接收参数,配置改参数后,所有路由传递的参数,都将以props的形式传递给组件。
在接收参数的组件配置路由时,添加props配置项,例如在配置Detail组件路由时,添加props配置项,书写方式有三种,如下所示。注意,第二种方式只能用于param方式传参,第三种方式最灵活,可同时运用于param和query方式传参,也能添加其他参数。:
- {
- name:'xiangqing',
- path:'detail',
- // path:'detail/:id/:title',
- component:Detail,
-
- //props的第一种写法,值为对象,该对象中的所有key-value都会以props的形式传给Detail组件。这种方式用的很少,因为传递的参数是写死的。
- // props:{a:1,b:'hello'}
-
- //props的第二种写法,值为布尔值,若布尔值为真,就会把该路由组件收到的所有params参数,以props的形式传给Detail组件。注意,这种方式只能用于param方式传参。
- // props:true
-
- //props的第三种写法,值为函数
- props($route){
- return {
- id:$route.query.id,
- title:$route.query.title,
- a:1,
- b:'hello'
- }
- }
-
- }
当然,这时候在Detail也需要配置props参数:
- <template>
- <ul>
- <li>消息编号:{{id}}</li>
- <li>消息标题:{{title}}</li>
- </ul>
- </template>
-
- <script>
- export default {
- name:'Detail',
- props:['id','title'],
- }
- </script>
