温馨提示:本文以vue3+vite+ts举例,vite配置和ts语法侧重较少,比较适合有vuex或者vue基础的小伙伴们儿查阅。
安装pinia
yarn add pinia
npm install pinia
pnpm add pinia
1-开始
方式一:在main.ts中直接引入pinia
在 src/main.ts 中引入pinia(根存储),并传递给应用程序。
import { createApp } from 'vue'import './style.css'import App from './App.vue'// 1-创建一个 pinia(根存储)import { createPinia } from 'pinia'const app = createApp(App)// 2-告诉应用程序,我们将使用piniaconst pinia = createPinia();// 以插件形式传递给appapp.use(pinia);app.mount('#app');
方式二(推荐):单独开个.ts文件引入pinia
在根目录下新建文件夹,这里我命名为store,再在文件夹下新建一个index.ts文件(src/store/index.ts),用以配置和引入pinia。
// 1-创建一个 pinia(根存储)import { createPinia } from 'pinia'// 2-定义pinia实例const pinia = createPinia();// 3-暴露pinia实例export default pinia;
然后在src/main.ts 中使用。
......import pinia from '@/store/index.ts'app.use(pinia);......
其实和方式一没啥区别,只是为了保持main.ts文件整洁,并且方便配置pinia。
2-创建仓库
pinia与vuex差不多,相比于vuex,少了mutation 和modules。
pinia创建仓库,有选项式写法和组合式写法。
选项式Options API写法
在根目录下创建一个文件夹store (src/store),在store文件夹中可以创建你的仓库,比如下面我创建了一个名为user的仓库 (src/store/user.ts)。
// 选项式写法// 1-引入apiimport { defineStore } from "pinia";// 2-定义仓库const store = defineStore('user', { // 3-设置组件共享的状态,相当于组件的data state: () => ({ userInfo: { name: '老刘', sex: '男', age: 17, isStudent: false }, token: '5201314', password: '123456', }), // 3-设置状态计算值,相当于组件的computed getters: { name: (state) => state.userInfo.name, sex: (state) => state.userInfo.sex, }, // 3-设置组件共享的方法,相当于组件的methods actions: { addAge() { this.userInfo.age++; } }});// 最后别忘了把仓库暴露出去哦export default store;
组合式Composition API写法(推荐)
上面的仓库 (src/store/user.ts)组合式写法如下:
// 组合式写法// 1-引入pinia的apiimport { defineStore } from "pinia";// 2-引入vue3相关apiimport { ref, reactive, computed } from 'vue';// 3-定义仓库,注意第二个参数需要传入一个函数,函数需要返回一个对象!const store = defineStore('user', () => { // 4-在这里面可以像在组件中一样,使用vue3的API,定义响应式数据 const userInfo = reactive({ name: '老刘', sex: '男', age: 17, isStudent: false }); const token = ref('5201314'); const password = ref('123456'); // 这里computed的作用相当于getters const name = computed(() => userInfo.name); const sex = computed(() => userInfo.sex); // 4-还可以定义方法 function addAge() { userInfo.age++; } // 5-然后把需要共享的数据或方法,装进一个对象,return出去 return { userInfo, token, password, name, sex, addAge }});// 最后别忘了把仓库暴露出去哦export default store;
TIP
还可以在仓库中使用watch、watchEffect等vue3的API喔~。
import { ref, reactive, computed, watch } from 'vue';const store = defineStore('user', () => { const userInfo = reactive({ age: 17, }); // 使用vue3的watch()函数,可以对仓库状态进行监听 watch(() => userInfo.age, (val) => { console.log(val); });});
3-使用pinia
完成了上面的工作后,我们就可以在组件中愉快地使用pinia啦!
下面以src/App.vue作为示例。
(1)引入仓库
<template></template><script setup lang="ts">// 1-引入刚刚自定义的仓库,模块名store 可以自定义import store from '@/store/user.ts';// 2-使用仓库,仓库实例名userStore 可以自定义const userStore = store();</script>
(2)在组件中访问仓库state和getters
在模板和script中,state和getters可以看作仓库实例(如userStore)的属性,直接加.访问即可。
<template> <div> <!-- 1-访问仓库的计算属性getters --> <span>姓名:{{ userStore.name }}</span> <span>性别:{{ userStore.sex }}</span> <!-- 1-访问仓库的状态state --> <span>年龄:{{ userStore.userInfo.age }}</span> <span>是否学生:{{ userStore.userInfo.isStudent ? '是' : '否' }}</span> </div></template><script setup lang="ts">import store from '@/store/user.ts';const userStore = store();// 1-访问state和getters,类似于reactive响应式数据的访问console.log('userStore', userStore);console.log('姓名:', userStore.name);console.log('性别:', userStore.sex);console.log('年龄:', userStore.userInfo.age);console.log('是否学生:', userStore.userInfo.isStudent ? '是' : '否');</script>
输出
userStore Proxy(Object) {$id: 'user', $onAction: ?, $patch: ?, $reset: ?, $subscribe: ?, …}[[Handler]]: Object[[Target]]: Object[[IsRevoked]]: false 姓名: 老刘 性别: 男 年龄: 17 是否学生: 否
(3)在组件中使用仓库actions
使用仓库方法与访问仓库state类似,仓库实例后直接加.调用即可。
<template> <div> <!-- 按钮点击,年龄+1 --> <button @click="onAddAge">年龄+1</button> <span>年龄:{{ userStore.userInfo.age }}</span> </div></template><script setup lang="ts">import store from '@/store/user.ts';const userStore = store();// 按钮点击触发function onAddAge() { // 1-使用仓库的actions userStore.addAge();}</script>
(4)修改state
直接修改
与vuex不同,pinia支持在组件中直接修改state。
<template> <div> <!-- 按钮点击,年龄+1 --> <button @click="onAddAge">年龄+1</button> <span>年龄:{{ userStore.userInfo.age }}</span> </div></template><script setup lang="ts">import store from '@/store/user.ts';const userStore = store();// 按钮点击触发function onAddAge() { // 1-直接修改state userStore.userInfo.age++;}</script>
利用仓库actions进行修改
src/store/user.ts
......const store = defineStore('user', () => { ...... // 1-定义方法 function addAge() { userInfo.age++; } // 2-return出去 return { addAge }});// 3-导出仓库export default store;
src/App.vue
<template> <div> <!-- 按钮点击,年龄+1 --> <button @click="onAddAge">年龄+1</button> <span>年龄:{{ userStore.userInfo.age }}</span> </div></template><script setup lang="ts">import store from '@/store/user.ts';const userStore = store();// 按钮点击触发function onAddAge() { // 4-使用仓库的方法 userStore.addAge();}</script>
批量变更
通过仓库实例(如userStore)的 $patch 方法,可以对state同时应用多个更改。
<script setup lang="ts">......function changeState() { console.log(userStore.token); // '5201314' console.log(userStore.password); // '123456' // $patch()接收一个对象,对象内的属性是 需要变更的state // 注意是变更,新增state是无效的! userStore.$patch({ token: '1024', password: '654321' }); console.log(userStore.token); // '1024' console.log(userStore.password); // '654321'}</script>
上面的方法每次进行批量修改都需要传入一个新对象,有时候使用起来并不方便。下面是另一种写法,$patch接受一个函数来批量修改集合内部分对象。(推荐)
<script setup lang="ts">......function changeState() { // 这里的any是typescript的类型标注,可以不用理会 // 回调函数的参数state就是 仓库目前的state userStore.$patch((state: any) => { state.token = '1024'; state.password = '654321'; });}</script>
整体替换(不推荐)
通过仓库实例(如userStore)的 $state 属性,来为新对象替换仓库的整个状态。
pinia官网提到整体替换state的方法,但并未说明是否保留数据响应式。经笔者实践,这种方法会丢失数据的响应式,所以不推荐使用。
<script setup lang="ts">......function updateStore() { userStore.$state = { userInfo: { name: '老王', sex: '男', age: 66, isStudent: false } };}</script>
(5)重置state
通过调用仓库实例上的 $reset() 方法将状态重置到其初始值。
<script setup lang="ts">......function resetStore() { userStore.$reset();}</script>
$reset() 的坑
细心的你会发现,仓库state并没有重置,然后你打开你的的控制台,你会惊讶地发现它报了这么一个错误:

这时候请你不要慌,先冷静地看一下报错信息。
这里翻译一下:Store "user"是使用setup语法构建的,不实现$reset()。(猜测是pinia的缺陷)
所以,根据报错信息,这里提供下面两种解决方案。
使用选项式Options API
使用选项式Options API编写pinia仓库,并且在组件中不能用script setup语法,要使用setup函数进行开发。
src/store/user.ts
......// 使用选项式Options API编写仓库const store = defineStore('user', { // 3-设置组件共享的状态,相当于组件的data state: () => ({ userInfo: { name: '老刘', sex: '男', age: 17, isStudent: false }, token: '5201314', password: '123456', }),});export default store;
src/App.vue
<!-- 这里不能用script setup,否则依然报错 --><script lang="ts">import store from '@/store/user.ts';export default { setup() { const userStore = store(); function resetStore() { // 重置state userStore.$reset(); } // 把响应式数据或方法return出去 return { userStore, resetStore } },}</script>
重写一个$reset()方法(推荐)
原理:自定义pinia插件(Plugins),利用$patch() 重置整个state。
在之前创建的pinia配置文件中修改(src/store/index.ts)。
import { createPinia } from 'pinia';const pinia = createPinia();// 1-使用pinia自定义插件pinia.use(({ store }) => { // 2-获取最开始的State const initialState = JSON.parse(JSON.stringify(store.$state)); // 3-重写$reset()方法 store.$reset = () => { // 4-利用$patch()批量变更state,达到重置state的目的 store.$patch(initialState); }});export default pinia;
推荐使用这种方法,这样就可以在script setup中愉快地使用pinia啦!
完整示例
仓库配置
src/store/index.ts
import { createPinia } from 'pinia';const pinia = createPinia();pinia.use(({ store }) => { const initialState = JSON.parse(JSON.stringify(store.$state)); store.$reset = () => { store.$patch(initialState); }});export default pinia;
定义仓库
src/store/user.ts
// 组合式写法import { defineStore } from "pinia";import { ref, reactive, computed, watch } from 'vue';const store = defineStore('user', () => { const userInfo = reactive({ name: '老刘', sex: '男', age: 17, isStudent: false }); const token = ref('5201314'); const password = ref('123456'); const name = computed(() => userInfo.name); const sex = computed(() => userInfo.sex); watch(() => userInfo.age, (val) => { console.log(val); }); function addAge() { userInfo.age++; } return { userInfo, token, password, name, sex, addAge }});export default store;
父组件
src/App.vue
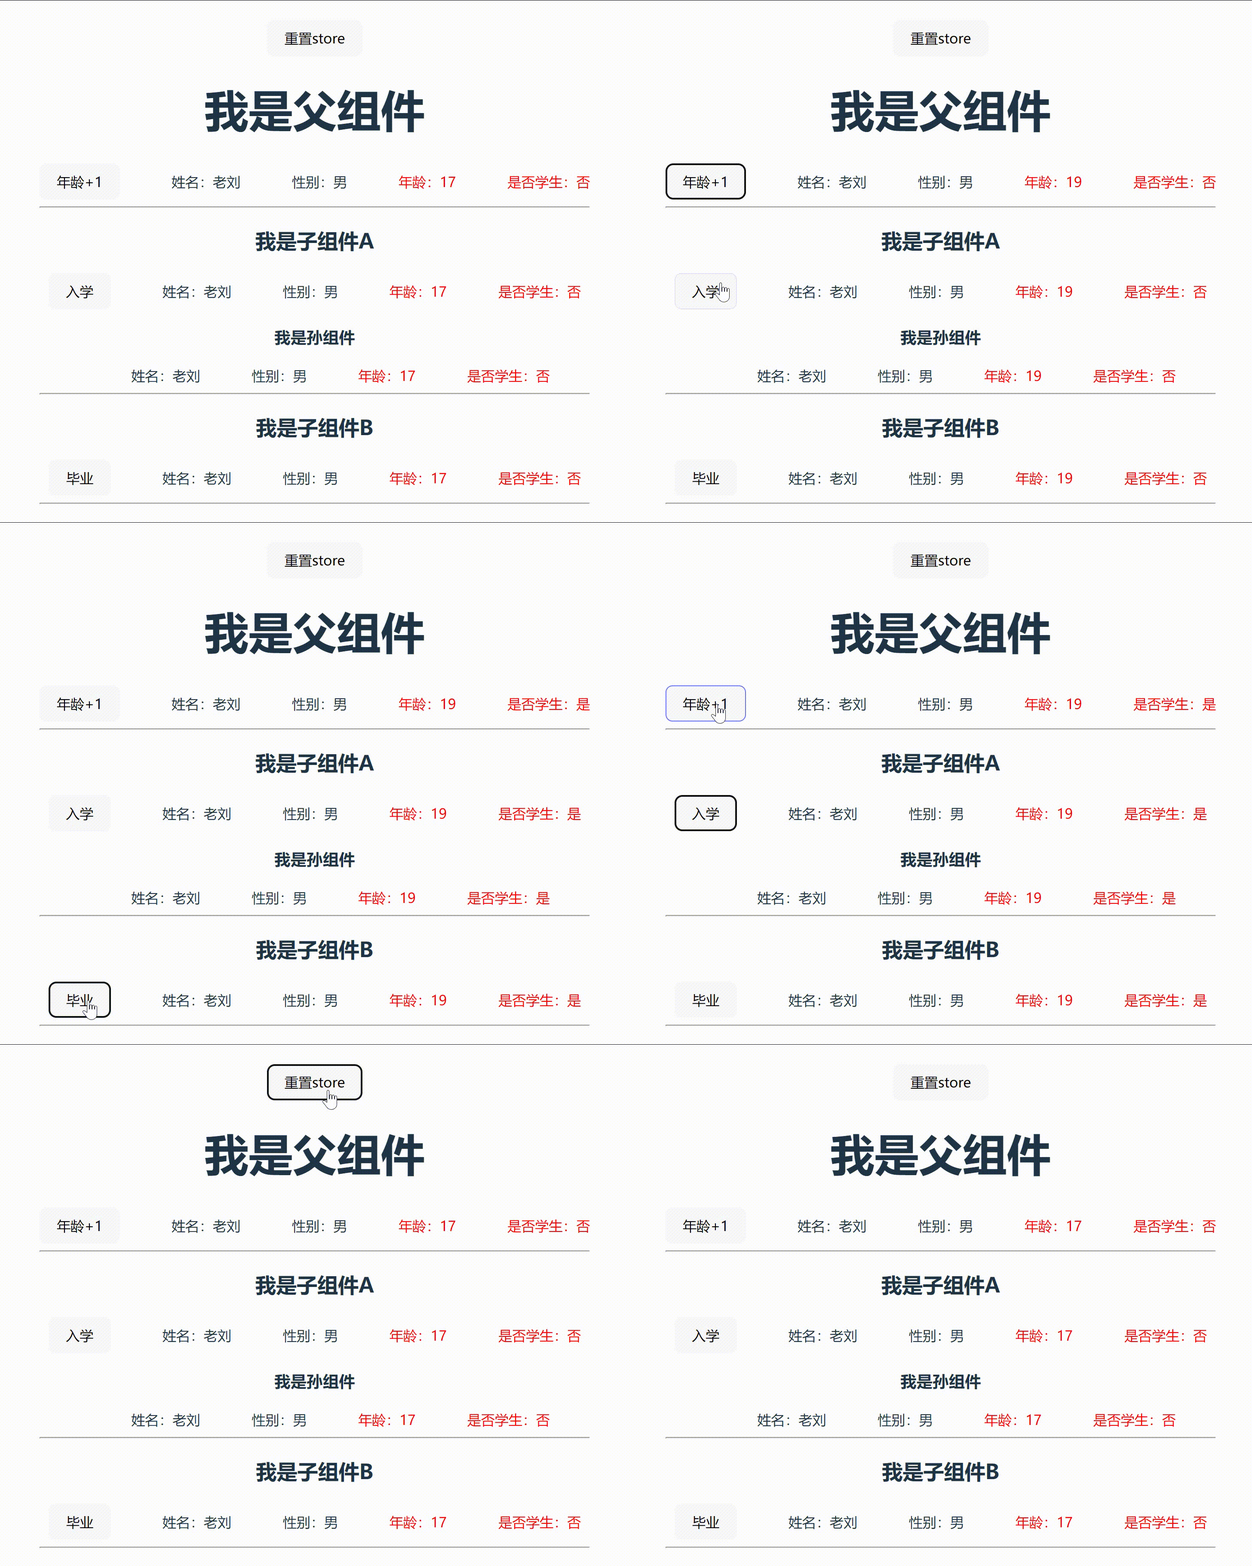
<template> <div> <button @click="resetStore">重置store</button> <h1>我是父组件</h1> <button @click="userStore.userInfo.age++">年龄+1</button> <span class="marginLeft60">姓名:{{ userStore.name }}</span> <span class="marginLeft60">性别:{{ userStore.sex }}</span> <span class="marginLeft60 red">年龄:{{ userStore.userInfo.age }}</span> <span class="marginLeft60 red">是否学生:{{ userStore.userInfo.isStudent ? '是' : '否' }}</span> <hr> <!-- 使用子组件A --> <son-a /> <hr> <!-- 使用子组件B --> <son-b /> <hr> </div></template><script setup lang="ts">// 引入子组件import SonA from './components/sonA.vue';import SonB from './components/sonB.vue';// 1-引入仓库import store from '@/store/user.ts';// 2-使用仓库const userStore = store();// 重置storefunction resetStore() { userStore.$reset();}</script><style>.marginLeft60 { margin-left: 60px;}.red { color: red;}</style>
子组件A
src/components/sonA.vue
<template> <div> <h2>我是子组件A</h2> <button @click="userStore.userInfo.isStudent = true">入学</button> <span class="marginLeft60">姓名:{{ userStore.name }}</span> <span class="marginLeft60">性别:{{ userStore.sex }}</span> <span class="marginLeft60 red">年龄:{{ userStore.userInfo.age }}</span> <span class="marginLeft60 red">是否学生:{{ userStore.userInfo.isStudent ? '是' : '否' }}</span> <grandson /> </div></template><script setup lang="ts">import Grandson from './grandson.vue';import store from '@/store/user.ts';const userStore = store();</script>
子组件B
src/components/sonB.vue
<template> <div> <h2>我是子组件B</h2> <button @click="userStore.userInfo.isStudent = false">毕业</button> <span class="marginLeft60">姓名:{{ userStore.name }}</span> <span class="marginLeft60">性别:{{ userStore.sex }}</span> <span class="marginLeft60 red">年龄:{{ userStore.userInfo.age }}</span> <span class="marginLeft60 red">是否学生:{{ userStore.userInfo.isStudent ? '是' : '否' }}</span> </div></template><script setup lang="ts">import store from '@/store/user.ts';const userStore = store();</script>
孙组件
src/components/grandson.vue
<template> <div> <h3>我是孙组件</h3> <span class="marginLeft60">姓名:{{ userStore.name }}</span> <span class="marginLeft60">性别:{{ userStore.sex }}</span> <span class="marginLeft60 red">年龄:{{ userStore.userInfo.age }}</span> <span class="marginLeft60 red">是否学生:{{ userStore.userInfo.isStudent ? '是' : '否' }}</span> </div></template><script setup lang="ts">import store from '@/store/user.ts';const userStore = store();</script>
效果图
