- > 正所谓前人栽树,后人乘凉。
>
> 感谢[Huxpro](https://github.com/huxpro)提供的博客模板
>
> [我的的博客](https://flyingwzb.github.io)
# 前言
从 Jekyll 到 GitHub Pages 中间踩了许多坑,终于把我的个人博客[Will Wang Blog](https://flyingwzb.github.io)搭建出来了。。。
本教程针对的是不懂技术又想搭建个人博客的小白,操作简单暴力且快速。当然懂技术那就更好了。
看看看博客的主页样式:
[](https://flyingwzb.github.io/)
在手机上的布局:
[](https://flyingwzb.github.io/)
废话不多说了,开始进入正文。
# 快速开始
### 从注册一个Github账号开始
我采用的搭建博客的方式是使用 [GitHub Pages](https://pages.github.com/) + [jekyll](http://jekyll.com.cn/) 的方式。
要使用 GitHub Pages,首先你要注册一个[GitHub](https://github.com/)账号,GitHub 是全球最大的同性交友网站(吐槽下程序员~),你值得拥有。

### 拉取我的博客模板
注册完成后搜索 `flyingwzb.github.io` 进入[我的仓库](https://github.com/flyingwzb/flyingwzb.github.io)

点击右上角的 **Fork** 将我的仓库拉倒你的账号下
稍等一下,点击刷新,你会看到**Fork**了成功的页面
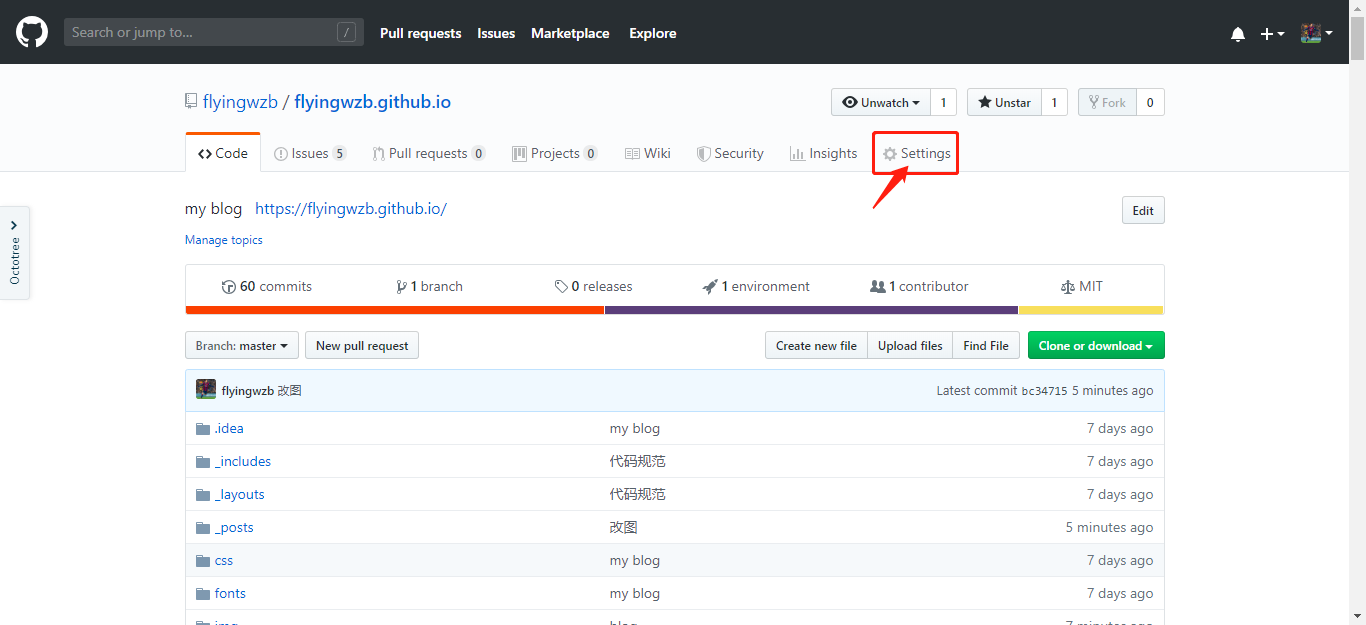
### 修改仓库名
点击**settings**进入设置
<p id = "Rename"></p>
修改仓库名为 `你的Github账号名.github.io`,然后 Rename

这时你在在浏览器中输入 `你的Github账号名.github.io` 例如:`flyingwzb.github.io`
你将会看到如下界面

说明已经成功一半了??。。。当然,还需要修改博客的配置才能变成你的博客。
若是出现

则需要 [检查一下你的仓库名是否正确](#Rename)
### 整个网站结构
修改Blog前我们来看看Jekyll 网站的基础结构,当然我们的网站比这个复杂。
```
├── _config.yml
├── _drafts
| ├── begin-with-the-crazy-ideas.textile
| └── on-simplicity-in-technology.markdown
├── _includes
| ├── footer.html
| └── header.html
├── _layouts
| ├── default.html
| └── post.html
├── _posts
| ├── 1994-10-03-Hello-World.md
| └── 2018-01-01-My-First-Blog.md
├── _data
| └── members.yml
├── _site
├── img
└── index.html
```
很复杂看不懂是不是,不要紧,你只要记住其中几个OK了
- `_config.yml` 全局配置文件
- `_posts` 放置博客文章的文件夹
- `img` 存放图片的文件夹
其他的想继续深究可以[看这里](http://jekyll.com.cn/docs/structure/)
### 修改博客配置
来到你的仓库,找到`_config.yml`文件,这是网站的全局配置文件。
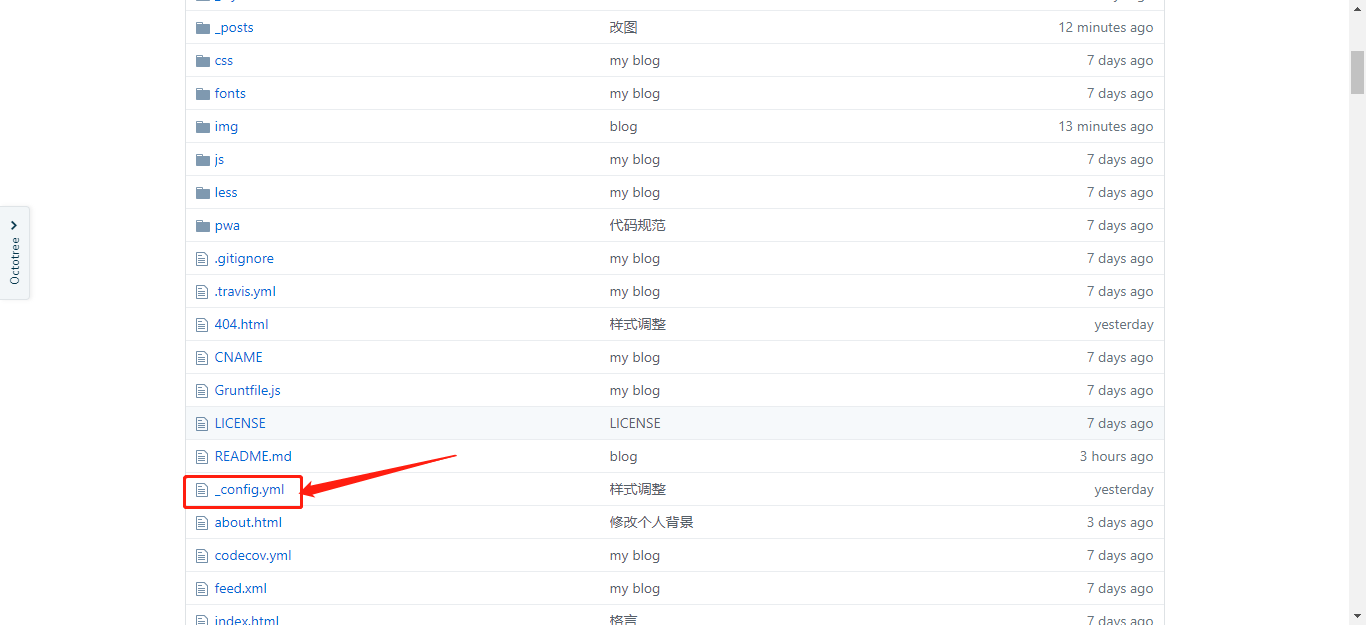
点击修改

然后编辑`_config.yml`的内容

接下来我们来详细说说以下配置文件的内容:
#### 基础设置
```yaml
# Site settings
title: My Blog # 你博客的标题
SEOTitle: 我的博客 | My Blog # 显示在浏览器上搜索的时候显示的标题
header-img: img/post-bg-rwd.jpg # 显示在首页的背景图片
email: You@gmail.com # 个人邮箱
description: "You Blog" # 网站介绍
keyword: "Will Wang, Will Wang Blog, 王志彪的博客, flyingwzb, 王志彪, Java, golang" #关键词
url: "https://flyingwzb.github.io" # 这个就是填写你的博客地址
baseurl: "" # 这个我们不用填写
```
#### 侧边栏
```yaml
# Sidebar settings
sidebar: true # 是否开启侧边栏.
sidebar-about-description: "侧边栏个人描述"
sidebar-avatar:/img/avatar-by.JPG # 你的个人头像
```
#### 社交账号
展示你的其他社交平台

在下面你的社交账号的用户名就可以了,若没有可不用填
```yaml
# SNS settings
RSS: false
weibo_username: username
zhihu_username: username
github_username: username
facebook_username: username
jianshu_username: jianshu_id
```
新加入了**简书**,`jianshu_id` 在你打开你的简书主页后的地址如:`http://www.jianshu.com/u/qwertyuiop`中,后面这一串数字:`qwertyuiop `
#### 评论系统
博客中使用的是 [Disqus](https://disqus.com/) 评论系统,在 [官网](https://disqus.com/) 注册帐号后,按下面的步骤简单的配置即可:
进入 [设置页面](https://disqus.com/home/settings/profile/) 配置个人信息

找到 **Username**

这个 **Username** 就是我们 `_config.yml` 中 `disqus_username`
```
# Disqus settings(https://disqus.com/)
disqus_username: flyingwzb
```
> 很对人反映 Disqus 评论插件加载不出来,因为 Disqus 在国内加载缓慢,所以我新集成了 Gitalk 评论插件(感谢[@FeDemo](https://github.com/FeDemo)的推荐),喜欢折腾的朋友可以看这篇:[《为博客添加 Gitalk 评论插件》](https://flyingwzb.github.io/2018/12/19/%E4%B8%BA%E5%8D%9A%E5%AE%A2%E6%B7%BB%E5%8A%A0-Gitalk-%E8%AF%84%E8%AE%BA%E6%8F%92%E4%BB%B6/)。 我已经在`_config.yml` 配置就好了,只需要填写参数可以了。
#### 网站统计
集成了 [Baidu Analytics](http://tongji.baidu.com/web/welcome/login) 和 [Google Analytics](http://www.google.cn/analytics/),到各个网站注册拿到track_id替换下面的就可以了
这是我的 Google Analytics

**不要使用我的track_id**??。。。
若不想启用统计,直接删除或注释掉就可以了
```
# Analytics settings
# Baidu Analytics
ba_track_id: 83e259f69b37d02a4633a2b7d960139c
# Google Analytics
ga_track_id: 'UA-90855596-1' # Format: UA-xxxxxx-xx
ga_domain: auto
```
#### 好友
```yaml
friends: [
{title: "书舟网",href: "http://kindle.archiew.top/"},
{title: "阮一峰",href: "http://www.ruanyifeng.com/home.html"},
{title: "阿里巴巴",href: "https://www.alibabagroup.com/cn/global/home"},
{title: "腾讯",href: "https://www.tencent.com/zh-cn/index.html"},
{title: "字节跳动",href: "https://www.bytedance.com/zh"}
]
```
#### 保存
讲网页拉倒底部,点击 `Commit changes` 提交保存

再次进入你的主页,

恭喜你,你的个人博客搭建完成了??。
# 写文章
利用 Github网站 ,我们可以不用学习[git](https://git-scm.com/),就可以轻松管理自己的博客
对于轻车熟路的程序猿来说,使用git管理会更加方便。。。
## 创建
文章统一放在网站根目录下的 `_posts` 的文件夹中。

创建一个文件

在下面写文章,和标题,还能实时预览,最后提交保存就能看到自己的新文章了。
## 格式
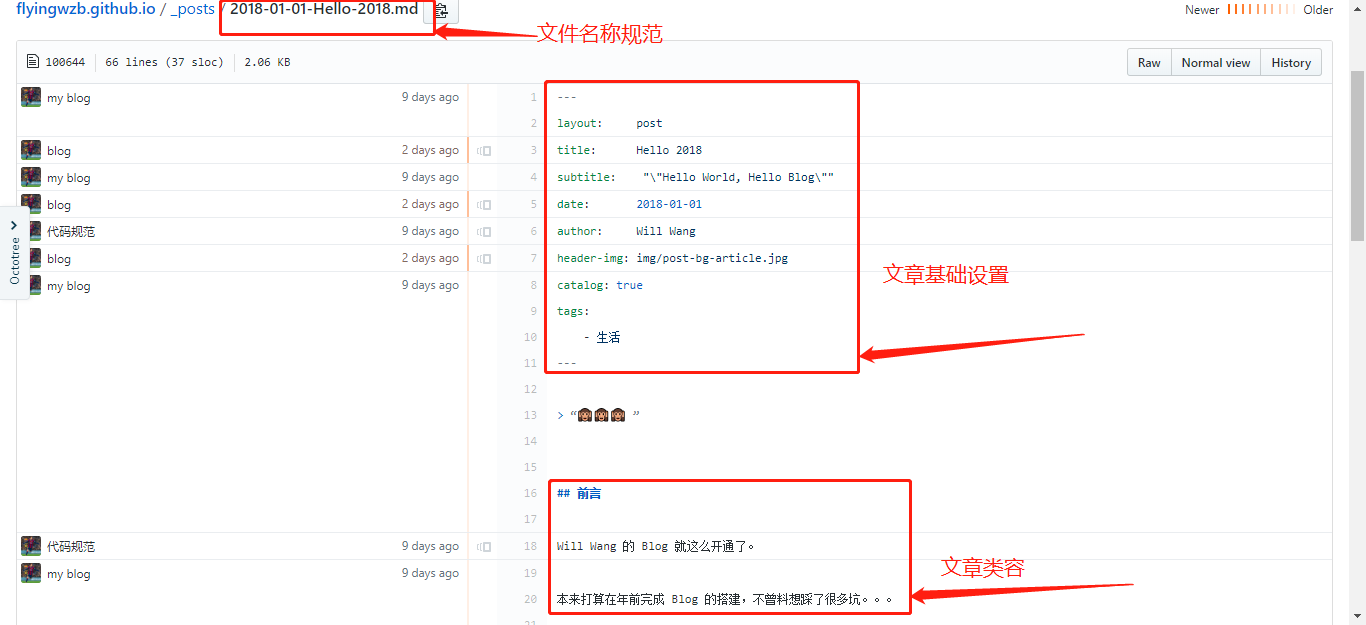
每一篇文章文件命名采用的是`2018-02-04-Hello-2018.md`时间+标题的形式,空格用`-`替换连接。
文件的格式是 `.md` 的 [**MarkDown**](http://sspai.com/25137/) 文件。
我们的博客文章格式采用是 **MarkDown**+ **YAML** 的方式。
[**YAML**](http://www.ruanyifeng.com/blog/2016/07/yaml.html?f=tt) 就是我们配置 `_config`文件用的语言。
[**MarkDown**](http://sspai.com/25137/) 是一种轻量级的「标记语言」,很简单。[花半个小时看一下](http://sspai.com/25137)就能熟练使用了
大概就是这么一个结构。
```
---
layout: post # 使用的布局(不需要改)
title: My First Post # 标题
subtitle: Hello World, Hello Blog # 副标题
date: 2018-02-06 # 时间
author: Will Wang # 作者
header-img: img/post-bg-2015.jpg # 这篇文章标题背景图片
catalog: true # 是否归档
tags: # 标签
- 生活
---
## Hey
>这是我的第一篇博客。
进入你的博客主页,新的文章将会出现在你的主页上.
```
按格式创建文章后,提交保存。进入你的博客主页,新的文章将会出现在你的主页上.

到这里,恭喜你!
你已经成功搭建了自己的个人博客以及学会在博客上撰写文字的技能了(是不是有点小兴奋??)。
#### 首页标签
在首页可以看到这些特色标签,当你的文章出现相同标签(默认相同的**标签数量大于1**),才会自动生成。
所以当你只放一篇文章的时候是不会出现标签的。

建站的初期,博客比较少,若你想直接在首页生成比较多的标签。你可以在 `_congfig.yml`中找到这段:
```
# Featured Tags
featured-tags: true # 是否使用首页标签
featured-condition-size: 1 # 相同标签数量大于这个数,才会出现在首页
```
将其修改为`featured-condition-size: 0`, 这样只有一个标签时也会出现在首页了。
相反,当你博客比较多,标签也很多时,这时你就需要改回 `1` 甚至是 `2` 了。
# 自定义域名
搭建好博客之后 你可能不想直接使用 [flyingwzb.github.io](http://flyingwzb.github.io) 这么长的博客域名吧, 想换成想 [flyingd.cn](https://flyingwzb.github.io) 这样简短的域名。那我们开始吧!
#### 购买域名
首先,你必须购买一个自己的域名。
我是在[阿里云](https://wanwang.aliyun.com/domain/?spm=5176.8006371.1007.dnetcndomain.q1ys4x)购买的域名

用**阿里云** app也可以注册域名,域名的价格根据后缀的不同和域名的长度而分,比如我这个 `flyingd.cn` 的域名第一年才只要4元~
域名尽量选择短一点比较好记住,注意,不能选择中文域名,比如 `张三.top` ,GitHub Pages **无法处理中文域名**,会导致你的域名在你的主页上使用。
注册的步骤就不在介绍了
#### 解析域名
注册好域名后,需要将域名解析到你的博客上
管理控制台 → 域名与网站(万网) → 域名

选择你注册好的域名,点击解析

添加解析
分别添加两个`A` 记录类型,
一个主机记录为 `www`,代表可以解析 `www.flyingd.cn`的域名
另一个为 `@`, 代表 `flyingd.cn`
记录值就是我们博客的IP地址,是 GitHub Pagas 在美国的服务器的地址 `185.199.111.153`

可以通过 [这个网站](http://ip.chinaz.com/) 或者直接在终端输入`ping 你的地址`,查看博客的IP
ping flyingwzb.github.io
细心地你会发现所有人的博客都解析到 `185.199.111.153` 这个IP。
然后 GitHub Pages 再通过 CNAME记录 跳转到你的主页上。
#### 修改CNAME
最后一步,只需要修改 我们github仓库下的 **CNAME** 文件。
选择 **CNAME** 文件
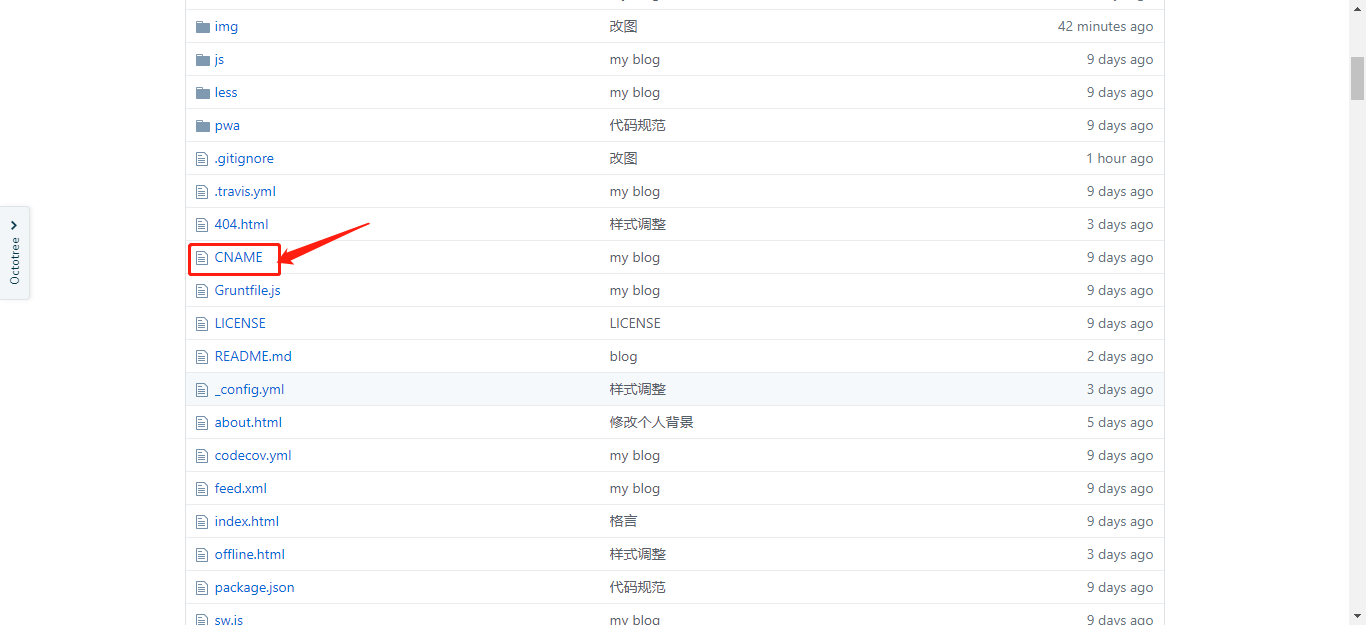
使用的注册的域名进行替换,然后提交保存

这时,输入你自己的域名,就可以解析到你的主页了。
大功告成!
# 进阶
若你对博客模板进行修改,你就要看看 Jekyll 的[开发文档](http://jekyll.com.cn),是中文文档哦,对英语一般的朋友简直是福利啊(比如说我??)。
还要学习 **Git** 和 **GitHub** 的工作机制了及使用。
你可以先看看这个[git教程](http://www.liaoxuefeng.com/wiki/0013739516305929606dd18361248578c67b8067c8c017b000/),对git有个初步的了解后,那么相信你就能将自己图片传到GitHub仓库上,或者可以说掌握了 **使用git管理自己的GitHub仓库** 的技能呢。
对于轻车熟路的程序猿来说,这篇教程就算就结束了,因为下面的内容对于你们来说 so eazy~
但相信很多小白都一脸懵逼,那我们继续??。
# 利用GithHub Desktop管理GitHub仓库
[GithHub Desktop](https://desktop.github.com/) 是 **GithHub** 推出的一款管理GitHub仓库的桌面软件,换句话说就是将你在**Github**上的文件同步到本地电脑上,并将修改后的文件同步到**Github**远程仓库。
#### 下载
点击图片进入下载页面,选择对应的平台进行下载
[](https://desktop.github.com/)
下面以**Mac**平台为例:
#### 安装
将下载好的文件解压,将这只小猫拖到应用程序文件夹中

就可以在**Launchpad**找到这只小猫咪~

#### 登录
点开应用,会弹出**登录**框,

输入你的**GitHub**账号和密码进行登录

登录后关闭窗口

然后返回引导窗,一直按 **Continue** 继续

**Continue**

还是**Continue**~

进入主界面,先 **右键Remve** 删除这个用户指导,贼烦~

#### 克隆仓库
选择你的仓库克隆到本地


#### 管理仓库
现在文件夹中打开

打开后你会的发现文件结构和你在Github上的一模一样~

你最先关心的可能是你的头像~在**img**文件夹中把替换我的头像就好了。

不仅是图片,所有在Github上的的操作都可以进行。
#### 保存修改
当你对仓库文件夹的文件下进行修改、添加或删除时,都可以在 **GitHub Desktop** 中看到
例如我在 `img` 中添加了一张图片 `avatar-demo.png` 添加了一张图片
就可以在看到**GitHub Desktop**显示了我的修改
保存修改只要按 **Commit to master**,然后可以写上你的修改说明

#### 同步
将修改同步到 **GitHub** 远程仓库上只需要一步:点击右上角的**同步按钮**

#### 完成
打开你的GitHub上的仓库,你就可以看到已经和本地同步了
可以看到你提交的详情: `add img`

这样,你已经能轻松管理自己的博客了。
想上传头像,背景,或者是删掉你不要的图片(我的头像??)已经是 so eazy了吧~
#### 注意
你在 **GitHub** 网站上进行 **Commit** 操作后,需要在**GitHub Desktop**上按一下 **同步按键** 才能同步网站上的修改到你的本地。
# 修改个人介绍

修改个人介绍需要修改根目录下的 `about.html` 文件

看不懂 HTML 标签?没关系,对照着修改就好了~ 还有注意这个有中英介绍

# 常见问题
最近有很多人给我提问题,我这边总结一下
#### 配置文件修改后没有效果
刷新几遍浏览器就好了~
不行的话,先清除浏览器缓存再试试。
#### 404错误
1. 检查你的仓库名是否有按照要求填写
2. 确定 **Fork** 的是不是我的仓库~
#### 修改CNAME文件,域名还是不变
清除浏览器缓存就OK~
#### 其他问题
直接在评论中提出来或私信我,我会一一替大家解决的??
# 其他
最近有人往我的远程仓库不停的 **push**,一天连收几十封邮件!例如像这样的

原因大多是直接Clone了我的仓库到本地,**没有删除我的远程仓库地址**,添加完自己的仓库地址后,一口气推送到所有远程仓库(包括我的??)~
打扰了我的工作和生活~
所以,**请不要往我的仓库上推送分支**!
我发现一个问题是,很多人每次修改博客的内容都commit一次到远程仓库,然后再查看修改结果,这样效率非常低!
#### 来,上车!
## 在本地调试博客
> 注:下面的操作是在 **Mac** 终端进行的。
> **Windows** 环境下的配置请参考 [@梦幻之云](http://www.jianshu.com/u/a13e7484dc21) 提供的 [这篇文章](https://agcaiyun.cn/2017/09/10/%E6%90%AD%E5%BB%BA%E4%B8%AA%E4%BA%BA%E5%8D%9A%E5%AE%A2/)。
有心的同学在 [jekyll官网](http://jekyllcn.com/) 就会发现 `jekyll` 的 提供的实例代码。
```
~ $ gem install jekyll bundler
~ $ jekyll new my-awesome-site
~ $ cd my-awesome-site
~/my-awesome-site $ bundle install
~/my-awesome-site $ bundle exec jekyll serve
# => 打开浏览器 http://localhost:4000
```
这段命令创建了一个默认的 `jekll` 网站,然后在本机的 4000 窗口展示。聪明的你应该发现怎么做了吧~
安装 `jekyll`和 `jekyll bundler`
```
$ gem install jekyll
$ gem install jekyll bundler
```
进入你的 **Blog 所在目录**,然后创建本地服务器
```
$ jekyll s
```
然后会显示
```
Auto-regeneration: enabled for '/Users/baiying/Blog'
Configuration file: /Users/baiying/Blog/_config.yml
Server address: http://127.0.0.1:4000/
Server running... press ctrl-c to stop.
```
你就可以在 <http://127.0.0.1:4000/> 看到你的博客,你对本地博客的修改都会在这个地址进行显示,这大大提高了对博客的配置效率。
使用`ctrl+c`就可以停止 **serve**
# Star
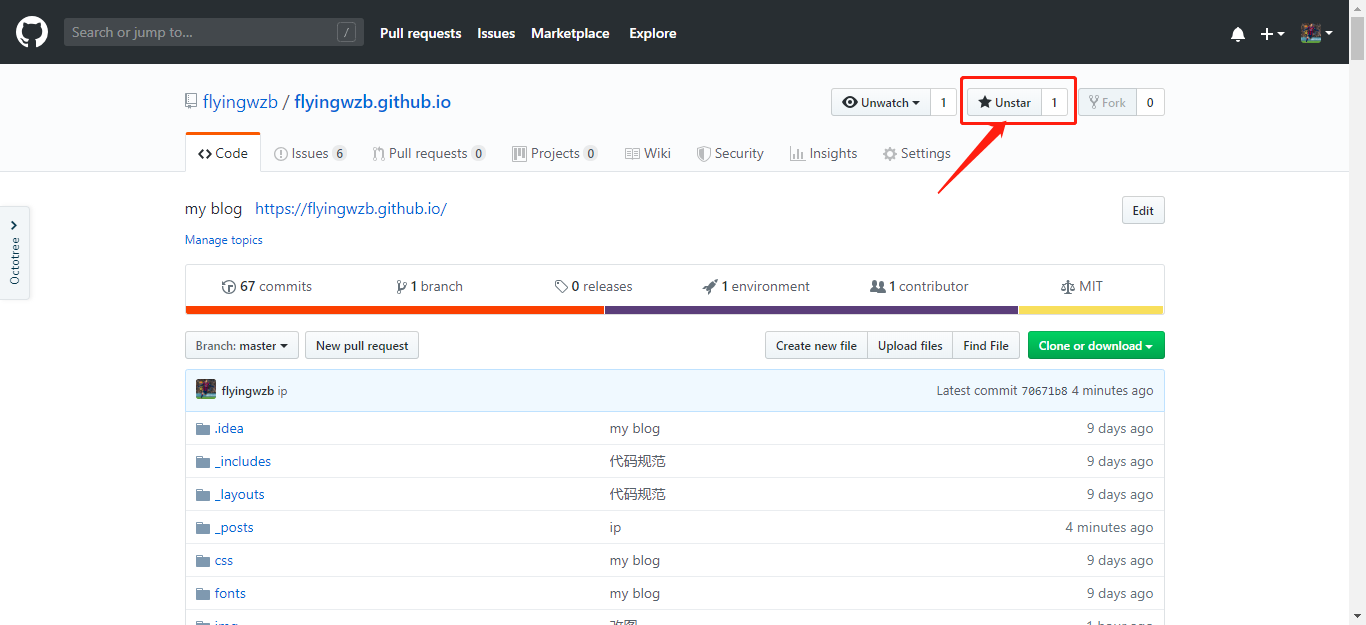
若本教程顺利帮你搭建了自己的个人博客,请不要 **害羞**,给我的 [github仓库](https://github.com/flyingwzb/flyingwzb.github.io) 点个 **star** 吧!
因为最近发现 Fork 将近破百,加上直接 Clone 仓库的,保守估计已经帮助上百人成功的搭建了自己的博客,~~可是 Star 却仅仅只有 **12**!可能还是做的不够好吧!~~现在已经破百了,感谢大家的Star!
### **别无他求,点个 [Star](https://github.com/flyingwzb/flyingwzb.github.io) 吧**!
**心满意足!**
# 补充
#### 修改网站的 **icon**
要修改如图所示的网站 **icon**:
在博客 `img` 目录下找到并替换 `favicon.ico` 这个图标即可,图标尺寸为`32x32`。

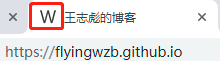
#### 修改主页的座右铭
最近有不少小伙伴私信我:**如何修改主页的座右铭?**
就是这个:

很简单,找到博客目录下的 **index.html** 文件,修改这句话就可以了。

#### 如何在博客文章中上插入图片
博客的文章用的是 MarkDown 格式,如果没用过 MarkDown 真的 强烈推荐 [花半个小时学习一下](http://sspai.com/25137)。
MarkDown 中添加图片的形式是 :``
例如:
``就会显示下面这张图片

`https://ws3.sinaimg.cn/large/006tNc79gy1fj9xhjzobbj30yg0my75z.jpg`就是这张图片的URL,我们可以在浏览器输入这个URL找到或下载这张图片。
所以,要在 MacDown 中插入图片,这张图片就需要上传到图床(网上),然后在引
用这张图片的URL。
##### 将图片上传到图床
Mac 上的图床神器:iPic
直接在App Store上下载,谁用谁知道!
使用方法很简单,直接拖动图片到 P 图标上,或者选中图片按快捷键 `?+U`,就能请示上传。
上传成功就能直接粘贴图片的URL。

用 iPic 上传图片后,获取URL插入文章中就可以了。

#### 推荐几个好用软件
##### MarkDown编辑器
[MacDown](https://macdown.uranusjr.com/):可能是Mac上最好的MacDown编辑器了

##### 图片压缩工具
[ImageOptim](https://imageoptim.com/)
对于我们的博客来说,图片越大,加载速度越慢。
不信你用手机打开你的博客试试~
所以有必要对我们上传到博客网站中的图片:指的是你的头像,首页背景图片,文章背景图片等。对于博客文章中插入的图片,其实也可以压缩了再上传。
对博客中的所有图片进行压缩:
看看压缩结果,最高的一张压缩了78.7%,这简直是太可怕了!

好了,现在个人博客的加载速度估计要起飞了~
# 最后要说个事情
我在博客中的文章,你们可以保留,让更多需要帮助人的看到,当然也可以删除。
但是,我发现居然有人把文章的作者改成了自己,然后当成自己的文章放在自己的博客上,这就令人感到气愤了。
比如说向我请教问题的这位:

我在博客中的每篇文章都是我一字一句敲出来的,转载的文章我也注明了出处,表示对原作者的尊重。同时也希望大家都能尊重我的付出。
谢谢~
