一、QQ邮箱打开POP3/SMTP服务


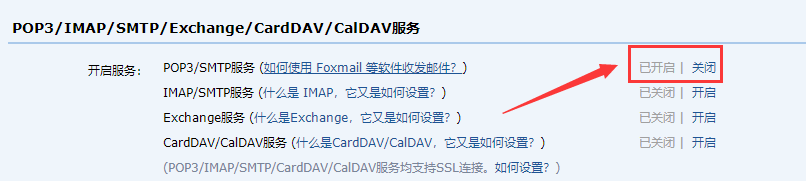
上面的服务开启后,会得到一串授权密码在springboot配置中需要用到
二、springboot配置
IDE目录

1.在pom.xml添加spring-boot-starter-mail起步依赖
- <!-- springboot开发mail项目的起步依赖-->
- <dependency>
- <groupId>org.springframework.boot</groupId>
- <artifactId>spring-boot-starter-mail</artifactId>
- </dependency>
2.在application.properties中配置mail属性
- #静态资源映射,localhost:8080/ == /resources
- spring.resources.static-locations=classpath:META-INF/resources/,classpath:static/,classpath:templates/
-
- #https://blog.csdn.net/jawhiow/article/details/82625842
- #如果原先访问首页的地址是:http://localhost:8888/index.html 那么在你配置这个配置后,http://localhost:8888/default/index.html
- spring.mvc.static-path-pattern=/*
-
- # 设置邮箱主机
- spring.mail.host=smtp.qq.com
- # 设置用户名
- spring.mail.username=xxxxxx@qq.com
- # 设置密码,该处的密码是QQ邮箱开启SMTP的授权码而非QQ密码
- spring.mail.password=xxxxxx
- # 设置是否需要认证,如果为true,那么用户名和密码就必须的,
- # 如果设置false,可以不设置用户名和密码,当然也得看你的对接的平台是否支持无密码进行访问的。
- spring.mail.properties.mail.smtp.auth=true
- # STARTTLS[1] 是对纯文本通信协议的扩展。它提供一种方式将纯文本连接升级为加密连接(TLS或SSL),而不是另外使用一个端口作加密通信。
- spring.mail.properties.mail.smtp.starttls.enable=true
- spring.mail.properties.mail.smtp.starttls.required=true
-
- spring.mail.properties.mail.smtp.ssl.enable=true
- spring.mail.port=465
3.编写controller文件
- @Controller
- public class EmailController {
- @Autowired
- private JavaMailSender javaMailSender;
-
- @RequestMapping("/")
- public void index(HttpServletRequest request, HttpServletResponse response) throws IOException {
- System.out.println("index.html");
- response.sendRedirect("/index.html");
- }
-
- @ResponseBody
- @RequestMapping("/emailSend")
- public String emailSend(@RequestParam(value = "email") String eamil){
- System.out.println(eamil);
- String content = "1234";
- try{
- SimpleMailMessage message = new SimpleMailMessage();
- message.setFrom("xxxxxx@qq.com");
- message.setTo(eamil);
- message.setSubject("主题:主题内容");
- message.setText(content);
- //发送邮件
- javaMailSender.send(message);
- System.out.println(eamil+"发送成功");
- }catch (Exception e){
- return "fail";
- }
- return "success";
- }
- }
4.编写网页页面
- <!DOCTYPE html>
- <html lang="en">
- <head>
- <meta charset="UTF-8">
- <title>邮件</title>
- </head>
- <body>
- <form action="/emailSend">
- 邮箱:<input type="text" name="email" value="xxxxxx@qq.com">
- <input type="submit">
- </form>
- </body>
- </html>
5.发送成功


到此这篇关于springboot 使用QQ邮箱 发送邮件的文章就介绍到这了,更多相关springboot QQ邮箱 发送邮件内容请搜索w3xue以前的文章或继续浏览下面的相关文章希望大家以后多多支持w3xue!
