本人关于thymeleaf的学习源自:
https://www.bilibili.com/video/BV1qy4y117qi
1、thymeleaf的项目搭建
首先创建springboot项目,相关博客有详细的创建教程,下方仅本人推荐示例(视频中也有相关项目创建教程):
IDEA创建项目教程 :https://www.jianshu.com/p/40422d484475
eclipse创建项目教程 :https://blog.csdn.net/qq_35170365/article/details/80688484
项目搭建完成后,配置application.properties,配置如下,端口号只要不和本机当前口号冲突即可,本人用的是8001
- server.port=8001
- spring.thymeleaf.cache=false
创建thymeleaf网页模板,相关代码如下:
- <!DOCTYPE html>
- <html lang="ch" xmlns:th="http://www.thymeleaf.org">
- <head>
- <meta charset="UTF-8">
- <title>Title</title>
- </head>
- <body>
-
- </body>
- </html>
2、第一个程序
项目结构如图:

第一个程序(基本使用),实现前端标题的数据渲染,先上代码:
后台 创建包controller以及类IndexController:
- package com.thym.thymdemo.controller;
- import com.thym.thymdemo.view.User;
- import org.springframework.stereotype.Controller;
- import org.springframework.ui.Model;
- import org.springframework.web.bind.annotation.GetMapping;
- import java.util.ArrayList;
- import java.util.Arrays;
- import java.util.Date;
- /**
- * @author June
- * @date 2021/12/25 15:35
- */
- @Controller
- public class IndexController {
- @GetMapping("/index")
- public String index(Model model){
- model.addAttribute("title","传递的title");
- model.addAttribute("keywords","传递的keywords");
- model.addAttribute("description","传递的description");
- return "index";
- }
- }
前端创建html网页,index.html,代码如下:
- <!DOCTYPE html>
- <html lang="ch" xmlns:th="http://www.thymeleaf.org">
- <head>
- <meta charset="UTF-8">
- <title th:text="|localhost-${title}|">默认的Title</title>
- <meta th:content="${description}" name="description" content="默认的description">
- <meta th:content="${keywords}" name="keywords" content="默认的keywords">
- </head>
- <body>
-
- </body>
- </html>
结果实现如下:

3、常用方法
实现后台数据的前端实现,有关对象与类的数据传递:
后台 创建实体类 User.java,代码如下:
- package com.thym.thymdemo.view;
- import lombok.Data;
- import java.util.Date;
- import java.util.List;
- /**
- * @author June
- * @date 2021/12/25 15:46
- */
- @Data
- public class User {
//其中lombok插件可实现创建get、set方法,所以此处并未创建get、set方法 - private String username;
- private Integer age;
- private Integer sex;
- private Boolean isVip;
- private Date createTime;
- private List<String> tags;
- }
IndexController.java 有关代码修改如下;
- package com.thym.thymdemo.controller;
- import com.thym.thymdemo.view.User;
- import org.springframework.stereotype.Controller;
- import org.springframework.ui.Model;
- import org.springframework.web.bind.annotation.GetMapping;
- import java.util.ArrayList;
- import java.util.Arrays;
- import java.util.Date;
- /**
- * @author June
- * @date 2021/12/25 15:35
- */
- @Controller
- public class IndexController {
- @GetMapping("/index")
- public String index(Model model){
- model.addAttribute("title","传递的title");
- model.addAttribute("keywords","传递的keywords");
- model.addAttribute("description","传递的description");
- return "index";
- }
- @GetMapping("/basic")
- public String basic(Model model){//此处即为javaweb项目中的前后端传值行为
- User user = new User();
- user.setUsername("lookroot");
- user.setAge(32);
- user.setSex(1);
- user.setIsVip(false);
- user.setCreateTime(new Date());
- user.setTags(Arrays.asList("PHP","Java"));
- model.addAttribute("user",user);
- return "basic";
- }
- }
前端创建html页面,basic.html 代码如下;
- <!DOCTYPE html>
- <html lang="ch" xmlns:th="http://www.thymeleaf.org">
- <head>
- <meta charset="UTF-8">
- <title>Title</title>
- </head>
- <body>
- <!--<h2 th:text="${user.username}"></h2>
- <h2 th:text="${user.age}"></h2>
- <h2 th:text="${user.sex}"></h2>
- <h2 th:text="${user.isVip}"></h2>
- <h2 th:if="${user.isVip}">会员</h2>
- <h2 th:text="${user.createTime}"></h2>
- <h2 th:text="${user.tags}"></h2>-->
- <div th:object="${user}">
- <h2 th:text="*{username}"></h2>
- <h2 th:text="*{age}"></h2>
- <h2 th:text="*{sex}"></h2>
- <h2 th:text="*{isVip}"></h2>
- <!--这里运用if标签判断该属性是否为真,如果为真则显示标题内容,如果为否则不显示相关内容-->
- <h2 th:if="*{isVip}">会员</h2>
- <h2 th:text="*{createTime}"></h2>
- <h2 th:text="*{tags}"></h2>
- </div>
- <!--规范话日期格式-->
- <p th:text="${#dates.format(user.createTime,'yyyy-MM-dd HH:mm')}"></p>
- <ul>
- <!--以列表形式显示List集合的各项-->
- <li th:each="tag:${user.tags}" th:text="${tag}"></li>
- </ul>
- <!--选择结构实现数据的前端显示-->
- <div th:switch="${user.sex}">
- <p th:case="1">男</p>
- <p th:case="2">女</p>
- <p th:case="*">默认</p>
- </div>
- <!--replace com1-->
- <div th:replace="~{component::com1}"></div>
- <!--insert com1-->
- <div th:insert="~{component::com1}"></div>
- <!--id com2-->
- <div th:insert="~{component::#com2}"></div>
- <div th:insert="~{component::com3('传递的数据')}"></div>
- <div th:insert="~{component::com4(~{::#message})}">
- <p id="message">替换的模块</p>
- </div>
- </body>
- </html>
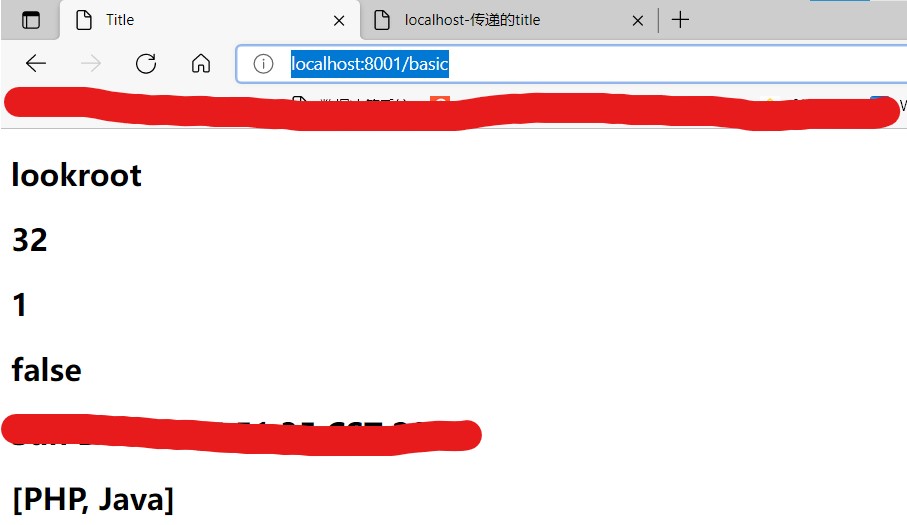
实现结果如下;
4、thymeleaf中JavaScript、css的应用
thymeleaf+css,首先在src\main\resources\static目录下,创建css文件,写入如下代码:
- .app{
- height: 300px;
- width: 300px;
- background-color: blue;
- }
前端basic页面中代码添加如下(由于所引用的css文件在根目录下,所以可以直接引用):
显示效果如下:

在html页面内部直接写入css有关代码
前端添加代码如下:
- <ul>
- <li th:each="tag,stat:${user.tags}" th:text="${tag}"
- th:classappend="${stat.last}?active"></li>
- </ul>
结果显示如下:

5、thymeleaf中组件的使用
创建component.html页面,写入如下代码:
- <!DOCTYPE html>
- <html lang="ch" xmlns:th="http://www.thymeleaf.org">
- <head>
- <meta charset="UTF-8">
- <title>Title</title>
- </head>
- <body>
- <footer th:fragment="com1">
- <!--/*@thymesVar id="user" type="com.thym.thymdemo.view.User"*/-->
- <h2 th:text="${user.username}"></h2>
- com1
- </footer>
- <div id="com2">
- com2
- </div>
- <div th:fragment="com3(message)">
- <p th:text="${message}"></p>
- </div>
- <div th:fragment="com4(message)">
- <p th:replace="${message}"></p>
- </div>
- </body>
- </html>
前端页面basic页面代码修改如下;
- <!DOCTYPE html>
- <html lang="ch" xmlns:th="http://www.thymeleaf.org">
- <head>
- <meta charset="UTF-8">
- <title>Title</title>
- <link rel="stylesheet" th:href="@{app.css}">
- <style>
- .active{
- color: red;
- }
- </style>
- </head>
- <body>
- <!--规范话日期格式-->
- <p th:text="${#dates.format(user.createTime,'yyyy-MM-dd HH:mm')}"></p>
- <ul>
- <!--以列表形式显示List集合的各项-->
- <li th:each="tag:${user.tags}" th:text="${tag}"></li>
- </ul>
- <ul>
- <li th:each="tag,stat:${user.tags}" th:text="${tag}"
- th:classappend="${stat.last}?active"></li>
- </ul>
- <!--replace com1-->
- <div th:replace="~{component::com1}"></div>
- <!--insert com1-->
- <div th:insert="~{component::com1}"></div>
- <!--id com2-->
- <div th:insert="~{component::#com2}"></div>
- <div th:insert="~{component::com3('传递的数据')}"></div>
- <div th:insert="~{component::com4(~{::#message})}">
- <p id="message">替换的模块</p>
- </div>
- </body>
- <script th:inline="javascript">
- const user = /*[[${user}]]*/{}
- console.log(user)
- </script>
- </html>
实现结果如下:

