好家伙,
0.代码已开源
https://github.com/Fattiger4399/ph_questionnaire-.git
1.事件触发
我们先从事件的触发开始讲起
大致上我们有两个思路可以选择
1.监控用户行为
2.监控数据变化
两种选择都会有较难处理的部分,这里我们先选第二个选项
关于监控数据,首先你会想到什么?
没错,watch
- watch: {
- formTemplate: {
- handler: function (oldVal, newVal) {
- if (!this.ischange) {
- // debugger
- console.log(oldVal, newVal)
- }
- },
- deep: true,
- immediate: true,
- }
- },
但是,这会出现一些问题
深度监视
来看看我们数据的样子
如果我们从数据的角度出发观察变化,在拖拽的过程中,
数据由
- {
- "list": [],
- "config": {
- "labelPosition": "top",
- "labelWidth": 80,
- "size": "mini",
- "outputHidden": true,
- "hideRequiredMark": false,
- "syncLabelRequired": false,
- "labelSuffix": "",
- "customStyle": ""
- }
- }
变成了
- {
- "list": [
- {
- "type": "input",
- "options": {
- "defaultValue": "",
- "type": "text",
- "prepend": "",
- "append": "",
- "placeholder": "请输入",
- "maxLength": 0,
- "clearable": false,
- "hidden": false,
- "disabled": false
- },
- "label": "输入框",
- "labelWidth": -1,
- "width": "100%",
- "span": 24,
- "model": "input_17211185804812",
- "key": "input_17211185804812",
- "rules": [
- {
- "required": false,
- "message": "必填项",
- "trigger": [
- "blur"
- ]
- }
- ],
- "dynamicLabel": false
- }
- ],
- "config": {
- "labelPosition": "top",
- "labelWidth": 80,
- "size": "mini",
- "outputHidden": true,
- "hideRequiredMark": false,
- "syncLabelRequired": false,
- "labelSuffix": "",
- "customStyle": ""
- }
- }
由于监控的是一个复杂对象,这会导致watch多次触发
2.防抖
- function debounce(func, wait) {
- let timeout;
- return function () {
- const context = this;
- const args = arguments;
- clearTimeout(timeout);
- timeout = setTimeout(() => {
- func.apply(context, args);
- }, wait);
- };
- }
- watch: {
- formTemplate: {
- handler: debounce(function (oldVal, newVal) {
- if (!this.ischange) {
- this.undoStack.push(deepClone(oldVal))
- }
- }, 300),
- deep: true,
- immediate: true,
- }
- },
3.栈实现撤回
这里我们使用栈去做状态记录的保存
- handleUndo() {
- this.ischange = true
- if (this.undoStack.length > 1) {
- let laststate = this.undoStack[this.undoStack.length - 2]
-
- this.formTemplate = deepClone(laststate)
- let redostate = this.undoStack.pop()
- this.redoStack.push(redostate)
- } else {
- alert("撤回栈已空,无法撤回")
- }
- setTimeout(() => {
- this.ischange = false
- }, 400)
- },
- handleRedo() {
- if (this.redoStack.length > 0) {
- this.formTemplate = this.redoStack.pop()
- } else {
- alert("无法重做")
- }
- },
-
撤销操作:
- 将当前状态保存到重做栈中。
- 从撤销栈中取出最后一个状态,并将其设为当前状态。
- 从撤销栈中移除最后一个状态。
-
重做操作:
- 将当前状态保存到撤销栈中。
- 从重做栈中取出最后一个状态,并将其设为当前状态。
- 从重做栈中移除最后一个状态。
逻辑图
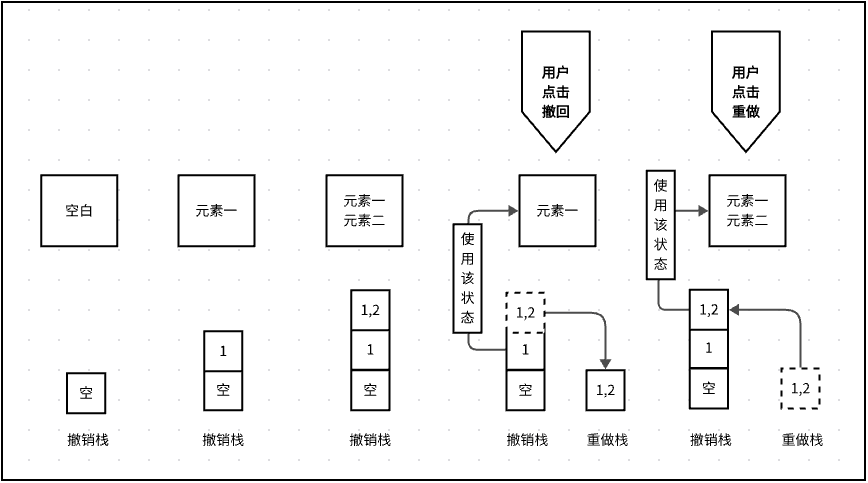
过程解释
-
初始状态:
-
用户进行第一个操作:
- 用户在工作区添加了“元素一”。
- 撤销栈中保存了操作前的状态(空白)。
- 重做栈依然是空的。
-
用户进行第二个操作:
- 用户在工作区添加了“元素二”。
- 撤销栈中保存了操作前的状态(元素一)。
- 撤销栈现在有两个状态(元素一和空白)。
- 重做栈依然是空的。
-
用户点击撤回:
- 撤回上一步操作,恢复到上一个状态(元素一)。
- 撤销栈中移除最后一个状态(元素二),撤销栈现在只有一个状态(空白)。
- 重做栈中保存被撤销的状态(元素二)。
-
用户点击重做:
- 重做上一步撤销的操作,恢复到上一个状态(元素一)。
- 撤销栈中保存恢复前的状态(空白)。
- 重做栈移除最后一个状态(元素一),现在只有一个状态(元素二)。
4.使用命令模式思想封装
最后,我们对代码进行封装
- //命令类
- class Command {
- constructor(execute, undo) {
- this.execute = execute;
- this.undo = undo;
- }
- }
- class UndoCommand extends Command {
- constructor(context) {
- super(
- () => {
- if (context.undoStack.length > 1) {
- let laststate = context.undoStack[context.undoStack.length - 2];
- context.formTemplate = deepClone(laststate);
- let redostate = context.undoStack.pop();
- context.redoStack.push(redostate);
- } else {
- alert("撤回栈已空,无法撤回");
- }
- setTimeout(() => {
- context.ischange = false;
- }, 400);
- },
- () => {
- if (context.redoStack.length > 0) {
- context.formTemplate = context.redoStack.pop();
- } else {
- alert("无法重做");
- }
- }
- );
- }
- }
- class RedoCommand extends Command {
- constructor(context) {
- super(
- () => {
- if (context.redoStack.length > 0) {
- context.formTemplate = context.redoStack.pop();
- } else {
- alert("无法重做");
- }
- },
- () => {
- // 这里可以实现撤销 redo 的逻辑,但我们暂时不需要
- }
- );
- }
- }
- //methods
- //撤销重做
- handleUndo() {
- this.ischange = true;
- const undoCommand = new UndoCommand(this);
- undoCommand.execute();
- },
- handleRedo() {
- const redoCommand = new RedoCommand(this);
- redoCommand.execute();
- },
