1 前言
? Shader Graph 16.0.3 中有 208 个 Node(节点),本文梳理了 Shader Graph 中大部分 Node 的释义,官方介绍详见→Node-Library。
? 选中节点后,右键弹出菜单栏,点击 Open Documentation(或 按 F1 键),浏览器中将跳转到该节点的官方释义网页。

? Shader Graph 通过图像的形式表达了顶点变换和片元着色流程,其背后都是一系列的数学理论支撑着,为更好地理解 Shader Graph 中的 Node,推荐读者学习以下内容。
2 Artistic(美术)
? Artistic 官方介绍详见→Artistic Nodes。
2.1 Adjustment(颜色调整)

? 1)Channel Mixer(通道混合)
? Channel Mixer 节点用于通道混合,根据混合权重对每个通道进行混合,_ChannelMixer_Red、_ChannelMixer_Green、_ChannelMixer_Blue 分别为红色、绿色、蓝色通道的权重向量。
void ChannelMixer(float3 In, float3 _ChannelMixer_Red, float3 _ChannelMixer_Green, float3 _ChannelMixer_Blue, out float3 Out) { Out = float3(dot(In, _ChannelMixer_Red), dot(In, _ChannelMixer_Green), dot(In, _ChannelMixer_Blue));}
? 2)Contrast(调整对比度)
? Contrast 节点用于调整对比度。
void Contrast(float3 In, float Contrast, out float3 Out) { float midpoint = pow(0.5, 2.2); // 约等于0.217638 Out = (In - midpoint) * Contrast + midpoint;}
? 说明:midpoint = pow(0.5, 2.2) 是对 0.5 进行了伽马编码(详见伽马校正),解决亮度异常问题。
? 3)Hue(调整色相)
? Hue 节点用于调整色相,其实现见→Hue Node。
void Hue(float3 In, float Offset, out float3 Out)
? 说明:色相调整有 2 种模式:Degrees、 Normalized。在可视化界面中,色相的调整一般通过色相环实现,offset 就对应色相环中的角度,在 Degrees 模式下,offset 取值范围是 0 ~ 360°,在 Normalized 模式下,offest 取值范围是 0 ~ 1。
? 4)Invert Colors(反转颜色)
? Invert Colors 节点用于反转颜色。
void InvertColors(float4 In, float4 InvertColors, out float4 Out) { Out = abs(InvertColors - In);}
? 5)Replace Color(替换颜色)
? Replace Color 节点用于替换颜色,如果输入颜色与 From 颜色比较接*,就将输入颜色替换为 To 颜色,Range 是输入颜色被替换的边界,Fuzziness 是模糊系数。
void ReplaceColor(float3 In, float3 From, float3 To, float Range, float Fuzziness, out float3 Out) { float Distance = distance(From, In); Out = lerp(To, In, saturate((Distance - Range) / max(Fuzziness, 1e-5))); // 1e-5=0.00001, 避免Fuzziness为0时除数为0}
? 6)Saturation(调整饱和度)
? Saturation 节点用于调整饱和度。
void Saturation(float3 In, float Saturation, out float3 Out) { float luma = dot(In, float3(0.2126729, 0.7151522, 0.0721750)); Out = luma.xxx + Saturation.xxx * (In - luma.xxx);}
? 7)White Balance(调整白*衡)
? White Balance 节点用于调整白*衡,其实现见→White Balance Node,Temperature 用于调整色温,Tint 用于调整色调。
void WhiteBalance(float3 In, float Temperature, float Tint, out float3 Out)
2.2 Blend(颜色混合)
? Blend 节点用于混合两种颜色。

? Mode 取值有:Burn、Darken、Difference、Dodge、Divide、Exclusion、Hard Light、Hard Mix、Lighten、Linear Burn、Linear Dodge、Linear Light、Linear Light Add Sub、Multiply、Negation、Overlay(默认值)、Pin Light、Screen、Soft Light、Subtract、Vivid Light、Overwrite。不同 Mode 对应的混合函数详见→Blend Node。
2.3 Filter(滤波器)
? Filter 里只有一个 Node:Dither,它用于模拟颜色随机振动,它通过一个 4 x 4 的矩阵模拟伪随机振动,这个矩阵的每一行和每一列都呈波浪状(一大一小交错排列)。

void Dither(float4 In, float4 ScreenPosition, out float4 Out) { float2 uv = ScreenPosition.xy * _ScreenParams.xy; float DITHER_THRESHOLDS[16] = { 1.0 / 17.0, 9.0 / 17.0, 3.0 / 17.0, 11.0 / 17.0, 13.0 / 17.0, 5.0 / 17.0, 15.0 / 17.0, 7.0 / 17.0, 4.0 / 17.0, 12.0 / 17.0, 2.0 / 17.0, 10.0 / 17.0, 16.0 / 17.0, 8.0 / 17.0, 14.0 / 17.0, 6.0 / 17.0 }; uint index = (uint(uv.x) % 4) * 4 + uint(uv.y) % 4; Out = In - DITHER_THRESHOLDS[index];}
? 说明:对于 ScreenPosition 的取值,用户可以自己输入,也可以使用 Unity 自带的取值,主要有:Default、Raw、Center、Tiled。
2.4 Mask(遮罩)

? 1)Channel Mask(通道遮罩)
? Channel Mask 节点用于遮罩通道,将被遮罩的通道置为 0,如下是将 RG 通道遮罩的代码逻辑。
void ChannelMask_RedGreen(float4 In, out float4 Out) { Out = float4(0, 0, In.b, In.a);}
? 2)Color Mask(颜色遮罩)
? Color Mask 节点用于颜色遮罩,计算输入颜色与目标颜色的*似程度,比较接*就输出 1,偏移比较大就输出 0。
void ColorMask(float3 In, float3 MaskColor, float Range, float Fuzziness, out float4 Out) { float Distance = distance(MaskColor, In); Out = saturate(1 - (Distance - Range) / max(Fuzziness, 1e-5)); // 1e-5=0.00001, 避免Fuzziness为0时除数为0}
2.5 Normal(法线)

? 1)Normal Blend(法线混合)
? Normal Blend 有 2 种模式:Default、Reoriented。
void NormalBlend(float3 A, float3 B, out float3 Out) { // Default模式 Out = normalize(float3(A.rg + B.rg, A.b * B.b));}void NormalBlend_Reoriented(float3 A, float3 B, out float3 Out) { // Reoriented模式 float3 t = A.xyz + float3(0.0, 0.0, 1.0); float3 u = B.xyz * float3(-1.0, -1.0, 1.0); Out = (t / t.z) * dot(t, u) - u;}
? 2)Normal From Height(由高度值转换为法线纹理)
? Normal From Height 节点用于将输入的高度值转换到法线纹理中。Output Space(输出空间)有:Tangent(切线空间)、World(世界空间)。源码详见→Normal From Height Node,它通过对 Position、In 求 ddx 和 ddy 等运算得到法线值。
void NormalFromHeight(float In, out float3 Out)
? 3)Normal From Texture(由高度纹理转换为法线纹理)
? Normal From Texture 节点用于将高度纹理转换为法线纹理。Offset 为高度采样 uv 偏移量,Strength 用于调整法线强度(物体表面凹凸程度)。
void NormalFromTexture(Texture texture, SamplerState Sampler, float2 UV, float Offset, float Strength, out float3 Out) { Offset = pow(Offset, 3) * 0.1; float2 offsetU = float2(UV.x + Offset, UV.y); float2 offsetV = float2(UV.x, UV.y + Offset); float normalSample = Texture.Sample(Sampler, UV); float uSample = Texture.Sample(Sampler, offsetU); float vSample = Texture.Sample(Sampler, offsetV); float3 va = float3(1, 0, (uSample - normalSample) * Strength); // 切线(高度图1m一个像素) float3 vb = float3(0, 1, (vSample - normalSample) * Strength); // 切线(高度图1m一个像素) Out = normalize(cross(va, vb)); // 通过2条切线向量叉乘得到法线向量}
? 4)Normal Reconstract Z(法线重构)
? Normal Reconstract Z 节点用于重构法线向量,原来的 z 分量被抛弃,由 x、y 分量推导出,再对法线向量进行归一化。
void NormalReconstructZ(float2 In, out float3 Out) { float reconstructZ = sqrt(1.0 - saturate(dot(In.xy, In.xy))); float3 normalVector = float3(In.x, In.y, reconstructZ); Out = normalize(normalVector);}
? 5)Normal Strength(调整物体表面凹凸程度)
? Normal Strength 节点用于调整法线强度(物体表面凹凸程度,案例见→法线贴图和凹凸映射)。注意,调整法线向量后需要归一化法线向量。
void NormalStrength(float3 In, float Strength, out float3 Out) { Out = {precision}3(In.rg * Strength, lerp(1, In.b, saturate(Strength)));}
? 说明:"{precision}3" 是一个类似于构造函数的语法,用于构建一个包含 3 个分量的向量。
? 6)Normal Unpack(由法线纹理解码法线向量)
? Normal Unpack 节点用于从法线纹理中解码法线向量。Output Space(输出空间)有:Tangent(切线空间)、Object(模型空间)。
void NormalUnpack(float4 In, out float3 Out) { //Tangent Out = UnpackNormalmapRGorAG(In);}void NormalUnpackRGB(float4 In, out float3 Out) { // Object Out = UnpackNormalmapRGB(In);}
2.6 Utility(实用工具)
? Utility 中只有 Colorspace Conversion 节点,用于进行 RGB、Linear、HSV 颜色空间之间的相互转换,源码详见→Colorspace Conversion Node。

3 Channel(通道)
? Channel 官方介绍详见→Channel Nodes。

? 1)Combine(合并通道)
? Combine 节点用于合并通道。
void Combine(float R, float G, float B, float A, out float4 RGBA, out float3 RGB, out float2 RG) { RGBA = float4(R, G, B, A); RGB = float3(R, G, B); RG = float2(R, G);}
? 2)Flip(翻转通道)
? Flip 节点用于翻转通道,即相应通道数值取反,Flip 取值为 0(未激活)或 1(激活)。
void Flip(float4 In, float4 Flip, out float4 Out) { Out = (Flip * -2 + 1) * In;}
? 3)Split(分离通道)
? Split 节点用于分离通道,以下是输入为 2 维的情况,如果输入维数低于输出维数,高维通道补零输出。
void Split(float2 In, out float R, out float G, out float B, out float A) { R = In[0]; G = In[1]; B = 0; A = 0;}
? 4)Swizzle(交换通道)
? Swizzle 节点用于交换通道,根据 Mask 中通道的顺序重组通道。如下是其中一种交换方式。
float4 _Swizzle_Out = In.xzyw;
? Input 官方介绍详见→Input Nodes。
4.1 Basic(基础变量)
? Basic 中是一些基础的变量节点,如:Boolean、Constant、Float、Integer、Slider、Time、Color、Vector2、Vector3、Vector4。

4.2 Geometry(顶点几何属性)
? Geometry 中提供了访问顶点或片元几何属性的节点,如:Position、Screen Position、UV、Vertex Color、Tangent Vector、Bitangent Vector、Normal Vector、View Direction、View Vector。

- Position:顶点或片元的坐标,Space 取值有:Object(模型空间)、World(世界空间)、View(观察空间)、Tangent(切线空间)、Absolute World(绝对世界空间)。对于所有可编程渲染管线,Absolute World 选项始终返回对象在场景中的绝对世界位置,World 选项返回所选的可编程渲染管线的默认世界空间。HDRP(高清渲染管线)使用 Camera Relative 作为默认世界空间,URP(通用渲染管线)使用 Absolute World 作为默认世界空间。
- Screen Position:顶点或片元的屏幕坐标,Mode 取值有:Default、Raw、Center、Tiled。
- UV:顶点或片元的 UV 坐标。
- Vertex Color:顶点或片元的颜色。
- Tangent Vector:顶点或片元的切线向量,Space 取值有:Object(模型空间)、World(世界空间)、View(观察空间)、Tangent(切线空间)。
- Bitangent Vector:顶点或片元的副切线向量,Space 取值有:Object(模型空间)、World(世界空间)、View(观察空间)、Tangent(切线空间)。
- Normal Vector:顶点或片元的法线向量,Space 取值有:Object(模型空间)、World(世界空间)、View(观察空间)、Tangent(切线空间)。
- View Direction:顶点或片元的观察向量(顶点指向相机,已归一化),Space 取值有:Object(模型空间)、World(世界空间)、View(观察空间)、Tangent(切线空间)。
- View Vector:顶点或片元的观察向量(顶点指向相机,未归一化),Space 取值有:Object(模型空间)、World(世界空间)、View(观察空间)、Tangent(切线空间)。
? Screen Position 不同模式下的实现如下。
// Default, 归一化的设备坐标(NDC), x、y值域: [0, 1], 可以用于颜色缓冲区(Scene Color)的uv坐标float4 Out = float4(IN.NDCPosition.xy, 0, 0);// Raw, 屏幕坐标, x值域: [0, w], y值域: [0, w]float4 Out = IN.ScreenPosition;// Center, 标准化的设备坐标, x、y值域: [-1, 1]float4 Out = float4(IN.NDCPosition.xy * 2 - 1, 0, 0);// Tiled, x值域: [-screenWidth/screenHeight, screenWidth/screenHeight], y值域: [-1, 1]float4 Out = frac(float4((IN.NDCPosition.x * 2 - 1) * _ScreenParams.x / _ScreenParams.y, IN.{0}.y * 2 - 1, 0, 0));// Pixel, 像素坐标, x值域: [0, screenWidth], y值域: [0, screenHeight]float4 Out = float4(IN.PixelPosition.xy, 0, 0);
4.3 Gradient(渐变颜色)
? Blackbody、Gradient、Sample Gradient 节点都是用于生成渐变颜色。

? 1) Blackbody(黑体辐射渐变采样)
? Blackbody 节点通过模拟黑体辐射渐变采样得到渐变颜色,其实现见→Blackbody Node,它基于 Mitchell Charity 收集的数据,输出线性 RGB 空间的颜色,并使用一个 D65 白点和一个 CIE 1964 10 度的颜色空间执行转换,Temperature 为采样的温度或温度贴图(以开尔文为单位)。
void Blackbody(float Temperature, out float3 Out)
? 2)Gradient(生成渐变对象)
? Gradient 节点用于生成 Gradient 渐变对象,它通过 2 个 Color 和 2 个 Alpha 参数计算得到,实现见→Gradient Node。

? 3)Sample Gradient(渐变采样)
? Sample Gradient 节点用于对 Gradient 进行渐变采样,其实现见→Sample Gradient Node,Time 为采样渐变的时间点 (0.0–1.0)。
void SampleGradient(float4 Gradient, float Time, out float4 Out)
4.4 Lighting(光照)

? 1)Ambient(环境光)
? Ambient 节点用于获取环境光颜色。
float3 _Ambient_ColorSky = SHADERGRAPH_AMBIENT_SKY;float3 _Ambient_Equator = SHADERGRAPH_AMBIENT_EQUATOR;float3 _Ambient_Ground = SHADERGRAPH_AMBIENT_GROUND;
? 2)Baked GI(烘焙的全局光照)
? Baked GI 节点用于获取烘焙的全局光照颜色,Position 为顶点坐标(世界空间),Normal 为顶点法线(世界空间)、StaticUV 为静态 lightmap 的纹理坐标、DynamicUV 为动态 lightmap 的纹理坐标。
void BakedGI(float3 Position, float3 Normal, float2 StaticUV, float2 DynamicUV, out float Out) { Out = SHADERGRAPH_BAKED_GI(Position, Normal, StaticUV, DynamicUV, false);}
? 3)Reflection Probe(反射探针)
? Reflection Probe 节点用于获取反射探针颜色。ViewDire 为顶点的坐标(模型空间),Normal 为顶点的法线向量(模型空间)。
void ReflectionProbe(float3 ViewDir, float3 Normal, float LOD, out float3 Out) { Out = SHADERGRAPH_REFLECTION_PROBE(ViewDir, Normal, LOD);}
? 4)Main Light Direction
? Main Light Direction 节点用于获取顶点指向光源的单位方向向量(世界空间)。Shader Graph 13.1.9(2022.1+)版本才开始出现 Main Light Direction 节点。如果用户的 Shader Graph 版本较低,可以通过 8.2 节中 Custom Function 节点创建自定义函数,获取灯光方向。
4.5 Matrix(矩阵)
? Matrix 中包含 Matrix 2x2、Matrix 3x3、Matrix 4x4、Transformation Matrix 节点。

? Transformation Matrix 节点可以获取到 Model、Inverse Model、View、Inverse View、Projection、Inverse Projection、View Projection、Inverse View Projection 矩阵,实现如下。
// Model, [模型空间->世界空间]的变换矩阵Mfloat4x4 _TransformationMatrix_Out = UNITY_MATRIX_M;// InverseModel, [世界空间->模型空间]的变换矩阵I_Mfloat4x4 _TransformationMatrix_Out = UNITY_MATRIX_I_M;// View, [世界空间->观察空间]的变换矩阵Vfloat4x4 _TransformationMatrix_Out = UNITY_MATRIX_V;// InverseView, [观察空间->世界空间]的变换矩阵I_Vfloat4x4 _TransformationMatrix_Out = UNITY_MATRIX_I_V;// Projection, [观察空间->裁剪空间]的变换矩阵Pfloat4x4 _TransformationMatrix_Out = UNITY_MATRIX_P;// InverseProjection, [裁剪空间->观察空间]的变换矩阵I_Pfloat4x4 _TransformationMatrix_Out = UNITY_MATRIX_I_P;// ViewProjection, [世界空间->裁剪空间]的变换矩阵VPfloat4x4 _TransformationMatrix_Out = UNITY_MATRIX_VP;// InverseViewProjection, [裁剪空间->世界空间]的变换矩阵I_VPfloat4x4 _TransformationMatrix_Out = UNITY_MATRIX_I_VP;
4.6 Scene(场景参数)

? 1)Camera(相机参数)
? Camera 节点用于获取相机的以下属性。
- Position:相机的坐标(世界空间),代码:_WorldSpaceCameraPos。
- Direction:相机的 forward 向量。
- Orthographic:如果摄像机是正交摄像机,则返回 1,否则返回 0,代码:unity_OrthoParams.w。
- Near Plane:*裁剪*面到相机的距离,代码:_ProjectionParams.y。
- Far Plane:远裁剪*面到相机的距离,代码:_ProjectionParams.z。
- Z Buffer Sign:使用反转的 Z 缓冲区时返回 -1,否则返回 1,代码:_ProjectionParams.x。
- Width:摄像机的宽度(如果是正交摄像机),unity_OrthoParams.x。
- Height:摄像机的高度(如果是正交摄像机),unity_OrthoParams.y。
? 2)Fog(雾效参数)
? Fog 节点用于获取 Color(雾效颜色)和 Density(裁剪空间深度处的雾效强度)。
void Fog(float3 Position, out float4 Color, out float Density) { SHADERGRAPH_FOG(Position, Color, Density);}
? 3)Object(对象参数)
? Object 节点用于获取当前渲染对象在世界空间中的位置缩放。
float3 _Object_Position = SHADERGRAPH_OBJECT_POSITION;float3 _Object_Scale = float3( length(float3(UNITY_MATRIX_M[0].x, UNITY_MATRIX_M[1].x, UNITY_MATRIX_M[2].x)), length(float3(UNITY_MATRIX_M[0].y, UNITY_MATRIX_M[1].y, UNITY_MATRIX_M[2].y)), length(float3(UNITY_MATRIX_M[0].z, UNITY_MATRIX_M[1].z, UNITY_MATRIX_M[2].z)));
? 4)Scene Color(场景颜色)
? Scene Color 节点用于获取 UV 处的颜色缓冲区的颜色值,uv 坐标可以通过 Screen Position 节点(Default 模式)获取。
void SceneColor(float4 UV, out float3 Out) { Out = SHADERGRAPH_SAMPLE_SCENE_COLOR(UV);}
? 说明:Scene Color 节点仅支持 URP 和 HDRP 管线,对于 Built-in 管线,节点返回 0;在URP 中,此节点返回 Camera Opaque Texture 的值,此纹理的内容仅适用于透明对象;将主节点的 Surface Type 属性设置为 Transparent 可以从此节点接收正确的值。
? 5)Scene Depth(场景深度)
? Scene Depth 节点用于获取 UV 处的深度缓冲区的深度值。
void SceneDepth_Raw(float4 UV, out float Out) { Out = SHADERGRAPH_SAMPLE_SCENE_DEPTH(UV);}
? 6)Screen(屏幕参数)
? Screen 节点用于获取屏幕的宽度和高度参数。
float _Screen_Width = _ScreenParams.x;float _Screen_Height = _ScreenParams.y;
4.7 Texture(纹理)

? 1)Texture 2D Asset 和 Cubemap Asset
? Texture 2D Asset 节点用于导入 Texture 2D 资源,Cubemap Asset 节点用于导入 Cubemap 资源。
? 2)Sample Texture 2D 和 Sample Cubemap
? Sample Texture 2D 节点用于对 Texture 2D 进行采样,Sample Cubemap 节点用于对 Cubemap 进行采样。
? 3)Texel Size(Texture 2D 的宽高)
? Texel Size 节点用于获取 Texture 2D 的宽度和高度。
float _TexelSize_Width = Texture_TexelSize.z;float _TexelSize_Height = Texture_TexelSize.w;
? 4)Split Texture Transform(Texture 2D 的缩放和偏移)
? Split Texture Transform 节点用于 Texture 2D 的 Tiling(缩放)和 Offset(偏移)属性。
? 5)Sampler State(采样器的状态配置)
? Sampler State 节点用于配置采样器的状态。Filter 定义了采样的滤波模式,选项有:Linear、Point、Trilinear;Wrap 定义了采样的包裹模式,选项有:Repeat、Clamp、Mirror、MirrorOnce。
5 Math(数学)
? Math 官方介绍详见→Math Nodes,其中引用 Shader 中的函数释义详见→Shader常量、变量、结构体、函数。
5.1 Basic(基础运算)
// 加法, Out=A+Bvoid Add(float4 A, float4 B, out float4 Out)// 减法, Out=A-Bvoid Subtract(float4 A, float4 B, out float4 Out)// 乘法void Multiply(float4 A, float4 B, out float4 Out) // Out=A*Bvoid Multiply(float4 A, float4x4 B, out float4 Out) // Out=mul(A,B)void Multiply(float4x4 A, float4x4 B, out float4x4 Out) // Out=mul(A,B)// 除法, Out=A/Bvoid Divide(float4 A, float4 B, out float4 Out)// 幂运算, Out=pow(A,B)void Power(float4 A, float4 B, out float4 Out)// *方根, Out=sqrt(In)void SquareRoot(float4 In, out float4 Out)
5.2 Advanced(高级运算)
// 绝对值, Out=abs(In)void Absolute(float4 In, out float4 Out)// 取反, Out=-1*Invoid Negate(float4 In, out float4 Out)// 倒数void Reciprocal(float4 In, out float4 Out) // Out=1.0/Invoid Reciprocal_Fast(float4 In, out float4 Out) // Out=rcp(In)// 取余, Out=fmod(A,B)void Modulo(float4 A, float4 B, out float4 Out)// 指数void Exponential(float4 In, out float4 Out) // Out=exp(In)void Exponential2(float4 In, out float4 Out) // Out=exp2(In)// 对数void Log(float4 In, out float4 Out) // Out=log(In)void Log2(float4 In, out float4 Out) // Out=log2(In)void Log10(float4 In, out float4 Out) // Out=log10(In)// 反*方根void ReciprocalSquareRoot(float4 In, out float4 Out) // Out=rsqrt(In)// 模长, Out=length(In)void Length(float4 In, out float Out)// 归一化void Normalize(float4 In, out float4 Out) // Out=normalize(In)// 多色调分色显示, Out=floor(In/(1/Steps))*(1/Steps)void Posterize(float4 In, float4 Steps, out float4 Out)
5.3 Trigonometry(三角函数运算)
// 角度转弧度, Out=radians(In)void DegreesToRadians(float4 In, out float4 Out)// 弧度转角度, Out=degrees(In)void RadiansToDegrees(float4 In, out float4 Out)// 正弦, Out=sin(In)void Sine(float4 In, out float4 Out)// 余弦, Out=cos(In)void Cosine(float4 In, out float4 Out)// 正切, Out=tan(In)void Tangent(float4 In, out float4 Out)// 反正弦, Out=asin(In)void Arcsine(float4 In, out float4 Out)// 反余弦, Out=acos(In)void Arccosine(float4 In, out float4 Out)// 反正切void Arctangent(float4 In, out float4 Out) // Out=atan(In)void Arctangent2(float4 A, float4 B, out float4 Out) // Out=atan2(A,B)// 双曲正弦, Out=sinh(In)void HyperbolicSine(float4 In, out float4 Out)// 双曲余弦, Out=cosh(In)void HyperbolicCosine(float4 In, out float4 Out)// 双曲正切, Out=tanh(In)void HyperbolicTangent(float4 In, out float4 Out)
5.4 Range(范围运算)
// 最大值, Out=max(A,B)void Maximum(float4 A, float4 B, out float4 Out)// 最小值, Out=min(A,B)void Minimum(float4 A, float4 B, out float4 Out)// 限界, Out=clamp(In,Min,Max)void Clamp(float4 In, float4 Min, float4 Max, out float4 Out)// 0-1限界, Out=saturate(In)void Saturate(float4 In, out float4 Out)// 取小数部分, Out=frac(In)void Fraction(float4 In, out float4 Out)// 1减, Out=1-Invoid OneMinus(float4 In, out float4 Out)// 重映射, Out=OutMinMax.x+(In-InMinMax.x)*(OutMinMax.y-OutMinMax.x)/(InMinMax.y-InMinMax.x)void Remap(float4 In, float2 InMinMax, float2 OutMinMax, out float4 Out)// 伪随机数生成器void RandomRange(float2 Seed, float Min, float Max, out float Out) { float randomno = frac(sin(dot(Seed, float2(12.9898, 78.233)))*43758.5453); Out = lerp(Min, Max, randomno);}

5.5 Round(取整运算)
// 正负符合, Out=sign(In)void Sign(float4 In, out float4 Out)// 取整数部分, Out=trunc(In)void Truncate(float4 In, out float4 Out)// 向上取整, Out=ceil(In)void Ceiling(float4 In, out float4 Out)// 向下取整, Out=floor(In)void Floor(float4 In, out float4 Out)// 四舍五入取整, Out=round(In)void Round(float4 In, out float4 Out)// 边界判断, Out=step(Edge,In), 即: In>=Edge时, 返回1, 否则返回0void Step(float4 Edge, float4 In, out float4 Out)
5.6 Interpolation(插值运算)
// 插值, Out=lerp(A,B,T), 即: Out=(1-T)*A+T*Bvoid Lerp(float4 A, float4 B, float4 T, out float4 Out)// 反插值, Out=(T-A)/(B-A)void InverseLerp(float4 A, float4 B, float4 T, out float4 Out)// *滑插值, Out=smoothstep(Edge1,Edge2,In), 即: k=saturate((In-Edge1)/(Edge2-Edge1)), Out=k*k*(3-2*k)void Smoothstep(float4 Edge1, float4 Edge2, float4 In, out float4 Out)
5.7 Vector(向量运算)
// 两点间距离, Out=distance(A,B)void Distance(float4 A, float4 B, out float Out)// 向量点乘, Out=dot(A,B)void DotProduct(float4 A, float4 B, out float Out)// 向量叉乘, Out=cross(A,B)void CrossProduct(float3 A, float3 B, out float3 Out)// 向量投影, Out=B*dot(A,B)/dot(B, B)void Projection(float4 A, float4 B, out float4 Out)// 向量反射, Out=reflect(In,Normal), In和Normal不需要归一化void Reflection(float4 In, float4 Normal, out float4 Out)// 菲涅尔效应, Out=pow((1.0-saturate(dot(normalize(Normal),normalize(ViewDir)))),Power)void FresnelEffect(float3 Normal, float3 ViewDir, float Power, out float Out)// 绕轴旋转void RotateAboutAxis(float3 In, float3 Axis, float Rotation, out float3 Out)// 球形遮罩, Out =1-saturate((distance(Coords,Center)-Radius)/(1-Hardness)), 即: 球内返回1, 求外返回零void SphereMask(float4 Coords, float4 Center, float Radius, float Hardness, out float4 Out)// 坐标或向量空间变换, 可以进行Object、World、View、Tangent、Absolute World空间之间变换void Transform(float4 In, out float4 Out)

5.8 Matrix(矩阵运算)

// 构建矩阵void MatrixConstruction(float4 M0, float4 M1, float4 M2, float3 M3, out float4x4 Out4x4, out float3x3 Out3x3, out float2x2 Out2x2)// 计算矩阵的秩, Out=determinant(In)void MatrixDeterminant(float4x4 In, out float Out)// 分离矩阵的行向量或列向量void MatrixSplit(float4x4 In, out float4 M0, out float4 M1, out float4 M2, out float4 M3)// 矩阵转置, Out=transpose(In)void MatrixTranspose(float4x4 In, out float4x4 Out)
5.9 Derivative(导数运算)
// Out=ddx(In)void DDX(float4 In, out float4 Out)// Out=ddxy(In)void DDXY(float4 In, out float4 Out)// Out=ddy(In)void DDY(float4 In, out float4 Out)
5.10 Wave(波运算)

// 锯齿波, Out=2*(In-floor(0.5 + In))void SawtoothWave(float4 In, out float4 Out)// 方波, Out=1.0-2.0*round(frac(In))void SquareWave(float4 In, out float4 Out)// 三角波, Out=2.0*abs(2*(In-floor(0.5+In)))-1.0void TriangleWave(float4 In, out float4 Out)// 带噪声的正弦波void NoiseSineWave(float4 In, float2 MinMax, out float4 Out) { float sinIn = sin(In); float sinInOffset = sin(In + 1.0); float randomno = frac(sin((sinIn - sinInOffset) * (12.9898 + 78.233))*43758.5453); float noise = lerp(MinMax.x, MinMax.y, randomno); Out = sinIn + noise;}
6 Procedural(程序纹理)
? Procedural 官方介绍详见→Procedural Nodes。
6.1 Checkerboard(棋盘纹理)
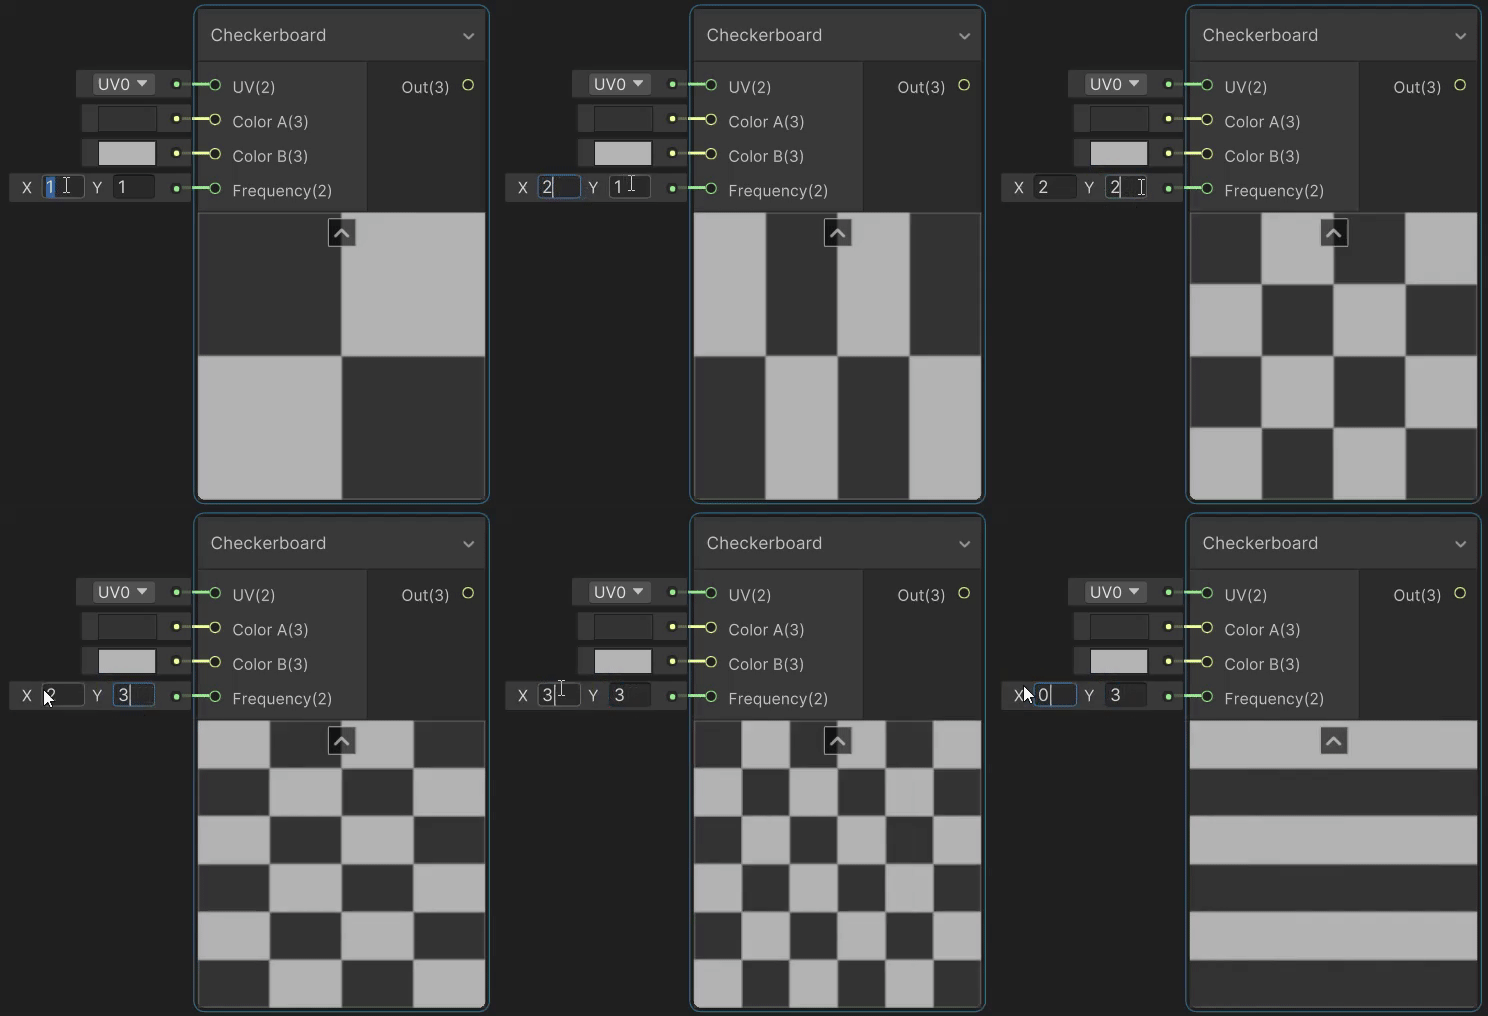
? Checkerboard 节点用于用于绘制棋盘纹理,实现见→Checkerboard Node。

6.2 Noise(噪声纹理)
? Noise 下面有 Gradient Noise(梯度噪声)、Simple Noise(简单噪声)、Voronoi(泰森多边形)。噪声纹理应用:选中物体消融特效、消融特效、流动雾效。

6.3 Shapes(形状纹理)
? Shapes 下面有 Ellipse(椭圆)、Polygon(多边形)、Rectangle(矩形)、Rounded Polygon(圆角多边形)、Rounded Rectangle(圆角矩形)。

7 UV(UV 变换)
? UV 官方介绍详见→UV Nodes。
? 1)Flipbook(翻书 uv 变换)
? Flipbook 节点用于做翻书动画,实现见→Flipbook Node,Width 和 Height 分别为水*和垂直区块的数量,Tile 为当前区块索引。

? 2)Polar Coordinates(极坐标 uv 变换)
? Polar Coordinates 节点用于将直角坐标系下的 uv 坐标转换为极坐标系下的坐标,实现见→Polar Coordinates。

? 3)Radial Shear(径向剪切 uv 变换)
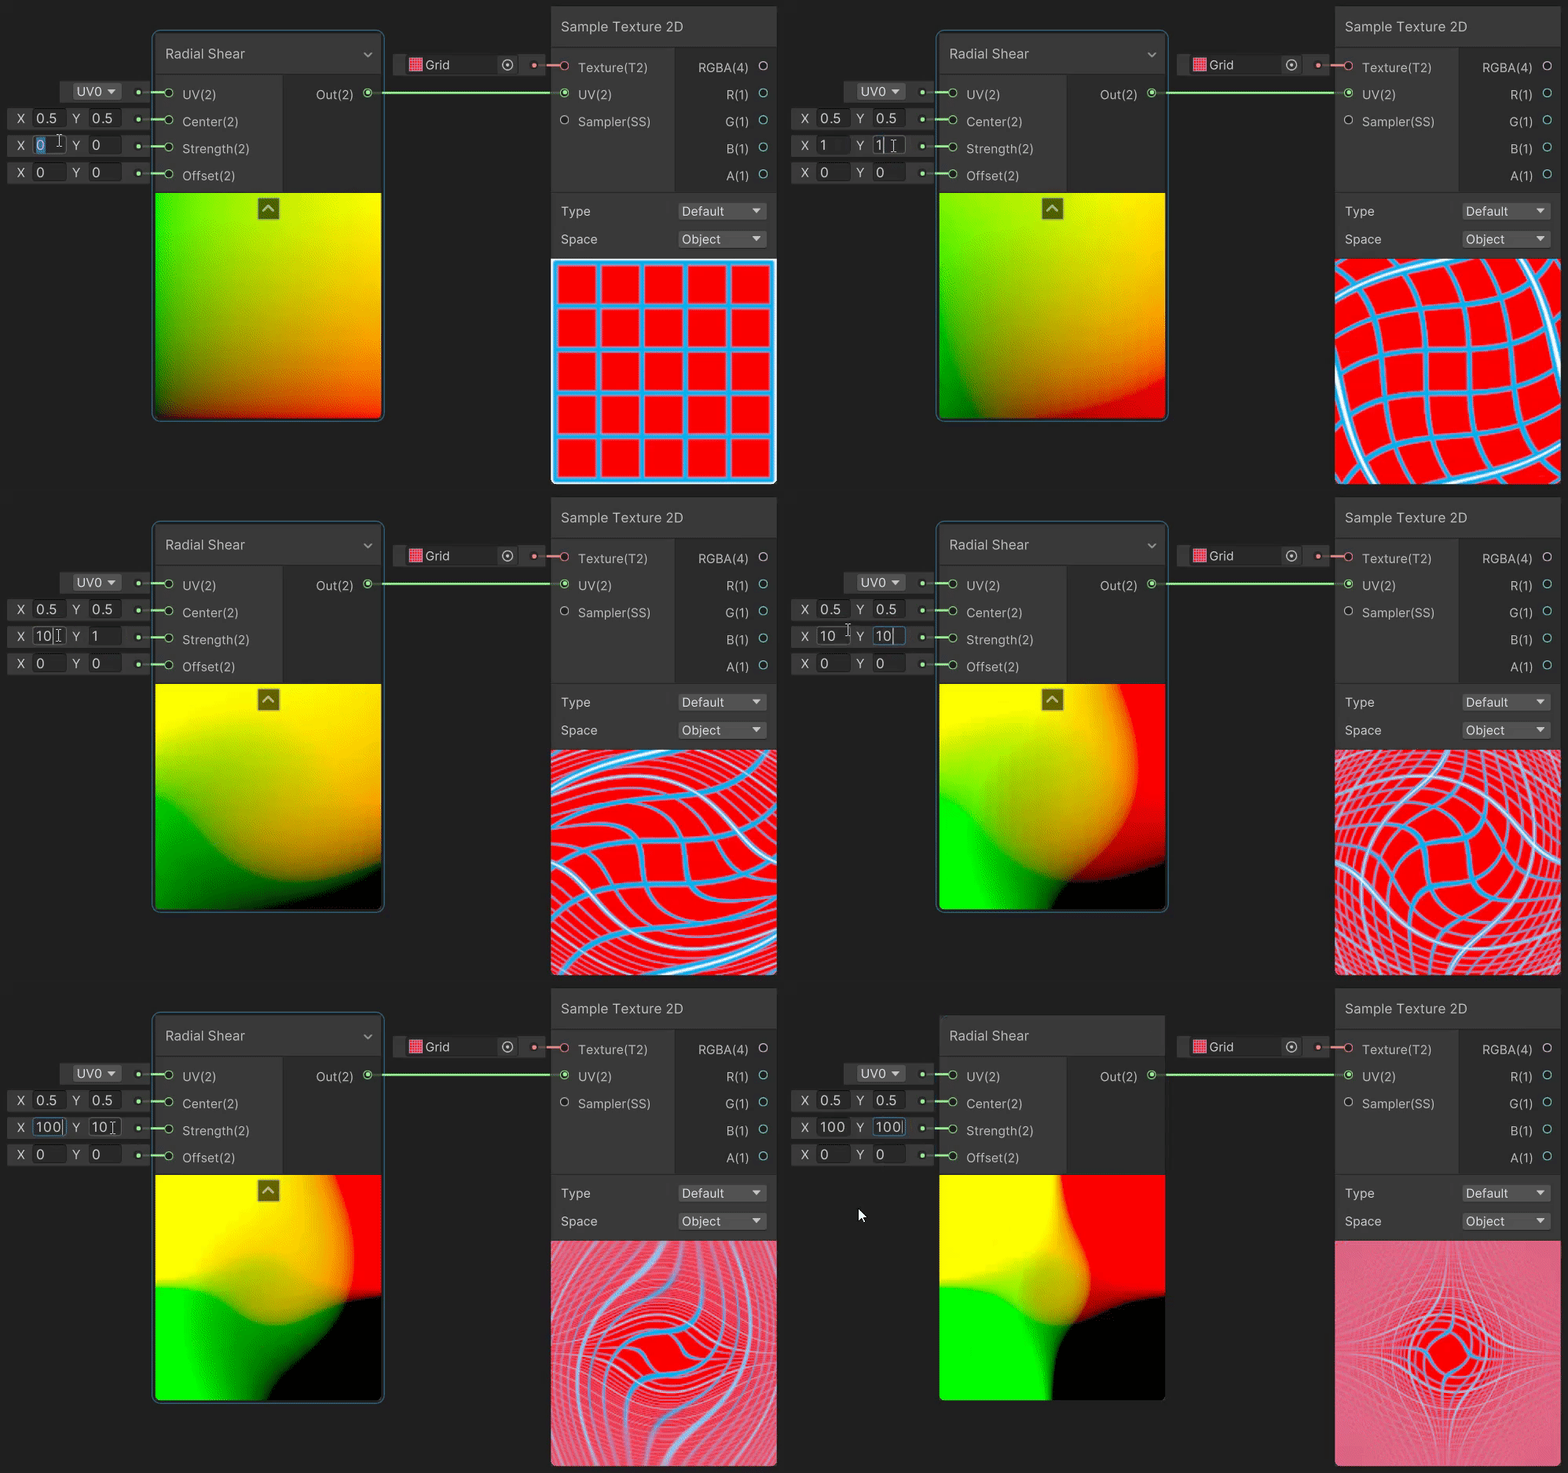
? Radial Shear 节点用于模拟波的径向剪切变形效果,实现见→Radial Shear Node。

? 4)Rotate(旋转 uv 变换)
? Rotate 节点用于实现纹理旋转效果,实现见→Rotate Node。

? 5)Spherize(球形变形 uv 变换)
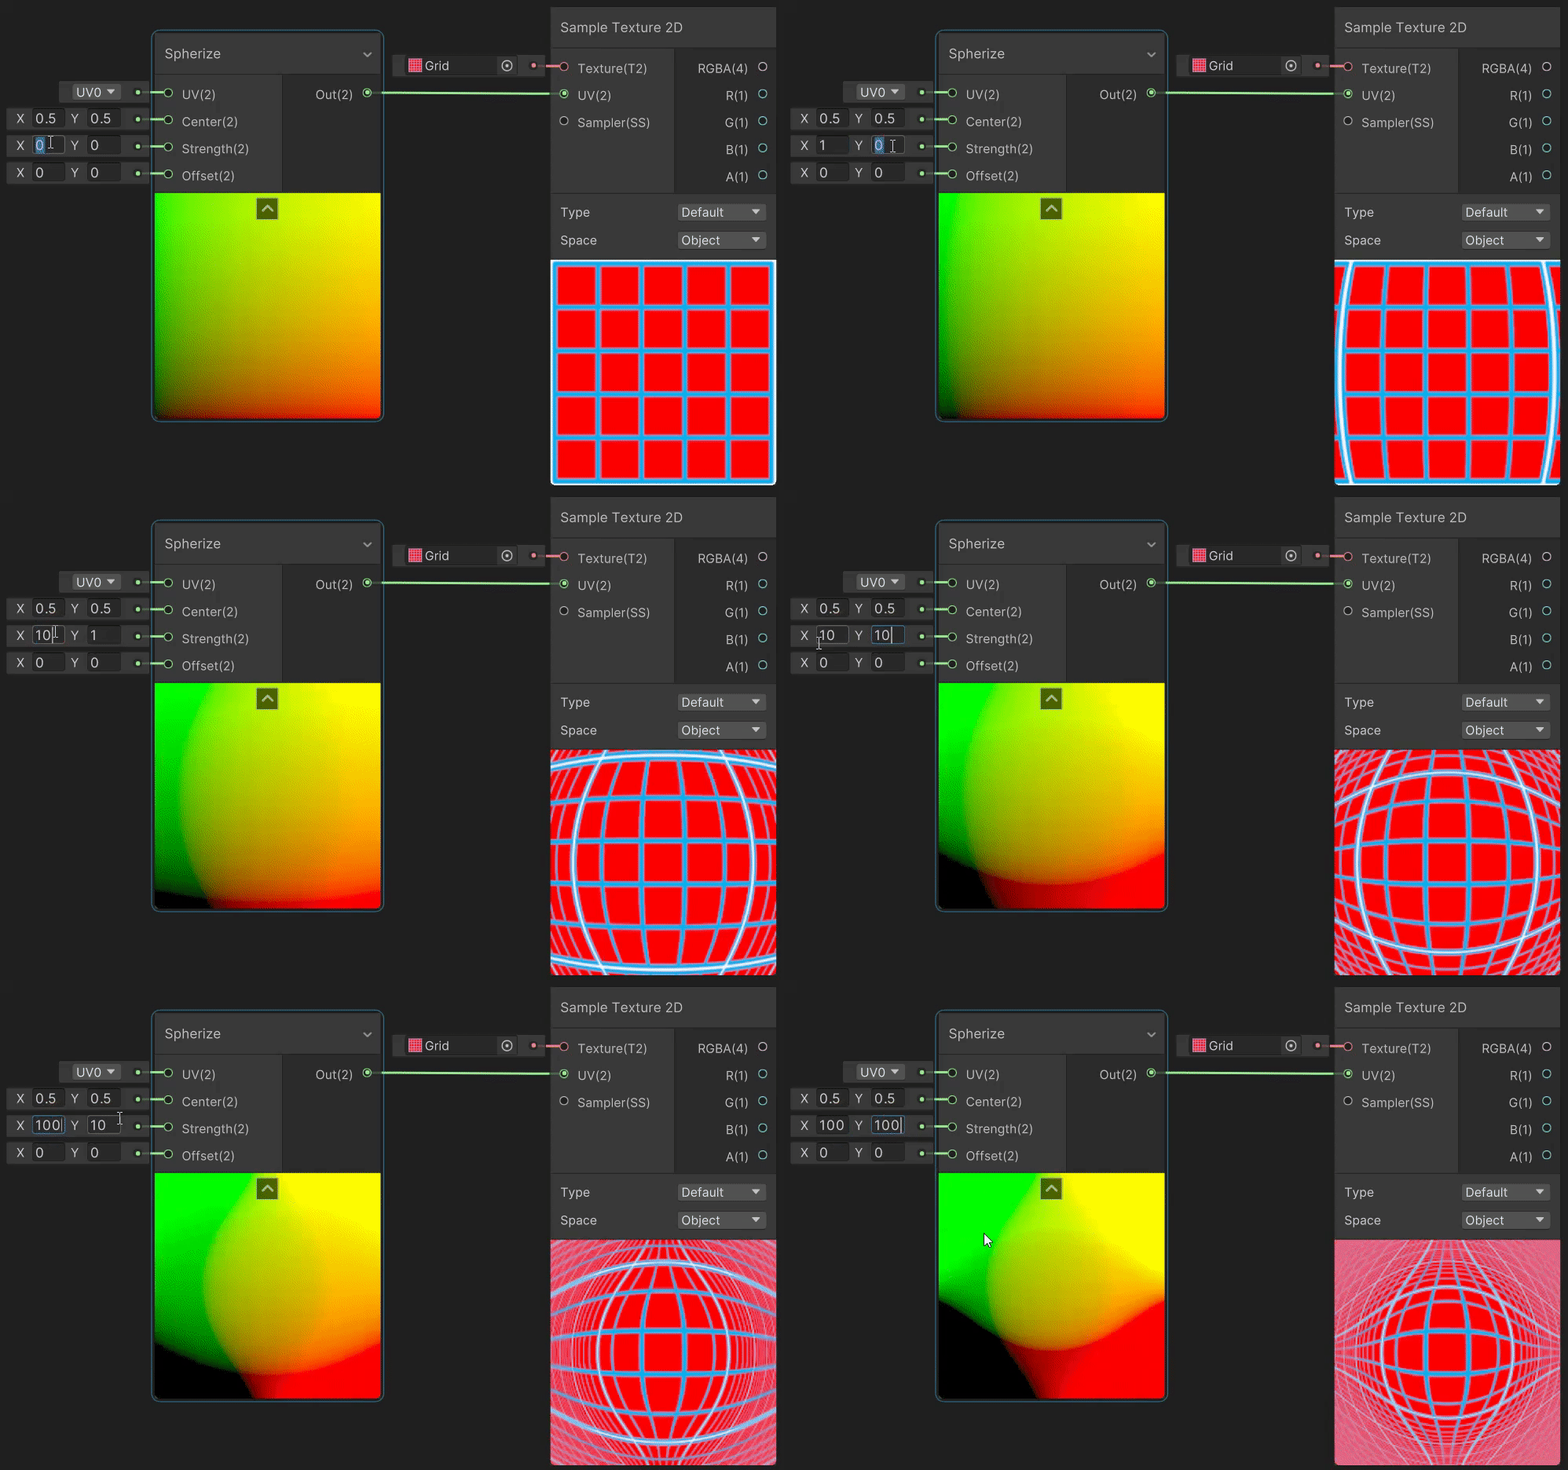
? Spherize 节点用于模拟鱼眼镜头的球形变形效果,实现见→Spherize。

? 6)Tiling And Offset(缩放和偏移 uv 变换)
? Tiling And Offset 节点用于缩放和偏移 uv 坐标。
void TilingAndOffset(float2 UV, float2 Tiling, float2 Offset, out float2 Out) { Out = UV * Tiling + Offset;}
? 7)Twirl(螺旋线 uv 变换)
? Twirl 节点用于对 uv 坐标进行螺旋线变换,实现见→Twirl Node。

8 Utility(实用工具)
? Utility 官方介绍详见→Utility Nodes。
8.1 Logic(逻辑判断)
// 与运算, Out=A&&Bvoid And(float A, float B, out float Out)// 或运算, Out=A||Bvoid Or(float In, out float Out)// 非运算, Out=!Invoid Not(float In, out float Out)// 全true, Out=all(In), 即: 如果In中每个分量都不为零则返回1, 否则返回0void All(float4 In, out float Out)// 存在一true, Out=any(In), 即: 如果In中存在一个分量不为零则返回1, 否则返回0void Any(float4 In, out float Out)// 全非判断, Out=!A&&!Bvoid Nand(float A, float B, out float Out)// 无穷数判断, Out = isinf(In)void IsInfinite(float In, out float Out)// 未知数判断, Out=(In<0.0||In>0.0||In==0.0)?0:1void IsNan(float In, out float Out)// 分支, Out=Predicate?True:Falsevoid Branch(float Predicate, float4 True, float4 False, out float4 Out)// 比较A和B的大小, 运算符可以选择: Equal、Not Equal、Less、Less Or Equal、Greater、Greater Or Equalvoid Comparison(float A, float B, out float Out)// 如果当前渲染正面则返回1,如果渲染背面则返回0void IsFrontFaceNode(out float Out)

8.2 Custom Function(自定义函数)
? 自定义函数节点允许用户通过脚本自定义节点的运算逻辑,官方介绍见→Custom Function Node。
? 4.4 4)节提过,Shader Graph 13.1.9(2022.1+)版本才开始出现 Main Light Direction 节点,如果用户想在低版本的 Shader Graph 中获取灯光方向,可以通过 Custom Function 实现。下面将通过 Custom Function 实现 Main Light Direction 节点的功能。Shader Graph简介 中基于自定义的 Main Light 实现了漫反射光照效果。
? 创建 Custom Function 节点,选中后,在 Node Settings 中配置如下,SHADERGRAPH_PREVIEW 用来判断是否是预览窗口。

#if SHADERGRAPH_PREVIEW Direction = half3(0.5, 0.5, 0); Color = half4(1, 0, 0, 1);#else Light light = GetMainLight(); Direction = light.direction; Color = light.color;#endif
? 声明:本文转自【Unity3D】Shader Graph节点。